Italian Pear Cake Soaked in Rum | Italian Pear Yogurt Cake | Torta di Pere | Kitchenstagram
Italian Pear Cake or Torta di Pere, is a timeless dessert that captures the cozy charm of Italian home baking. This soft, fragrant cake highlights the natural sweetness of ripe pears, creating a tender crumb that pairs beautifully with warm drinks and relaxed moments. It’s the kind of bake that feels comforting without being heavy, making it just right for a crisp day or whenever you want something gently sweet.
What makes this cake special is its rustic simplicity. The pears melt into the batter as it bakes, adding moisture and subtle fruitiness, while a touch of citrus or vanilla brings brightness to every bite. Olive oil keeps the texture light yet moist, allowing the cake to stay fresh for days- an added bonus if you love make-ahead treats. Some versions call for soaking the pears in a splash of rum extra depth, giving the cake a hint of warmth that feels perfect for leisurely afternoons.
This Italian classic is incredibly versatile. Slice it thick and serve it with your morning coffee, set it out for guests as an afternoon treat, or finish a cozy dinner with a warm piece topped with whipped cream, Mascarpone or even gelato. It’s understated but elegant, a cake that never tries too hard yet always impress.
Whether you’re baking with an abundance of seasonal pears or simply craving something homemade and comforting, this Italian Pear cake deserves a spot on your go-to recipe list. It’s easy, inviting and wonderfully timeless, an everyday cake that feels a little bit special every time you make it.
Why you’ll love this recipe?
The texture is incredibly soft and delicate, thanks to the use of butter, giving the cake rich mouthfeel and a tender crumb.
Light notes of vanilla enhances the flavour profile.
It carries the rustic charm of Italian baking- simple, elegant and effortlessly delicious.
Perfect for many occasions, enjoy it with coffee in the morning, serve it at tea time or present it as a light dessert after dinner.
This classic “ torta di pere” comes together quickly, making it ideal for both beginner bakers and anyone needing a fast,reliable recipe.
It’s a wonderful way to use up extra pears you have on hand, no matter the variety.
The generous amount of dices pears ensures juicy bites throughout the cake, giving every slice a naturally fruity sweetness.
Ingredients needed for Italian Pear Cake:
Fresh Pears: Choose firm pears that still have a slight bite- this helps them hold their shape while baking and prevents them from turning mushy. Varieties like Bartlett, Bosc or Conference offer great flavour and maintain a lovely texture in the finished cake. Their natural perfume and gentle sweetness shine once baked, turning soft and almost buttery without falling apart.
All-Purpose Flour: All-purpose flour forms the backbone of the cake, giving the structure and helping it bake evenly. For best results, weight your flour instead of measuring by volume. If you need a gluten-free option, a 1:1 blend will work well.
Baking powder: This is your rising agent, ensuring the cake bakes up soft and light. It provides the necessary lift for a tender crumb.
Baking Soda: Baking soda helps to rise, become light and fluffy and brown properly.
Salt: Even a dessert needs a touch of salt to balance the sweetness and enhance the overall flavour.
Sugar: Regular white sugar sweetens the batter while also helping create a lightly crisp, golden top as the cake bakes. Castor sugar works too and blends seamlessly into the mixture.
Eggs: Eggs help bind the ingredients and contribute to the cake’s light, airy texture. Beating them with the sugar adds volume, helping the batter become fluffy and delicate.
Yogurt: Yogurt adds creaminess and gentle tang, helping the cake stay soft and pleasantly moist. It brings balance to sweetness of the pears while keeping the texture light.
Butter: Gives the cake a luxurious richness and smooth crumb. Its warm, buttery notes pair beautifully with pears and yogurt, adding depth and helping the cake bake up tender and flavourful.
Vanilla: A teaspoon of vanilla enhances the aromas and deepens the cake’s overall warmth, pairing wonderfully with the pears.
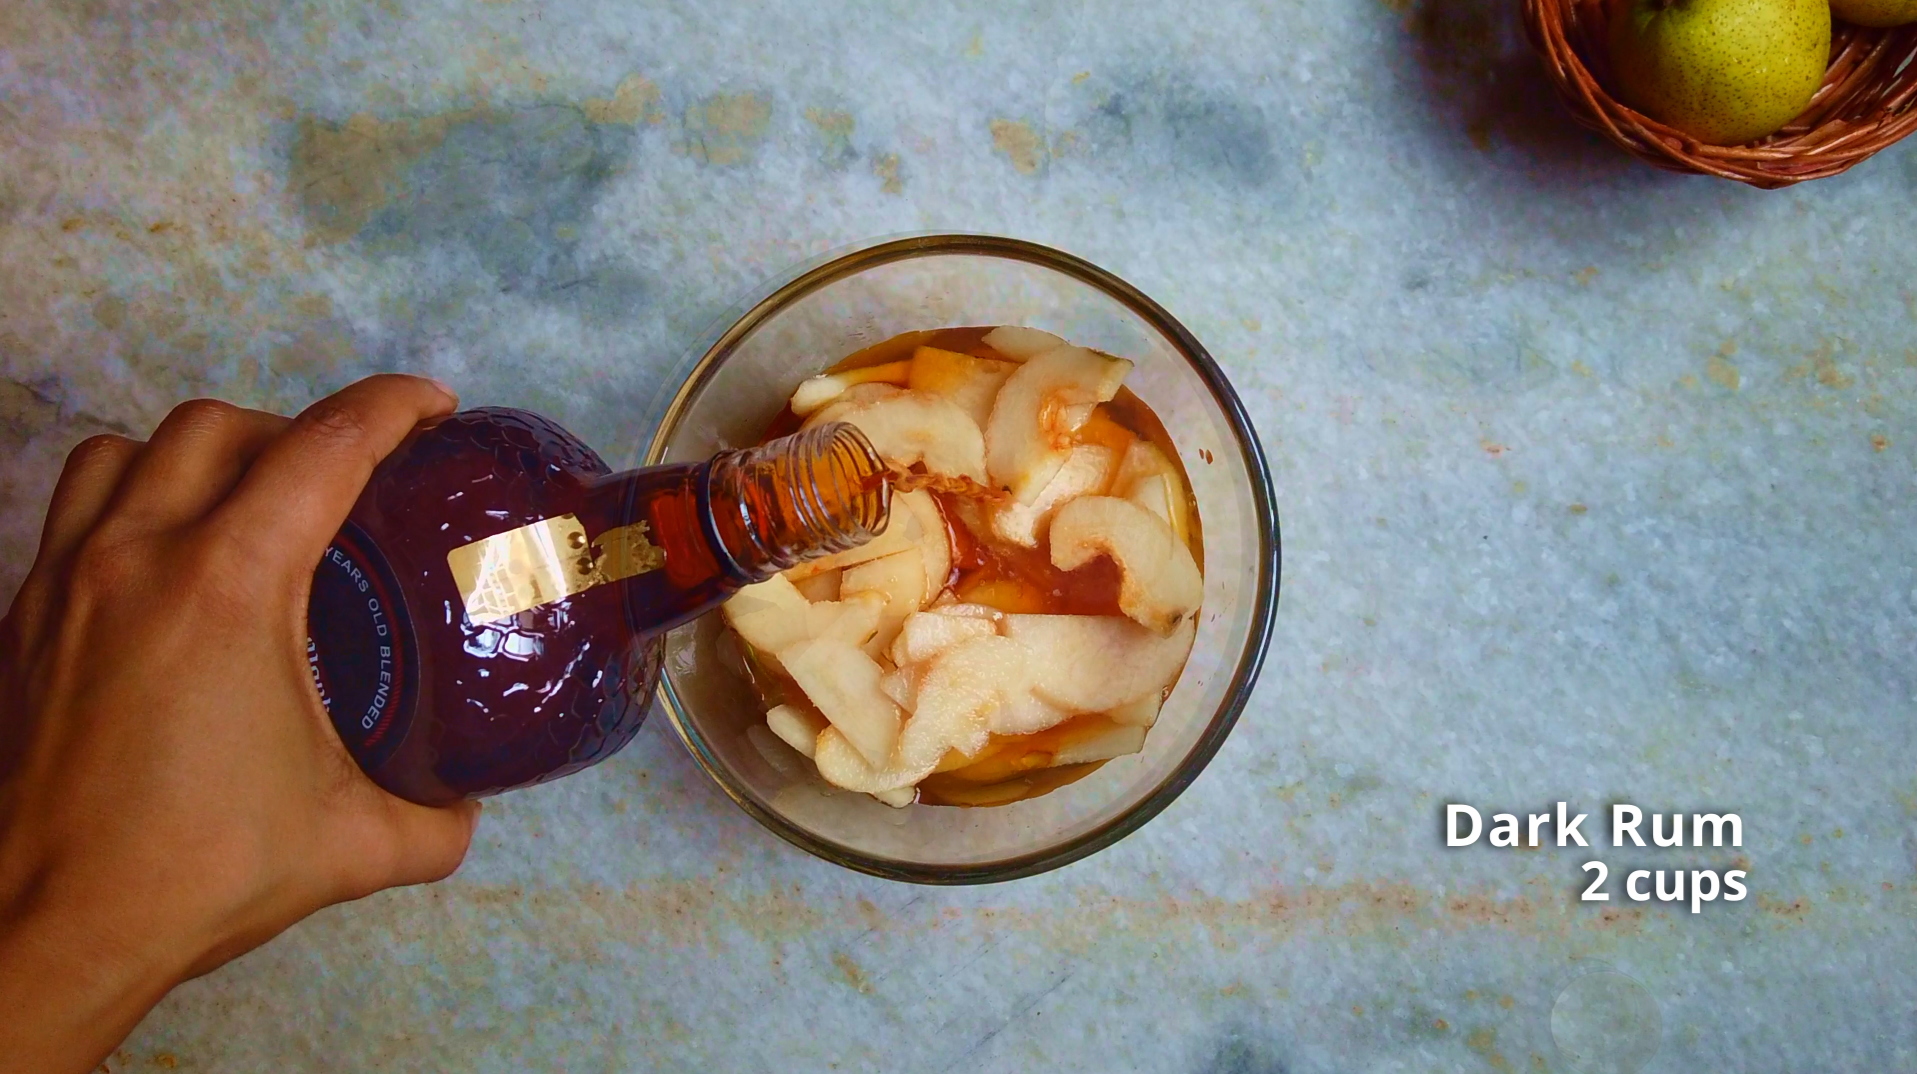
Rum: A splash of rum introduces warm, aromatic notes that complement the pears and add a subtle depth. It enriches the cake with a lightly spirited fragrance.
Raisins: Raisins soaked in rum provide little bursts of sweetness and a soft, luxurious texture. They pair well with fruity base and add a extra layer of flavour throughout the cake.
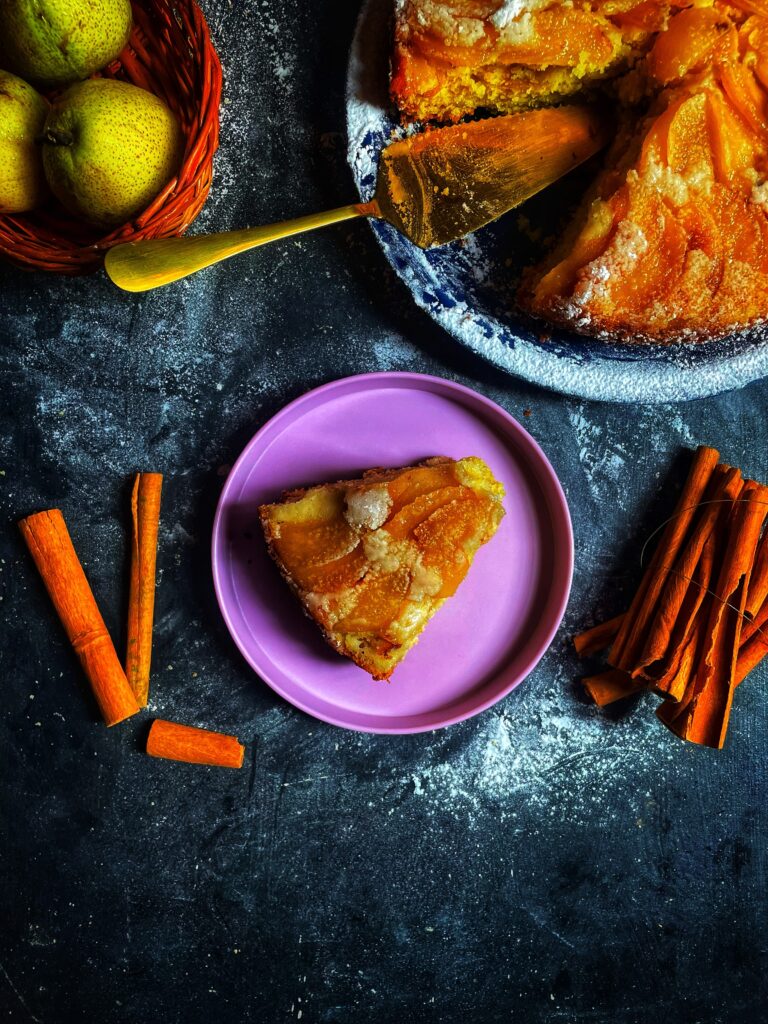
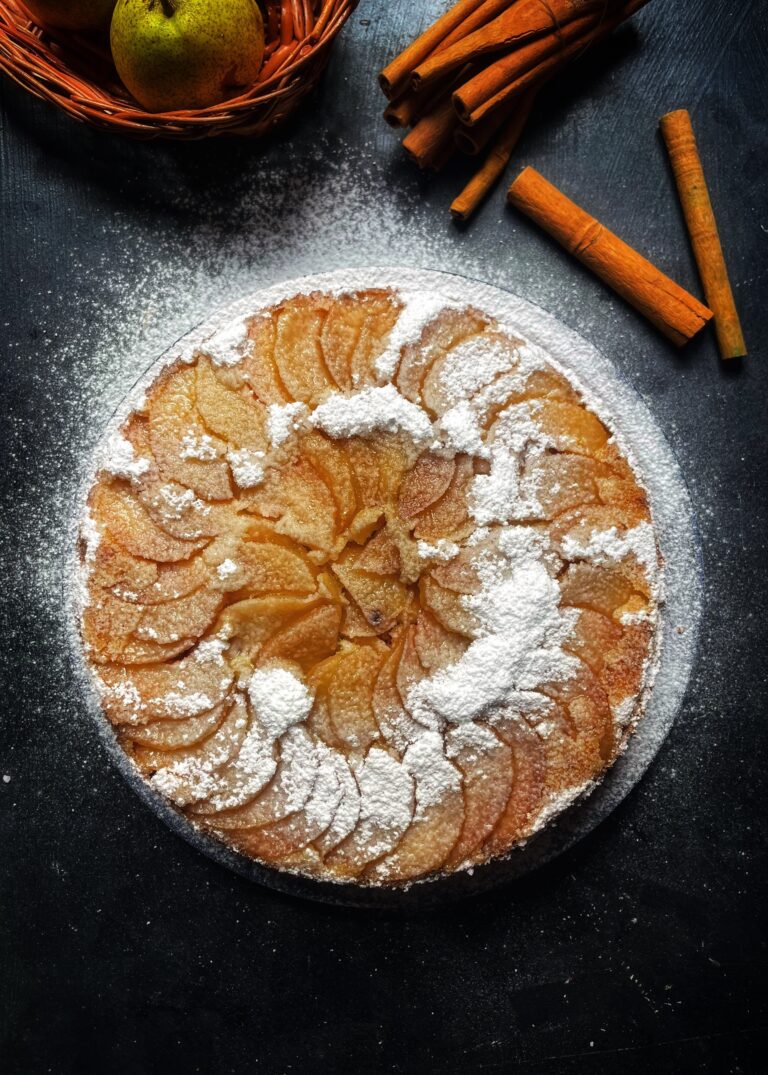
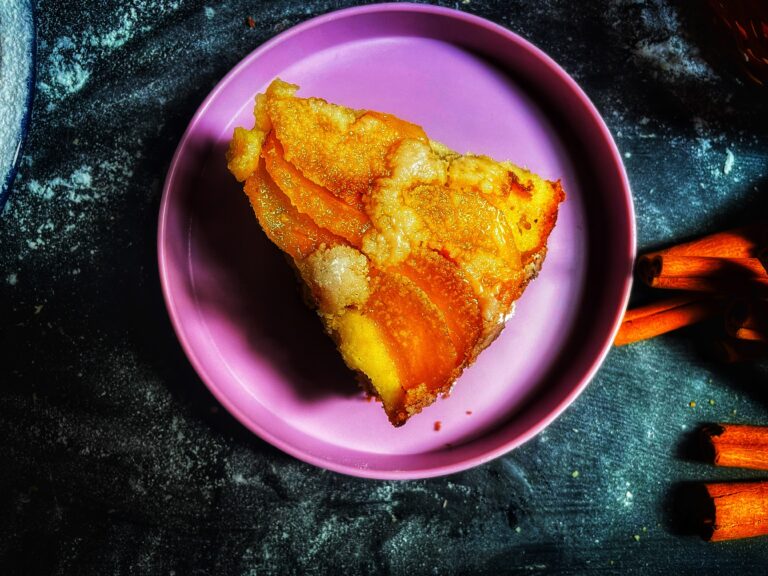
Powdered Sugar: A simple dusting on top just before serving gives the cake a polished, elegant finish.
Serving suggestions:
Italian Pear cake pairs beautifully with warm, comforting drinks or cool, refreshing sips. A fragrant herbal tea, a strong cup of coffee or even a cozy spiced beverage can highlight the cake’s fruity sweetness. For gatherings, a festive warm drink or lightly brewed tea works wonderfully to balance the soft tender crumb.
When it comes to toppings, keep it simple or dress it up depending on the occasion. A light sprinkle of sugar adds elegance, while creamy additions like yogurt, whipped cream, or ice cream create a richer bite. You can also drizzle a sweet sauce over the top for deeper flavour or finish the cake with a soft frosting for a bakery style touch.
Storage Tips:
This pear cake tastes wonderful the day it’s baked, but it also stores well. Keep it covered at room temperature for a short time if your kitchen isn’t too warm. For longer storage place it in an airtight container and refrigerate. Chilled, it stays moist and delicious for several days. Bring slices to room temperature before serving for the best texture.
Ingredients:
For Rum Soaking:
3 nos. Pear
2 cups Dark Rum
1 no. Cinnamon stick
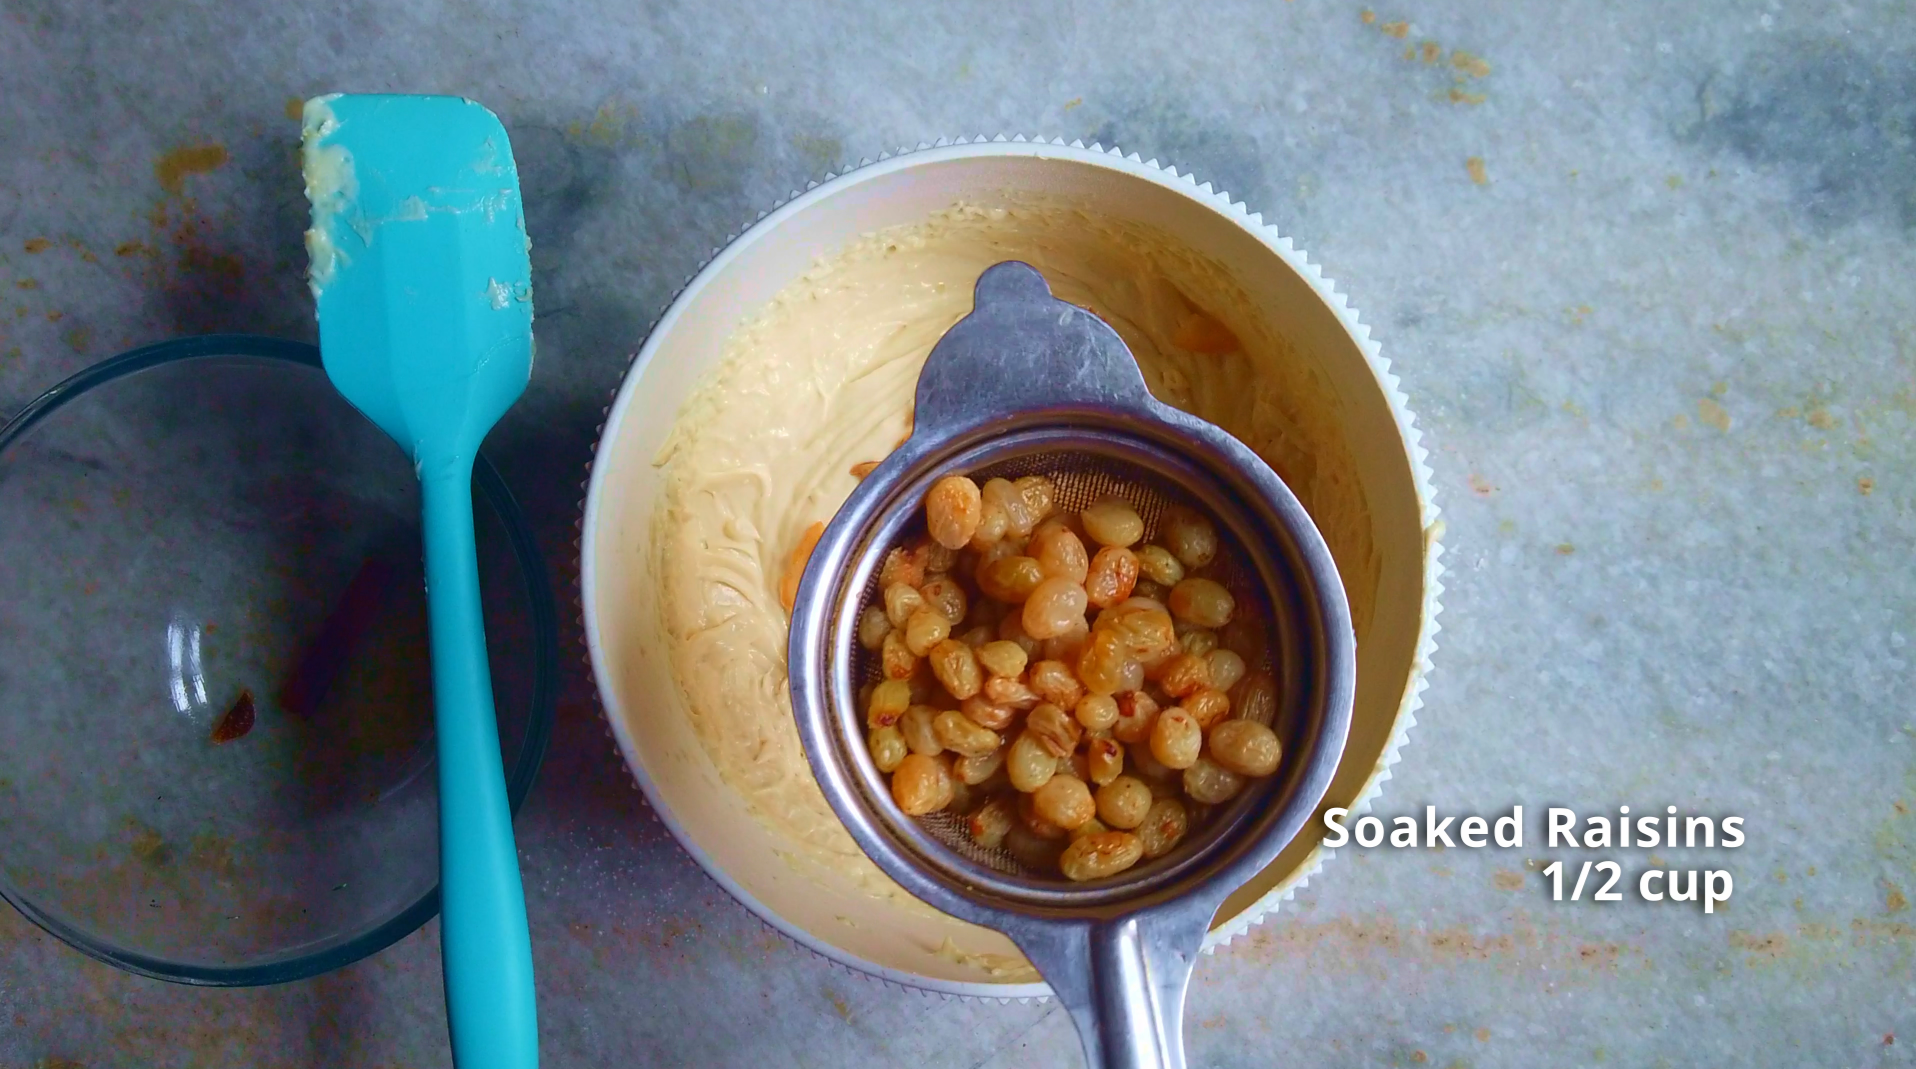
1/2 cup Raisins
For Cake Batter:
2 cups All-Purpose Flour
2 tsp Baking Powder
1 tsp Baking Soda
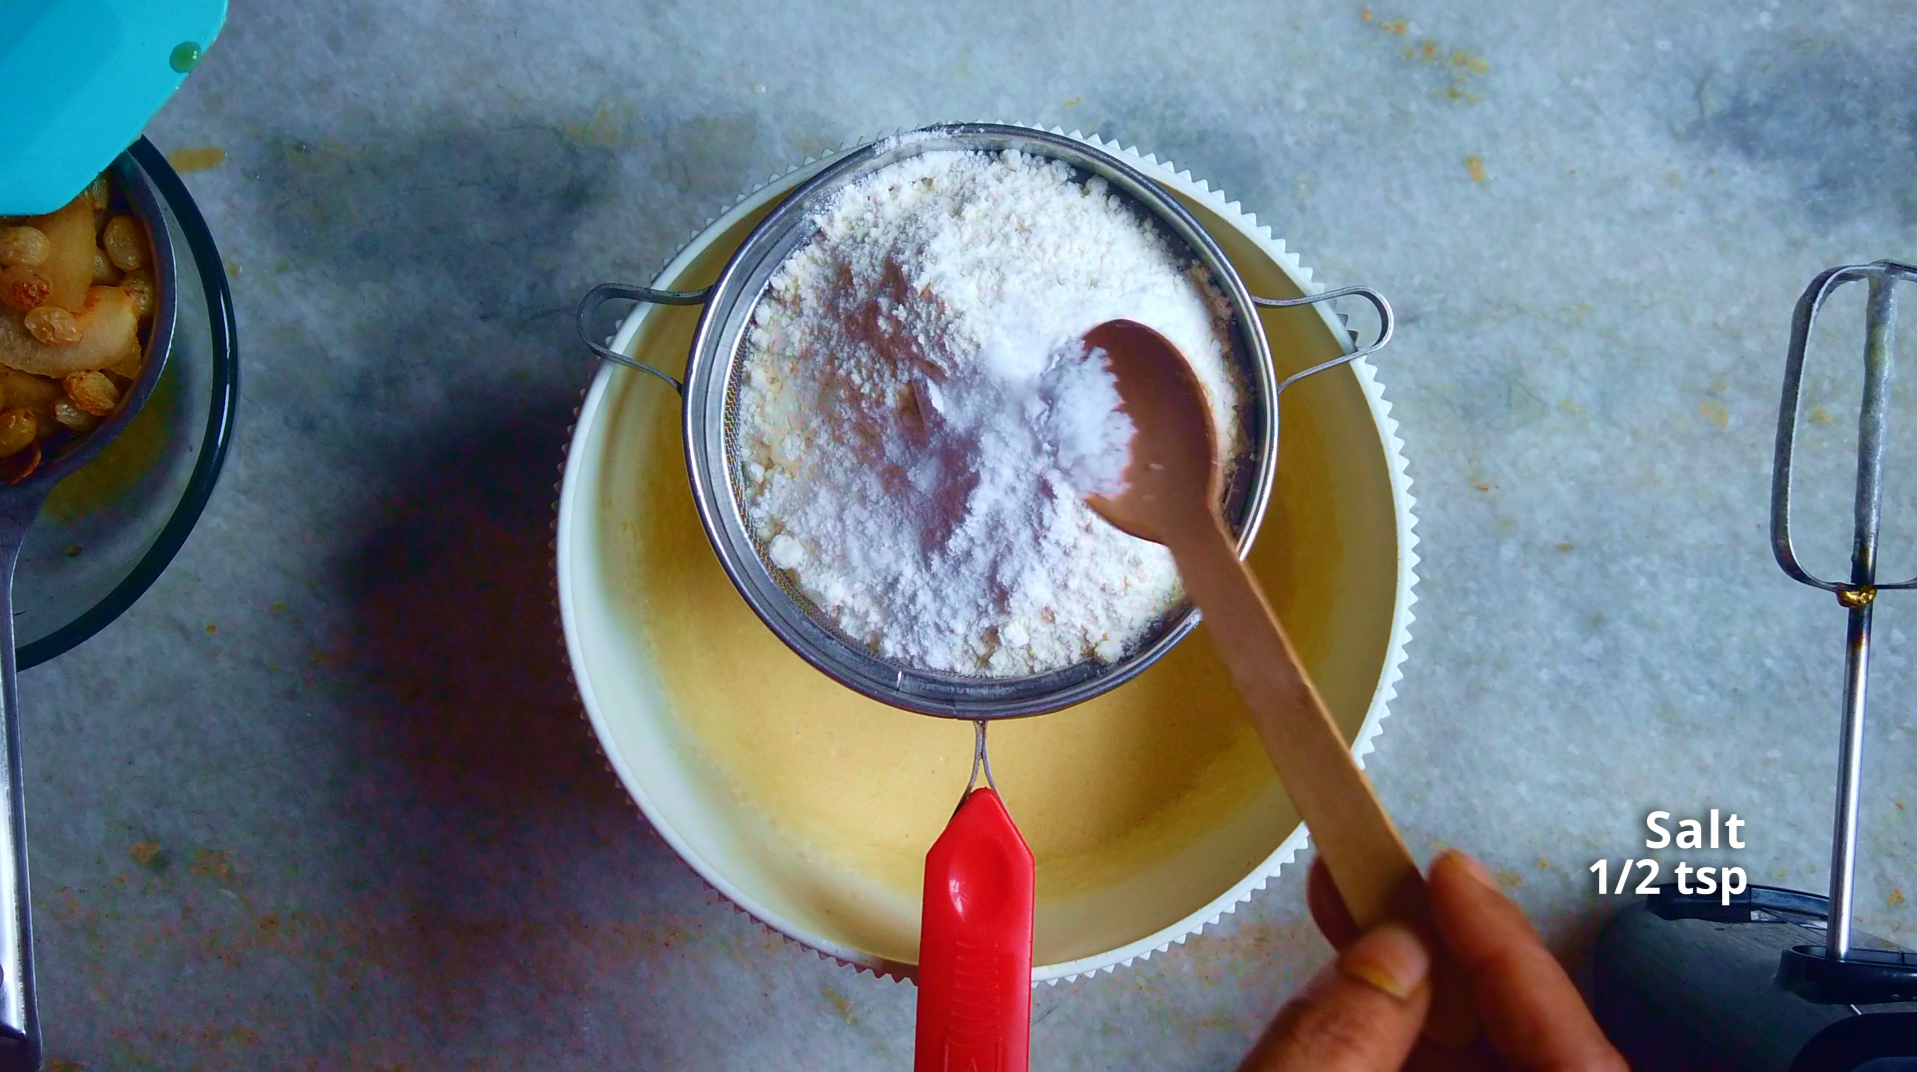
1/2 tsp Salt
8 tbsp Butter, room temperature
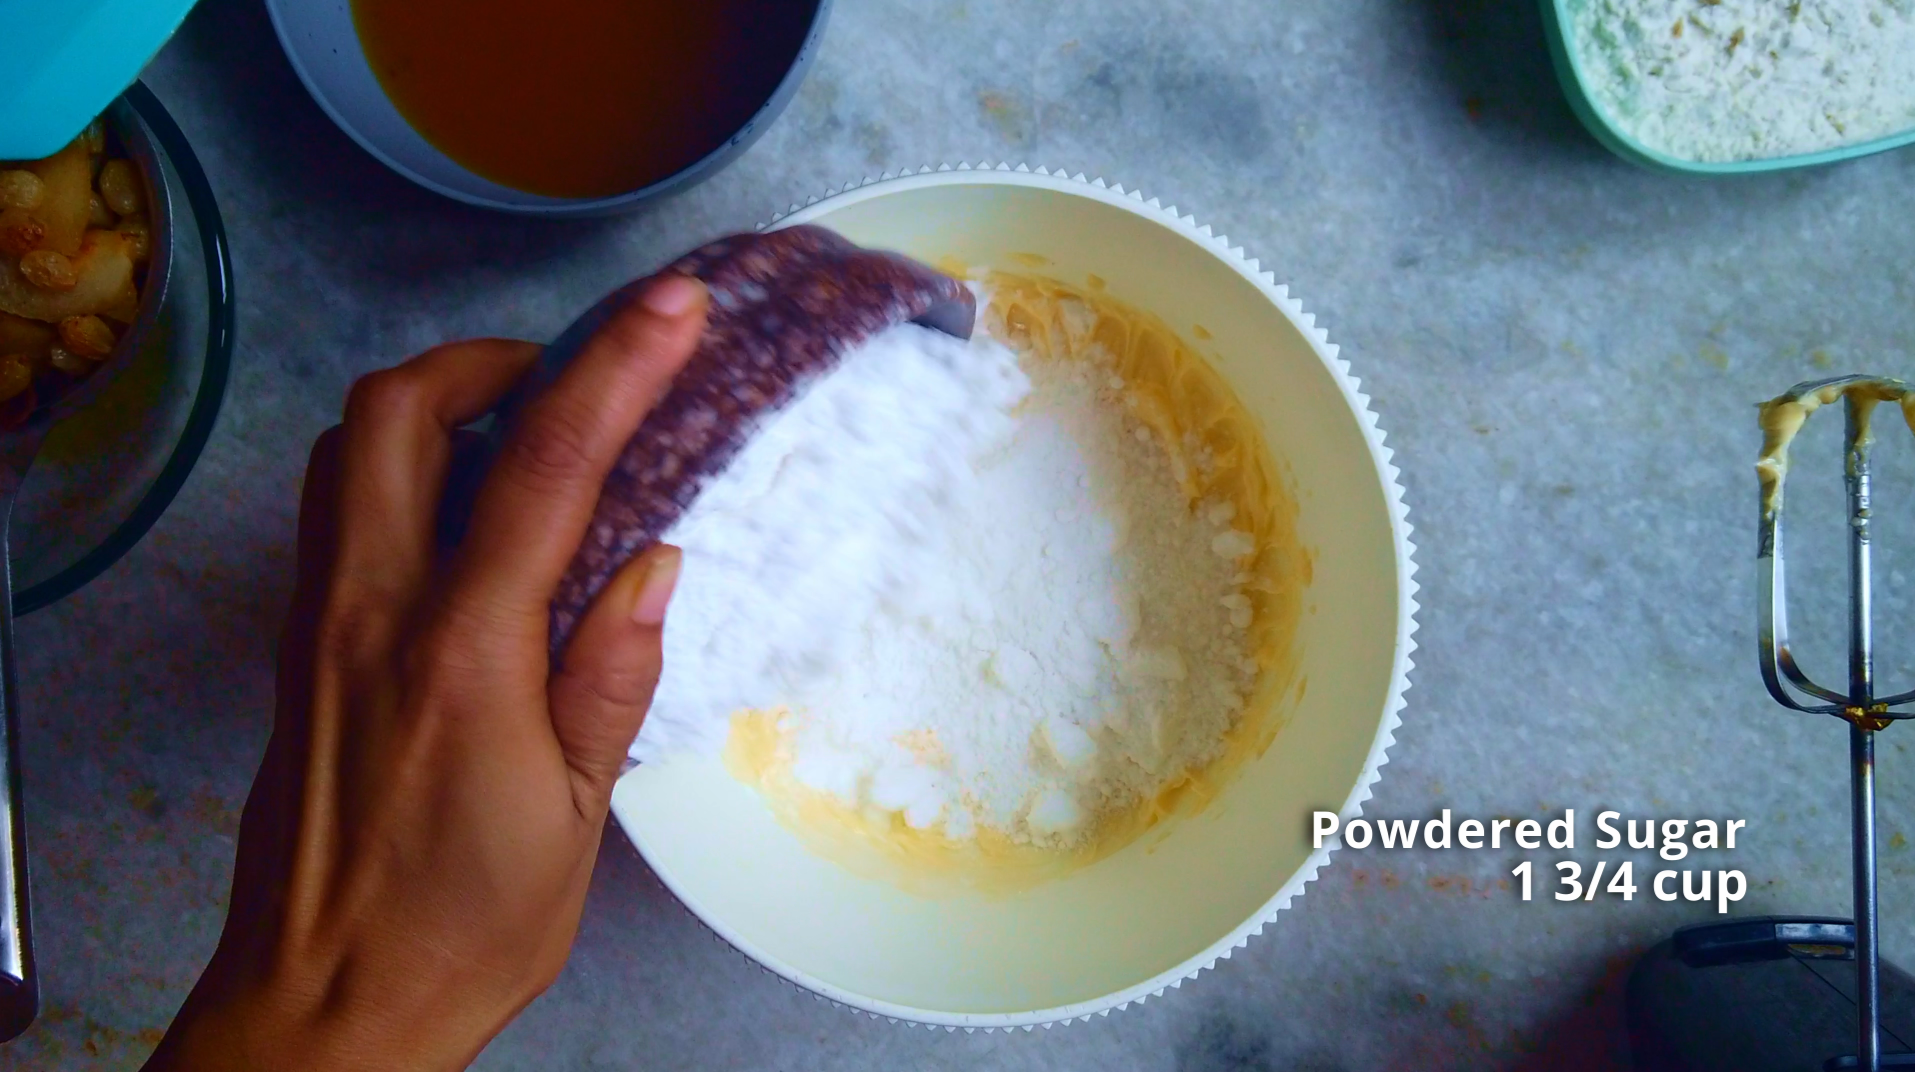
1 3/4 cup Powdered Sugar
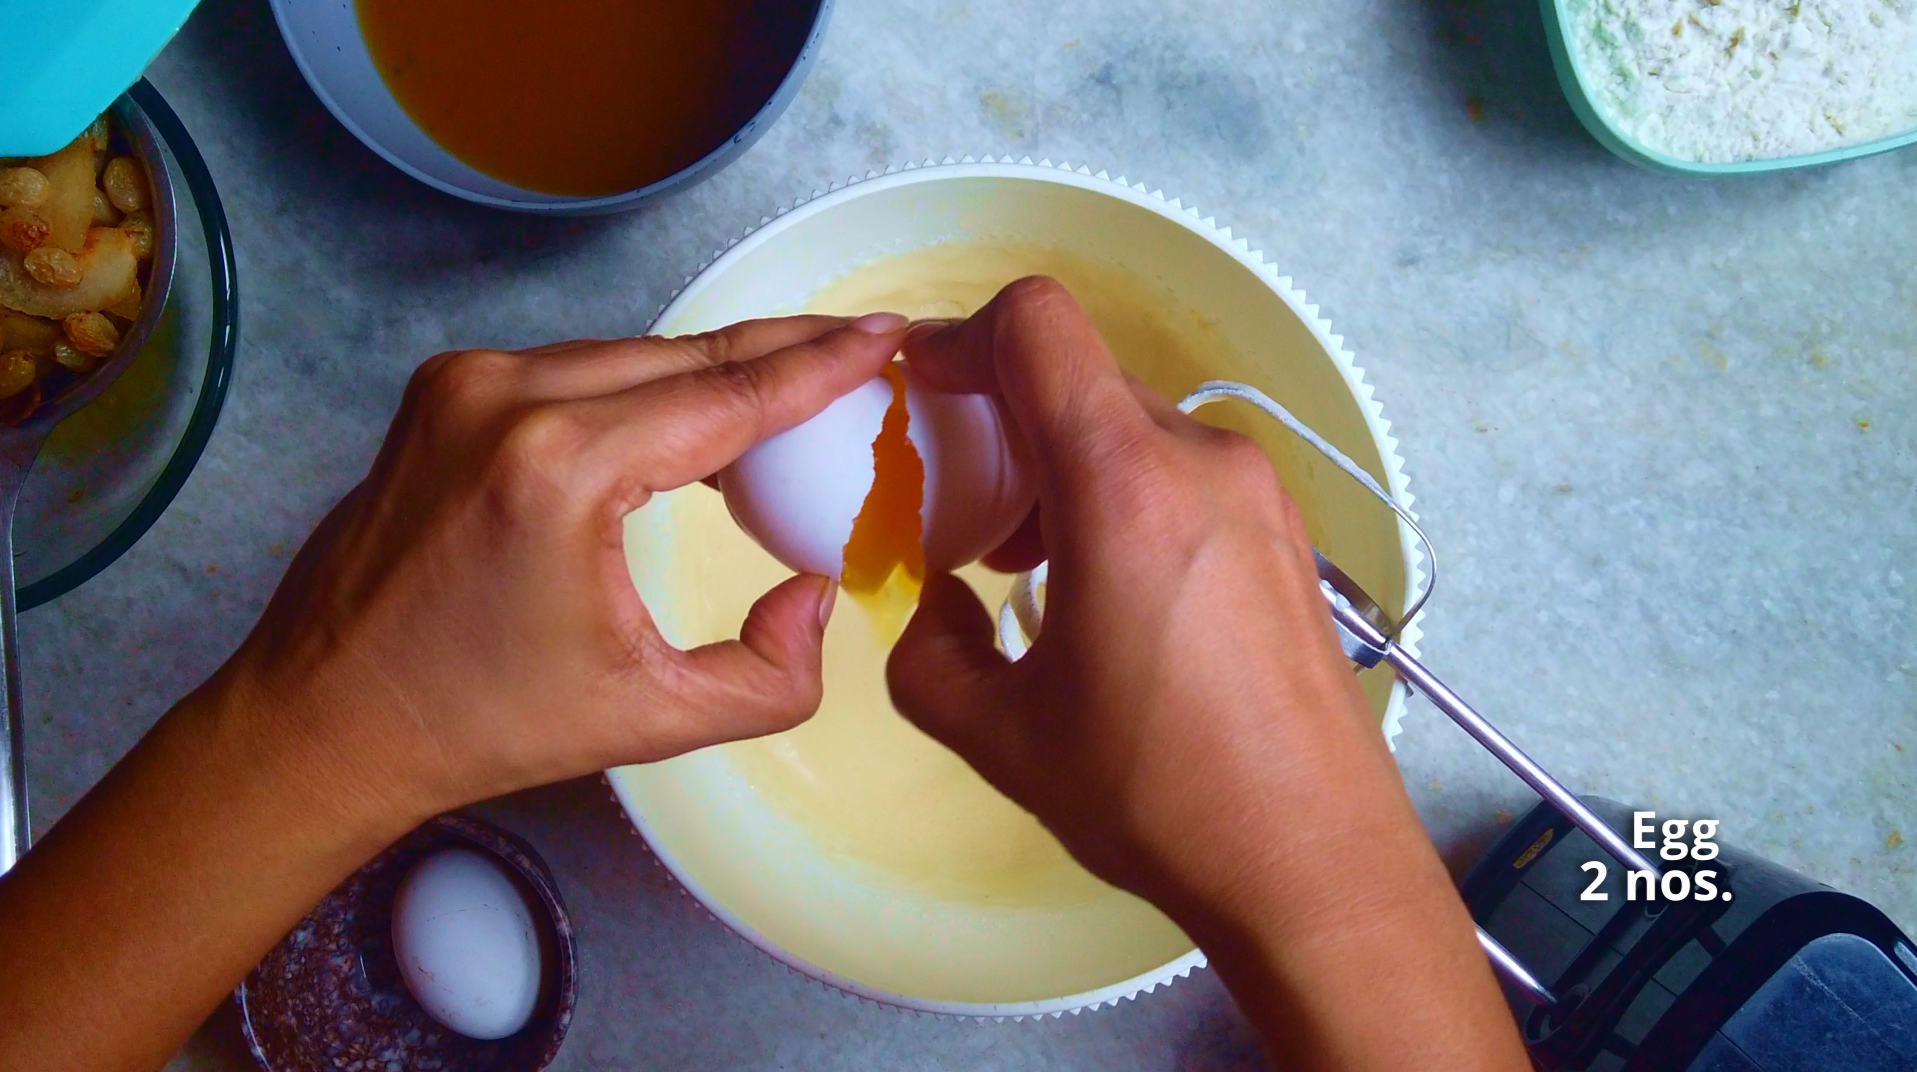
2 nos. Egg
3/4 cup Plain Yogurt
1 tsp Vanilla Extract
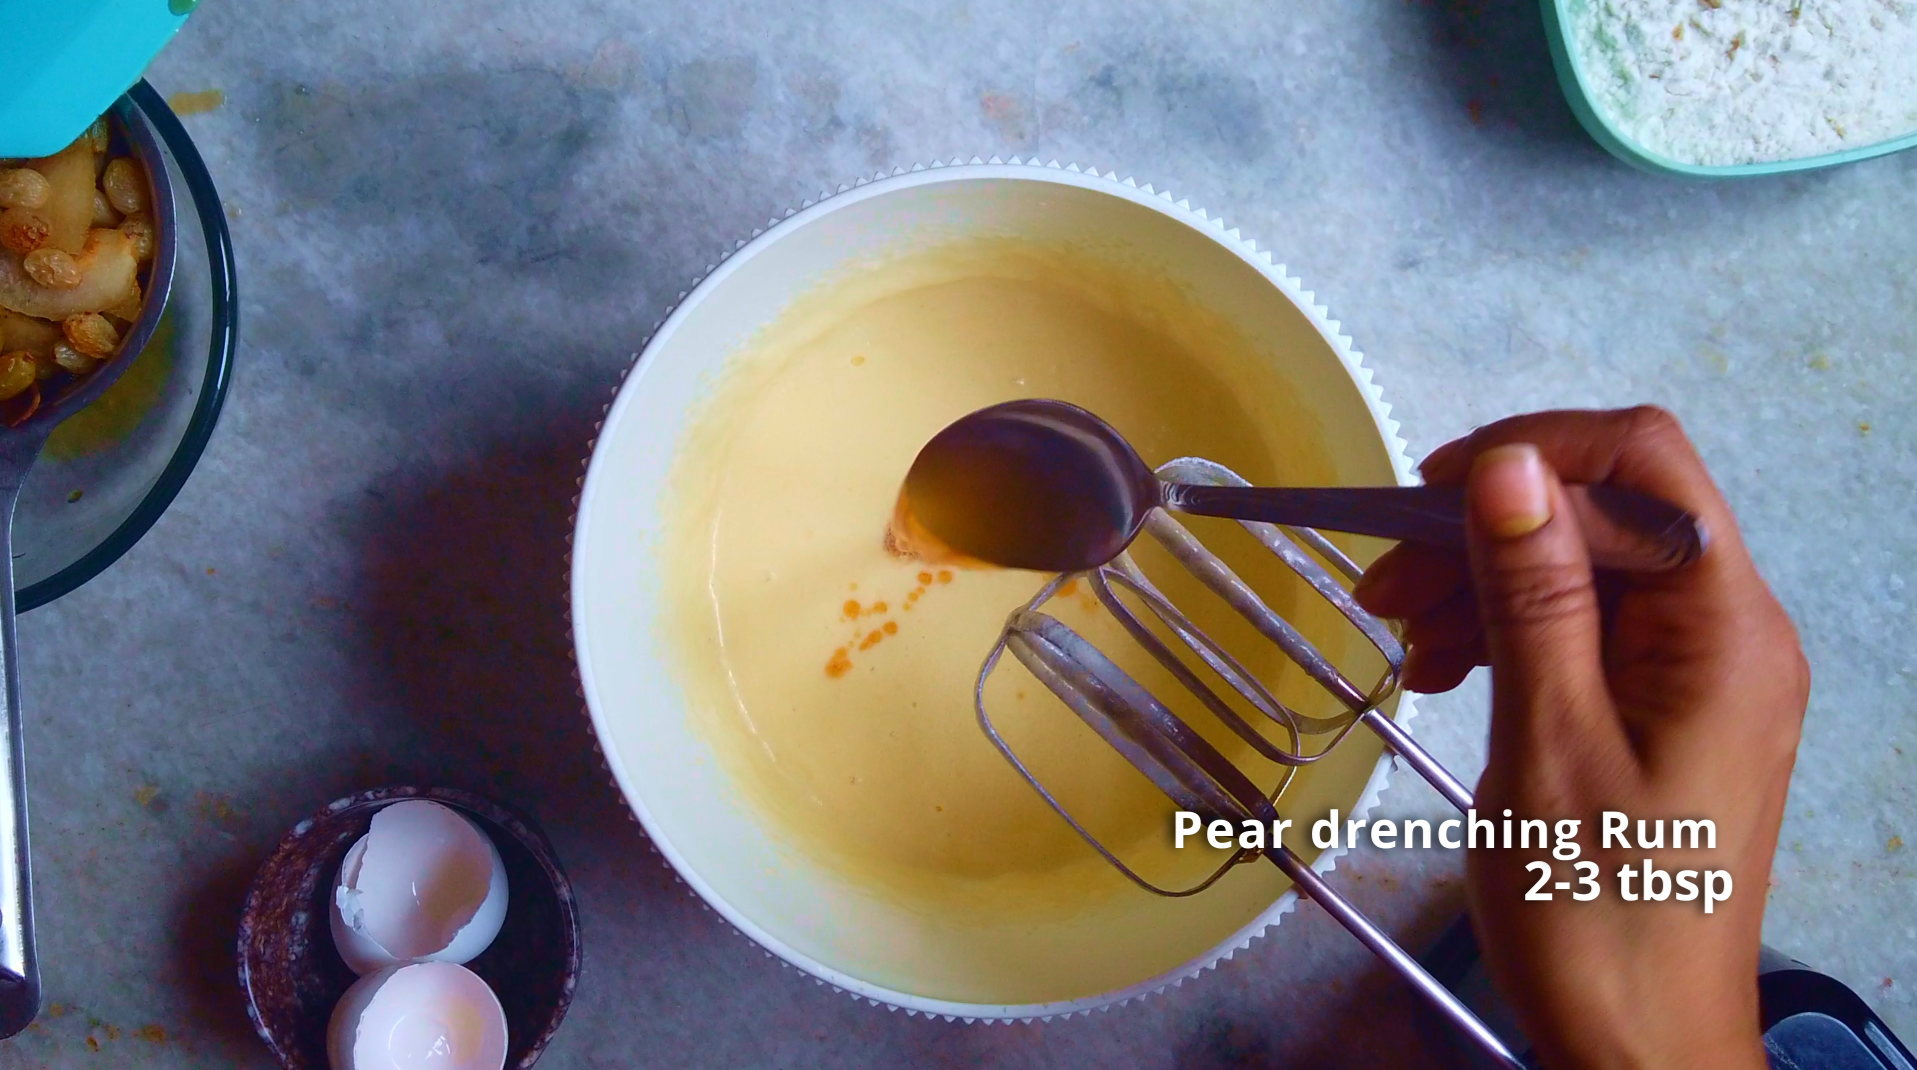
2-3 tbsp Pear drenching Rum
Preparation:
- Step 1: Peel and remove the core of the pears. Then slice the pears thinly. In a bowl combine rum, pear slices, cinnamon stick and raisins. Cover and soak for 2-3 hours.
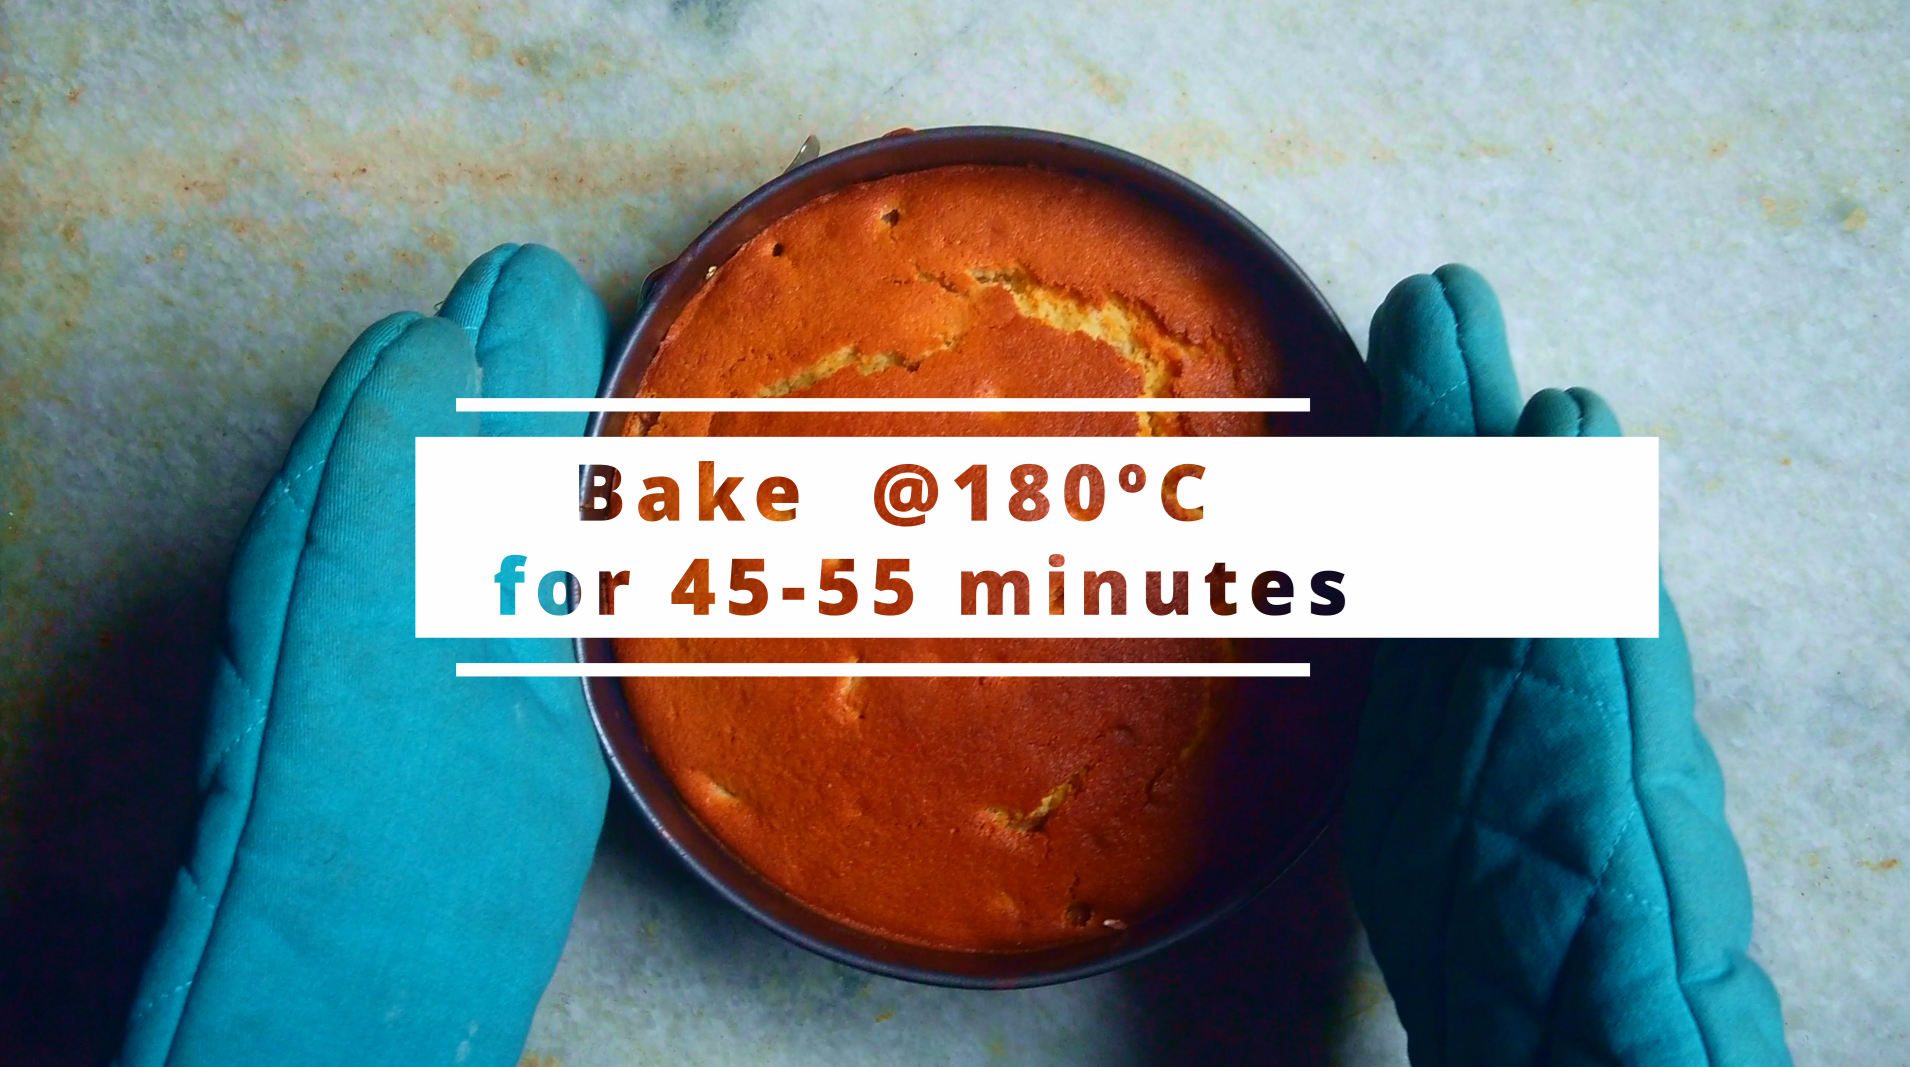
- Step 2: Preheat the oven @180ºC (350°F). Cover bottom of a springform pan with parchment paper. Keep aside.
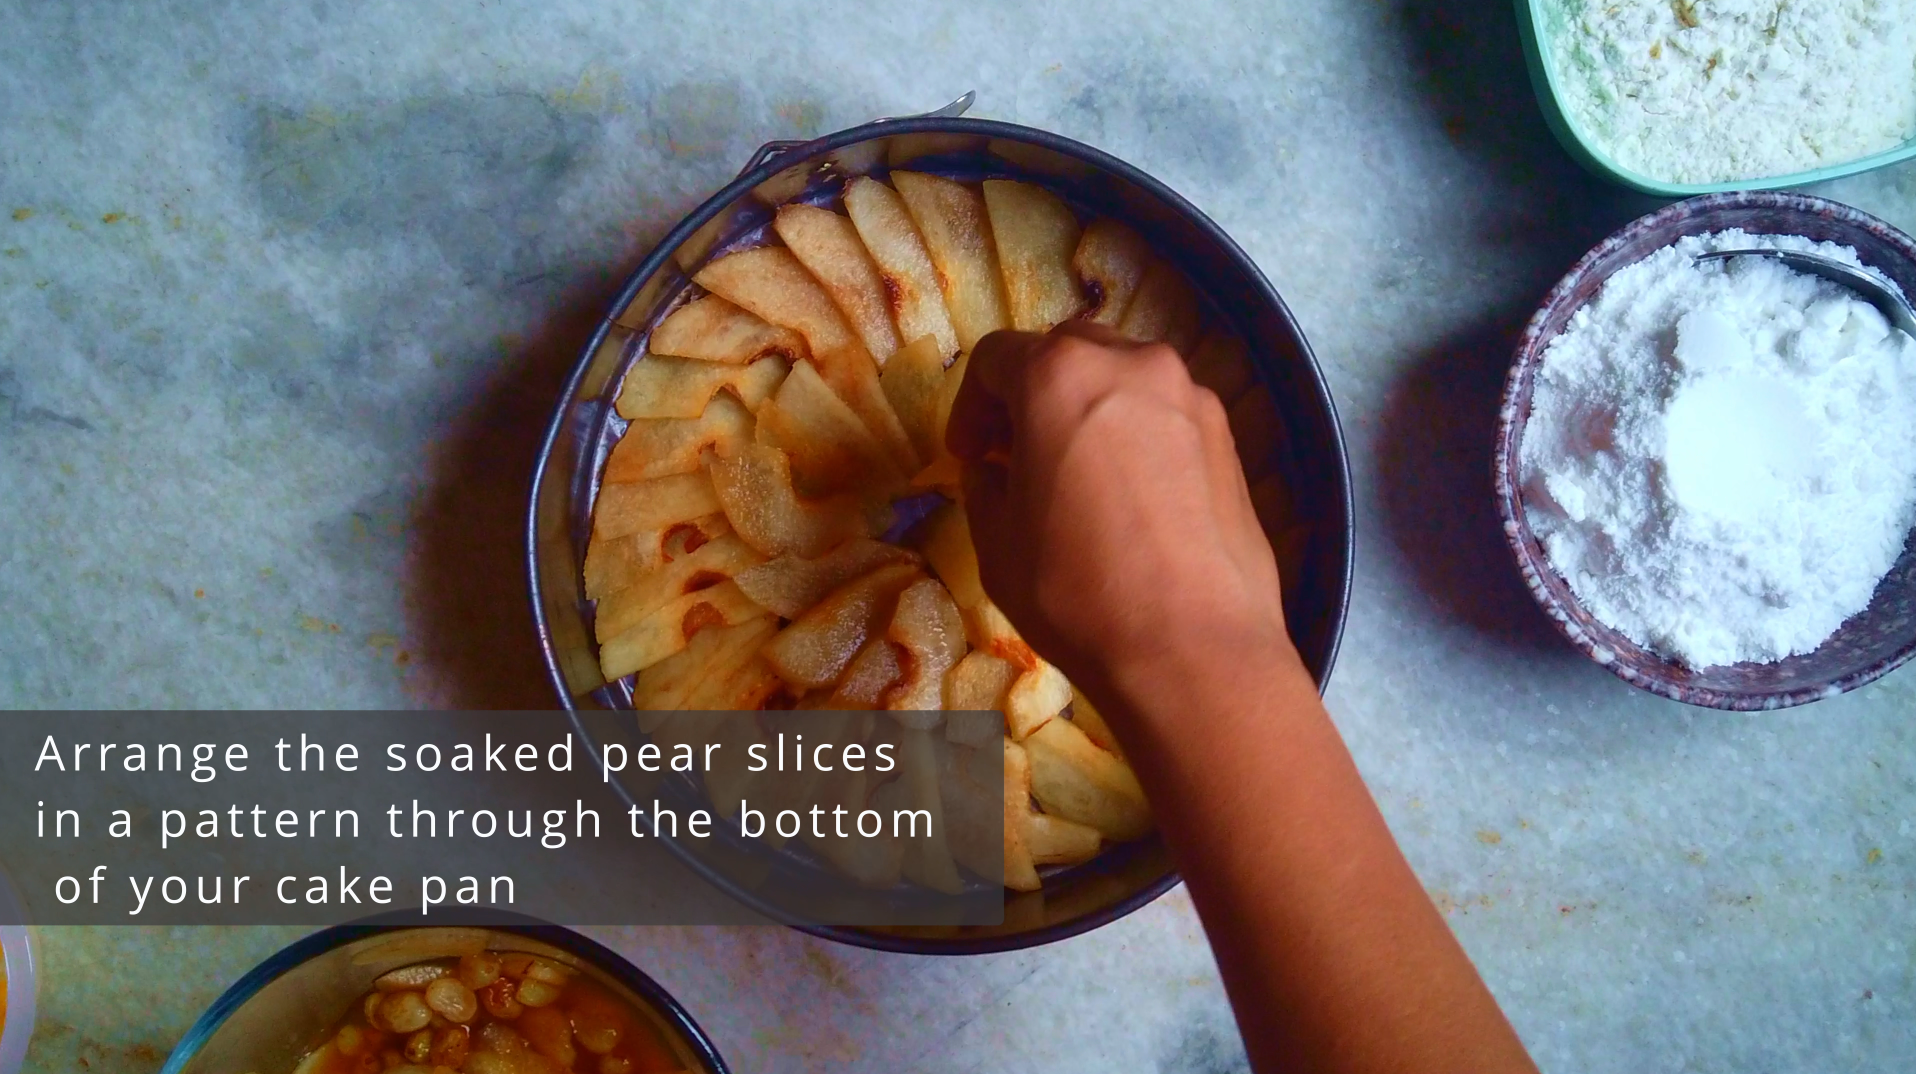
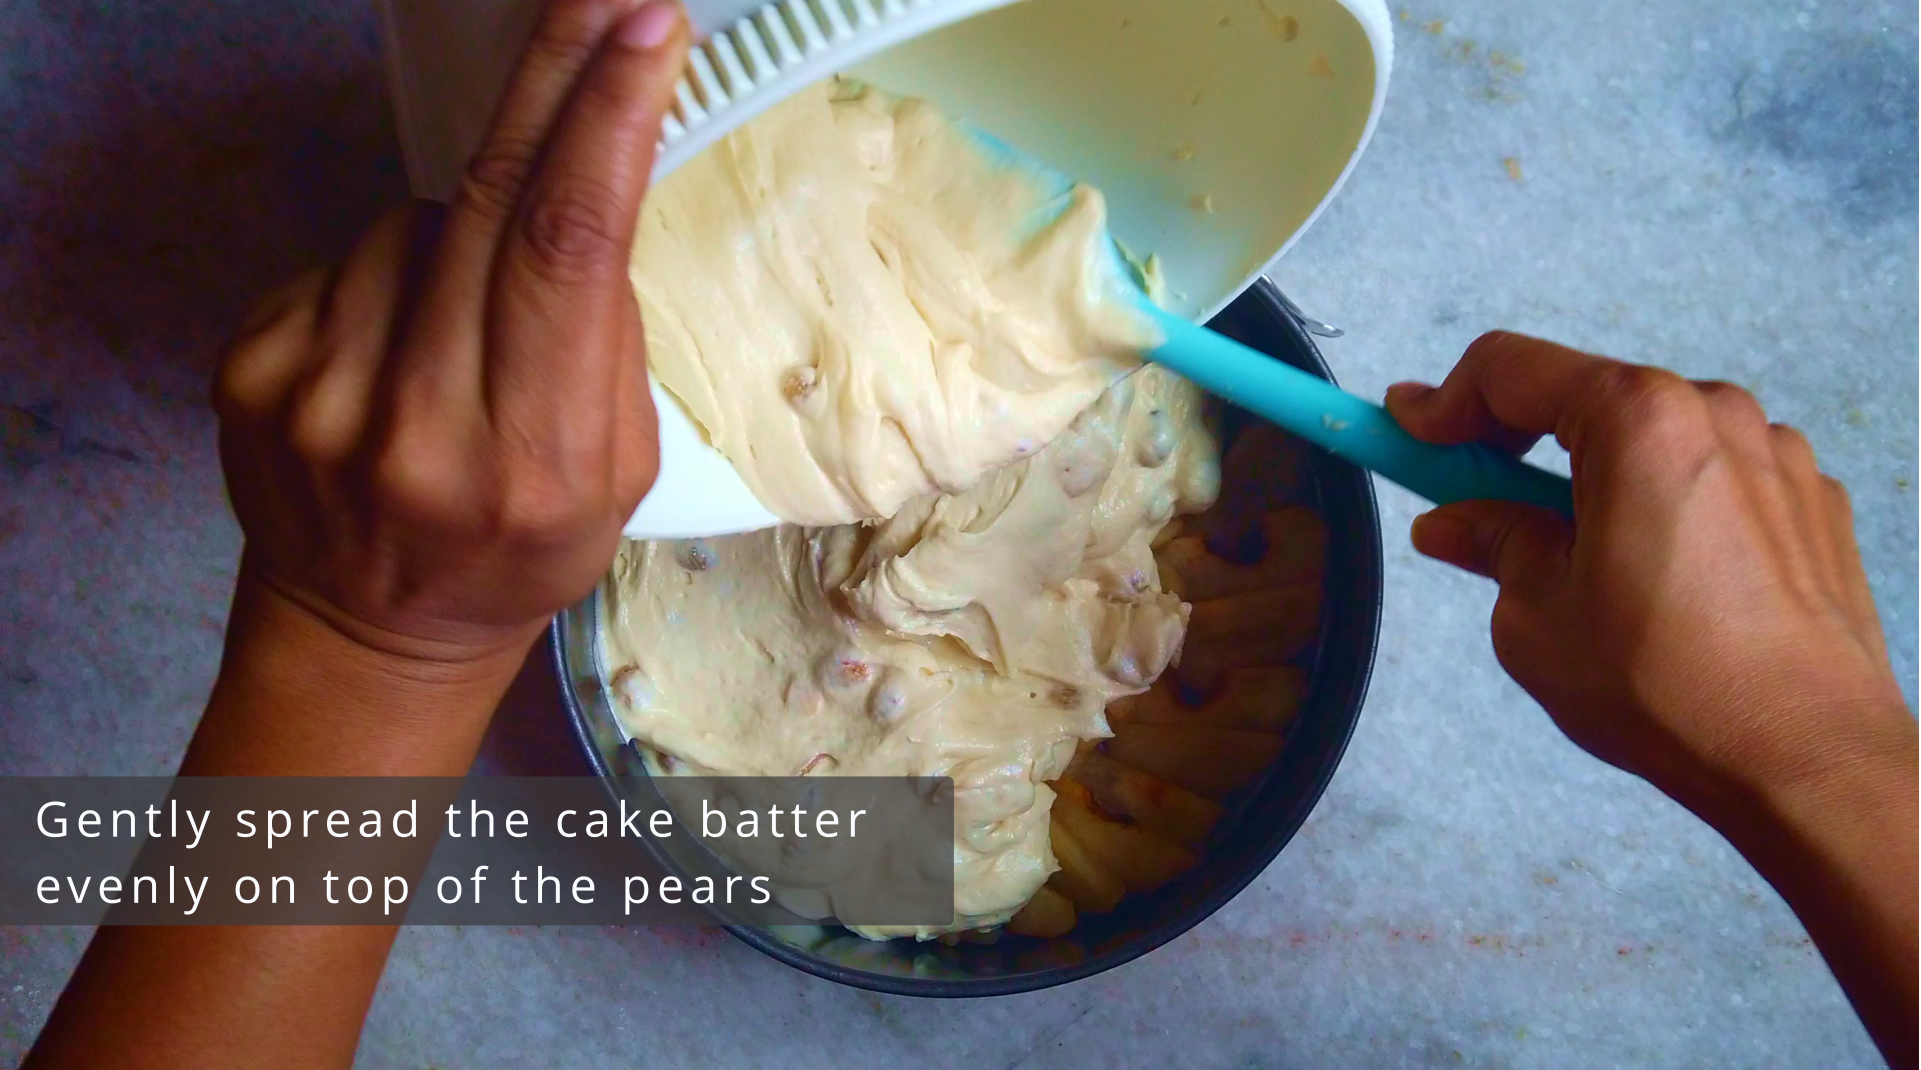
- Step 3: Arrange the soaked pear slices in a pattern through the bottom of your cake pan. Set aside.
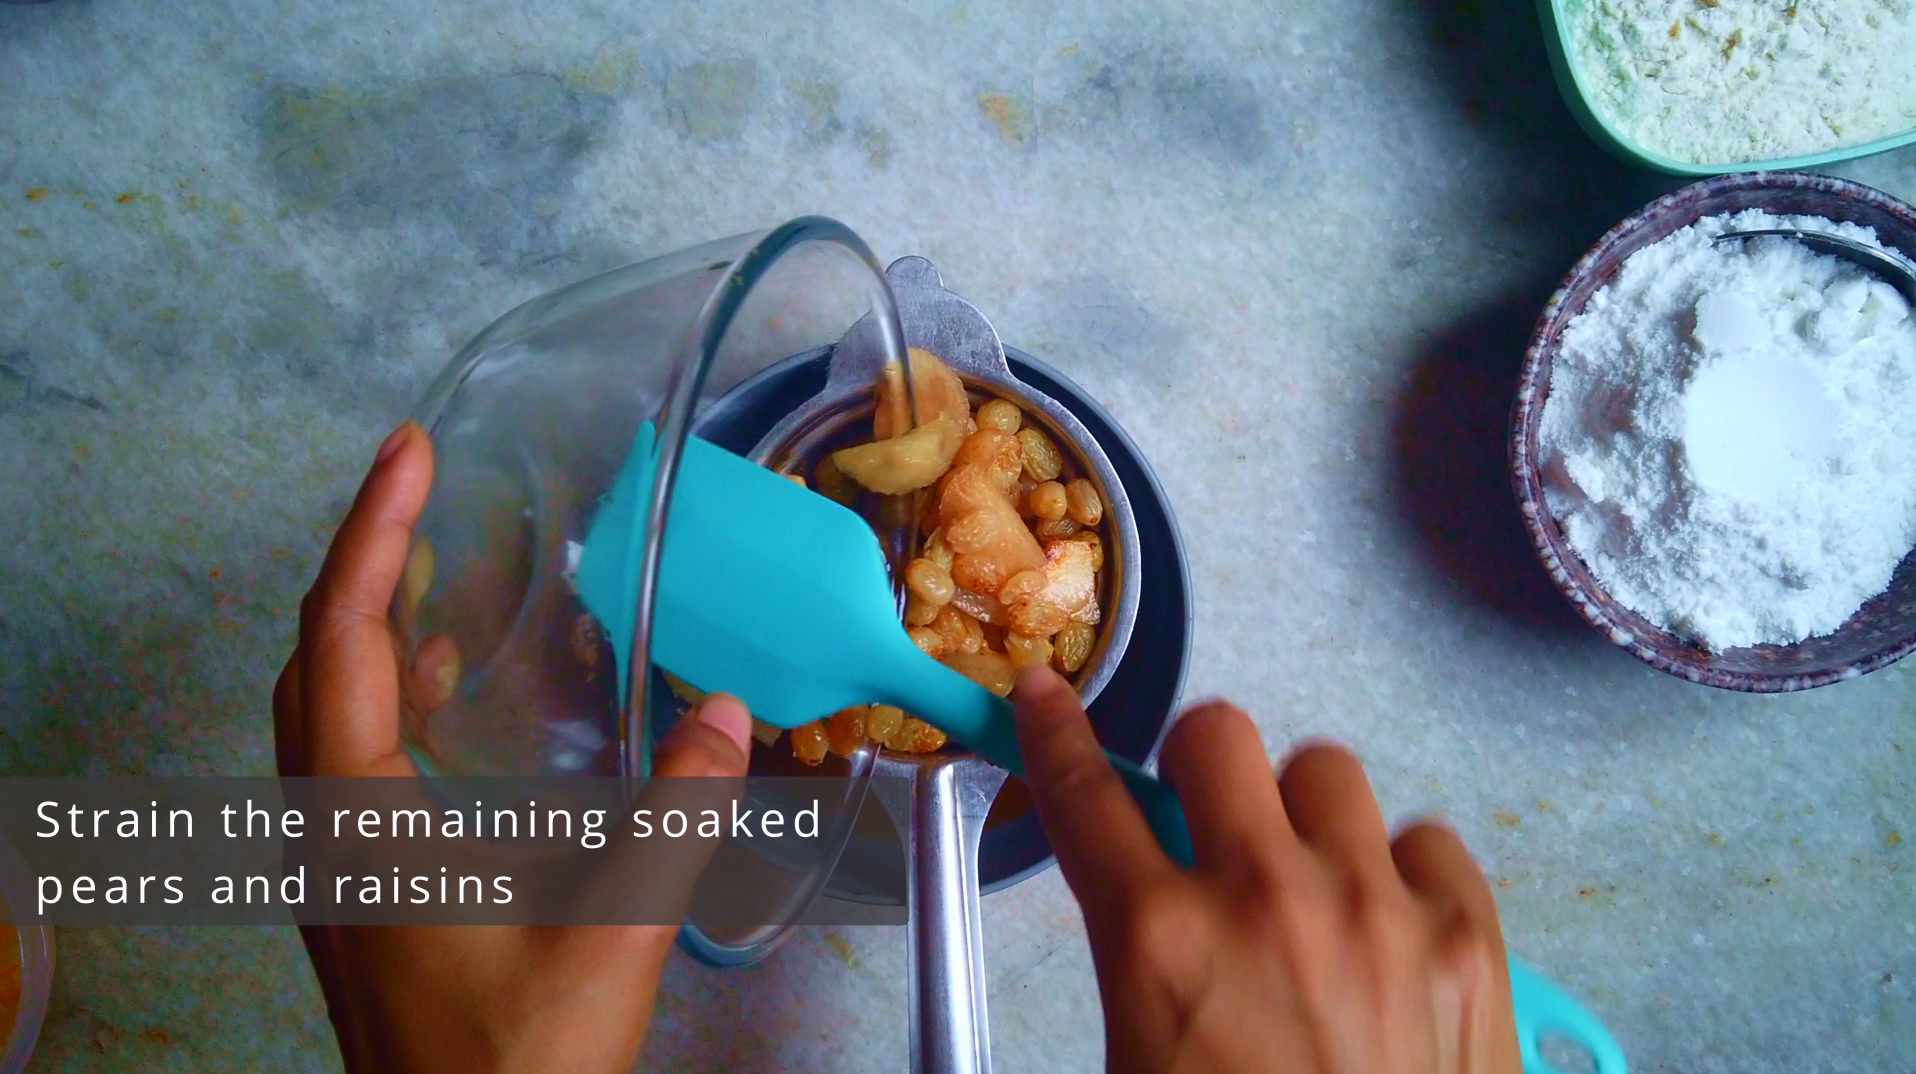
- Step 4: Then strain the remaining soaked pears and raisins. Keep aside.
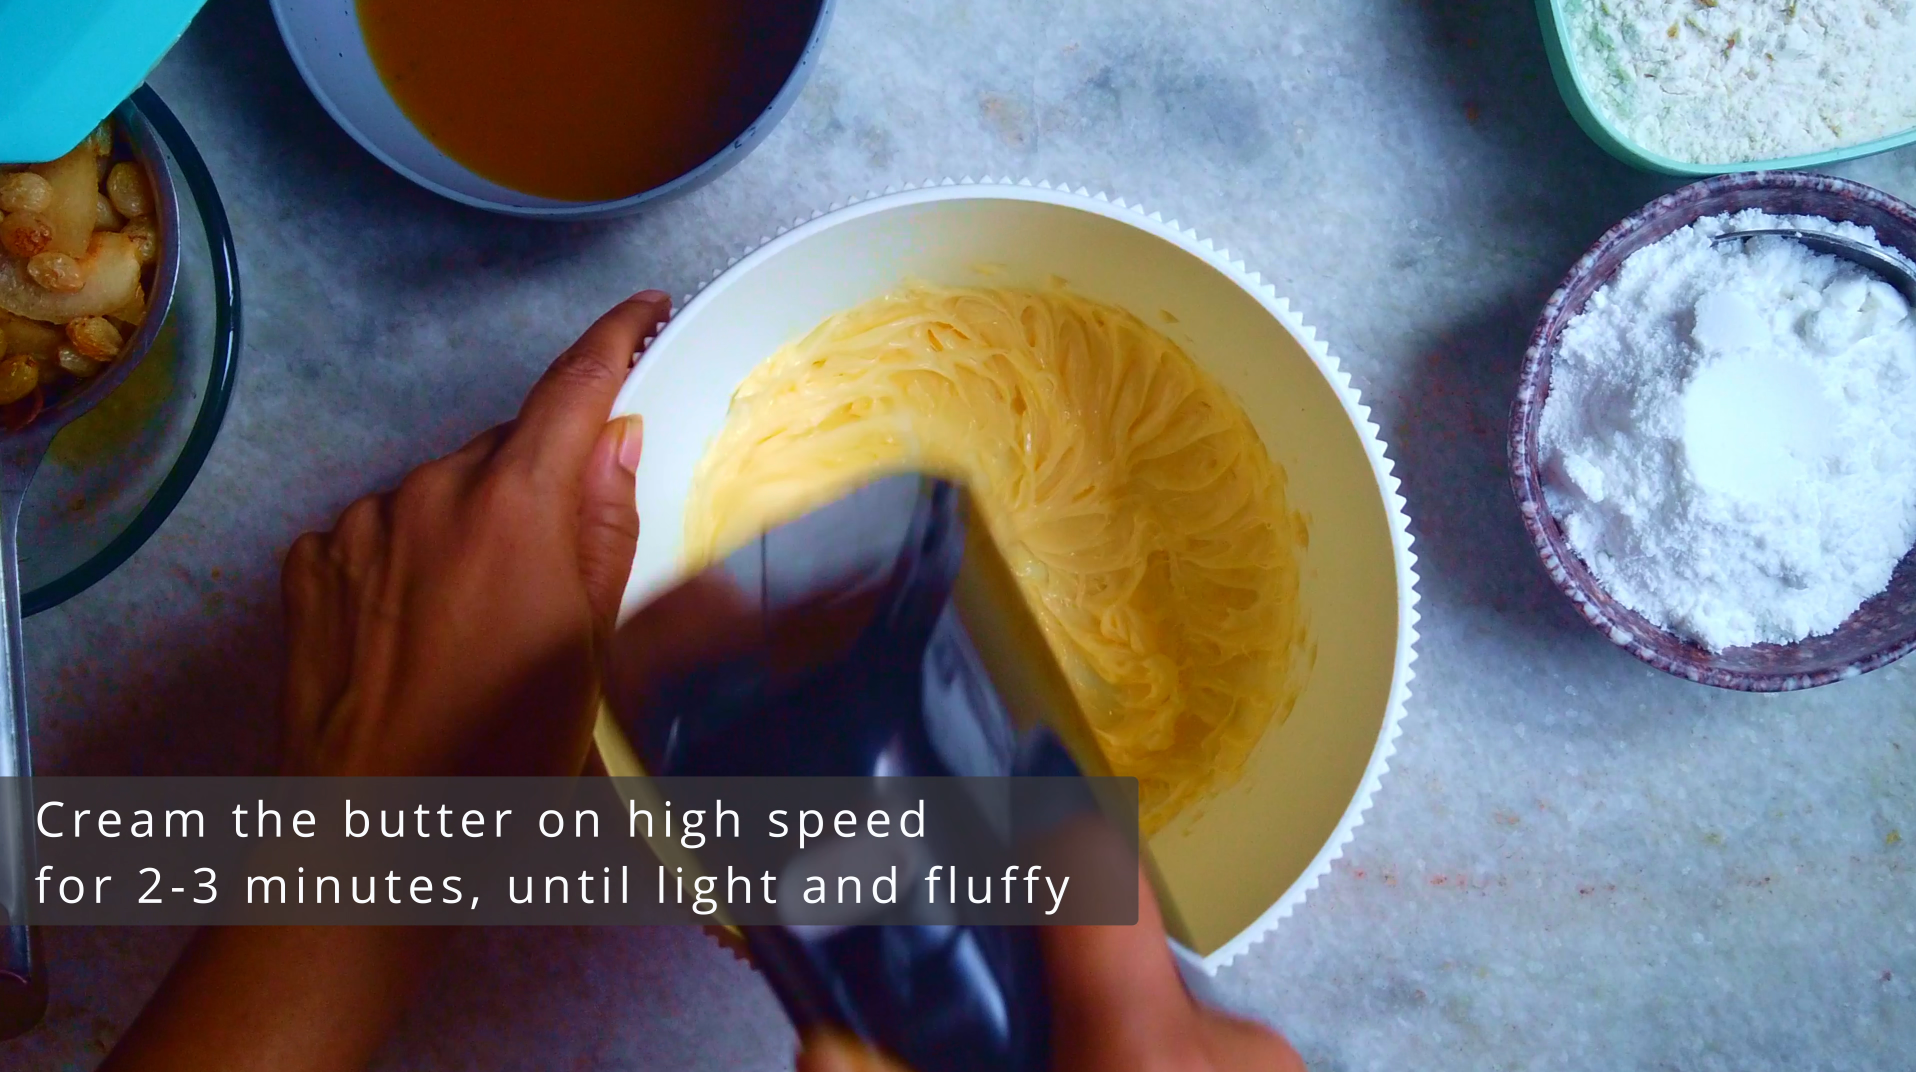
- Step 5: In a large mixing bowl, add softened butter and cream the butter on high speed for 2-3 minutes, until light and fluffy.
- Step 6: Gradually, add in the powdered sugar and continue creaming until really light and fluffy.
- Step 7: Then add the yogurt and beat well to combine. Next beat in the eggs, one at a time, beating well after each addition.
- Step 8: Then add vanilla and pear drenching rum and beat well to combine.
- Step 9: Sift flour, baking powder baking soda and salt in the mixing bowl, to get rid of any lumps and mix until just everything comes together. Do not overmix.
- Step 10: Then roughly break the remaining pears and add them to the batter along with the raisins. Gently fold them in the batter.
- Step 11: Gently spread the cake batter evenly on top of the pears.
- Step 12: Bake in the preheated oven for 45-55 minutes, until a toothpick inserted in the center comes out clean.
- Step 13: Let the baked cake cool on a wire rack for 5 minutes and then carefully remove the sides of the springform pan. Then invert the cake on a serving platter and peel off the parchment pepper. Let it cool a bit and sprinkle with confectioner sugar.

- Step 14: Serve the Italian Pear Cake with Mascarpone cheese, ice cream or whipped cream. Enjoy!!
Pro Tips:
Choose pears that feel firm when pressed and ripe enough for good flavour but not mushy. Softer fruit releases too much moisture, making the batter overly loose. Very hard pears don’t soften evenly in the oven and can alter the bake time.
Proper measuring makes all the difference. If using cups, aerate your flour first, lightly fill the cup, and sweep off the excess. A kitchen scale provides even more accuracy if you have one available.
Bringing refrigerated ingredients to room temperature makes mixing smoother. This step helps the fat whip properly and keeps the batter uniform.
When whipping the wet ingredients- butter, sugar, eggs and vanilla- mix until the texture becomes noticeably thicker and lighter in colour. This step adds structure and enhances the final crumb.
Keep in mind that ovens vary. The listed baking time is a helpful guide, but start checking the cake before the final minutes. Adjust the bake as needed based on your oven’s performance and how the cake looks and feels.
Allow the cake to cool completely before taking it out of the tin, removing it too early may cause breakage. Slicing is easiest once it has reached room temperature.
Leftover kept best when sealed in an airtight container and chilled. They stay fresh for several days and can be frozen for longer storage.
About Me

DEBJANI MONDAL
Welcome to Kitchenstagram, the home of delicious recipes, culinary inspiration and cooking adventures. I’m Debjani and I’m thrilled to be your guide through the wonderful world of food. I’m a self-taught professional baker, home chef, recipe developer, author of Kitchenstagram and an aspiring YouTuber.
My passion for food and cooking began at a very young age, when I would watch my mom and dad cook for me and my brother. My dad, in particular is a great cook whose culinary skills made a lasting impression on me. My dad would cook up a storm on special occasions by cooking variety of dishes, from delicious biriyani to samosa, fish fry, rasgullas and kachoris (sweet & spicy deep fried pastry with filling of lentils, meat or fish…>>>>>
FOLLOW ME
My Latest Posts
- post 1
- post 2