Semla Recipe | Swedish Cream Buns| Swedish Semlor | Swedish Fat Tuesday Buns | Lent Buns| Kitchenstagram

Few baked treat inspire as much seasonal excitement in Sweden as the beloved Semla. Soft, airy, lightly sweet and infused with the warmth of cardamom, these buns hold a treasured place in Scandinavian food culture. Although they are most famously eaten on Fat Tuesday, their charm stretches far beyond a single holiday and their story spans centuries, regions and countless variations.
A Semla may look like a simple cream bun at first glance, but it has an entire world of ritual, nostalgia and delight wrapped into its tender layers. Some people compare it to the cream buns found in Scottish bakeries, while others insist that Sweden’s version stands entirely on its own with its distinct spice and signature almond filling. Regardless of comparison, what unites them is the joy of cutting through a pillowy, fragrant bun and revealing that hidden swirl of luxurious filling.
In Sweden, Fettisdagen- the Swedish fat Tuesday- marks the height of Semla season. On this day, bakeries buzz with customers, cafes fill with people clutching steaming cups of coffee paired with these indulgent buns, and families make excuses to just have one more before lent begins. The association with fat Tuesday is deep-rooted, long before the dessert took on its modern shape, the celebration of the day involved savouring rich foods before fasting period began. Oven time, Semlor ( the plural of Semla) transitioned from a simple bun dipped in hot milk to the extravagant treat enjoyed today.
The Semla today is typically understood as a soft, enriched bun flavoured with cardamom, hollowed or cut open to hold a layer of almond paste topped with a dome of whipped cream. The little hat of dough placed back on top finishes the look, often dusted with a snowy coat of powdered sugar. But this familiar form is just one chapter of the pastry’s long story.
In earlier centuries, the bun was eaten entirely differently. Known then as hetvägg, it was served warm in a bowl of hot milk- a comforting, hearty dish well suited to Scandinavian winters. Only later did almond filling and whipped cream become standard, transforming the humble bun into the decadent treat adored today.
Though most closely tied to Sweden, Semlor are celebrated throughout the Nordic and Baltic regions, each with its own twist:
• Finland often fills theirs with jam- typically strawberry or raspberry-sparking lively debates over whether jam or almond is the “true” filling.
• Norway or Denmark serve varieties of cream and jam in soft buns, especially during Fastelavn celebrations.
• Iceland takes a distinctive approach, using Choux Pastry similar to éclairs or cream puffs.
• The Faroe Islands embrace a choux-style bun enriched with cream, am and often a glossy layer of chocolate on top.
• Estonia enjoys a similar version known as vastlakukkel, tied to traditions involving sledding for good luck in the coming year.
Today’s Semla is a marvel of texture and simple luxury. The bun itself is soft lightly sweet and enriched just enough to feel special without being heavy. Cardamom provides the unmistakable aroma that instantly signals Scandinavian baking- floral, warm and faintly citrus-like.
The filling brings its own delightful richness. Traditional almond paste, often thinned with milk and sometimes mixed with crumbs of the bun’s interior, adds sweetness without overwhelming the palate. A swirl of whipped cream sits on top, creating a beautiful contrast between the bun’s earthy spice and the airy creaminess within. Many describe the finished bun as “light as feather,” despite its indulgent ingredients. One bite offers the gentle resistance of the bun, the soft glide of cream and the sweet, nutty flavour of the almond layer.
And then comes the final flourish, the bun’s top back onto the cream like a little cap. This tiny lid makes the Semla instantly recognizable in bakery displays. Dusting it with powdered sugar gives it a festive finish.
One of the most charming cultural habits connected to Semlor is Fika, the cherished Swedish break for coffee and something sweet. A Semla is practically made for Fika. It’s celebratory without being fussy, comforting yet impressive and always best when enjoyed slowly with good company.
How do you eat Semla?
There are a few fun traditions for enjoying a Semla. Some people set the bun in a shallow bowl and warm it with hot milk until it becomes soft and dreamy. Others like to lift the little “hat” on top and use it to scoop up the cream before diving into the rest. And if you prefer a tidy approach, slice into it neatly so each bite brings together the aromatic bun, the rich filling and the fluffy cream.
Can you make Semlor in advance?
You can prepare Semla buns in advance, but they are always at their best on the day they’re baked. The rich dough tends to lose softness quickly, so same-day serving gives you that perfect fluffy texture. If you need to plan ahead, bake the buns and freeze them before adding any filling. This is actually what many people do, since a full batch is rarely eaten all at once. Just stash the plain buns in an airtight container or freezer bag, they’ll keep for several weeks. When you’re ready to serve, take out only what you need and let them come to room temperature before assembling.
The almond mixture holds up well if made the day before and chilled until you’re ready to use it. Whipped cream, however doesn’t stay firm for long, so it’s best to whip it right before serving. If you want to prep everything earlier in the day, a stabilized version of whipped cream is the way to go- it keeps its shape much longer and lets you assemble the buns ahead of time without worrying about collapse. This approach makes planning easier while still keeping each bun light, creamy and delicious.
Storage Tips:
You can easily break this recipe into two days with a little planning. One method is to let the dough complete its initial rise, then chill it overnight to slow fermentation, it will need several hours the next day to become puffy again before shaping. Another approach is to shape the rolls first and freeze them unbaked for a later bake. Stored in airtight freezer bags, they keep well for a few months. When you’re ready to use them, let the frozen rolls thaw and fully proof again.
Ingredients:
For Cardamom Buns:
330 gm All-Purpose Flour
1 tbsp Baking Powder
1/2 tsp Salt
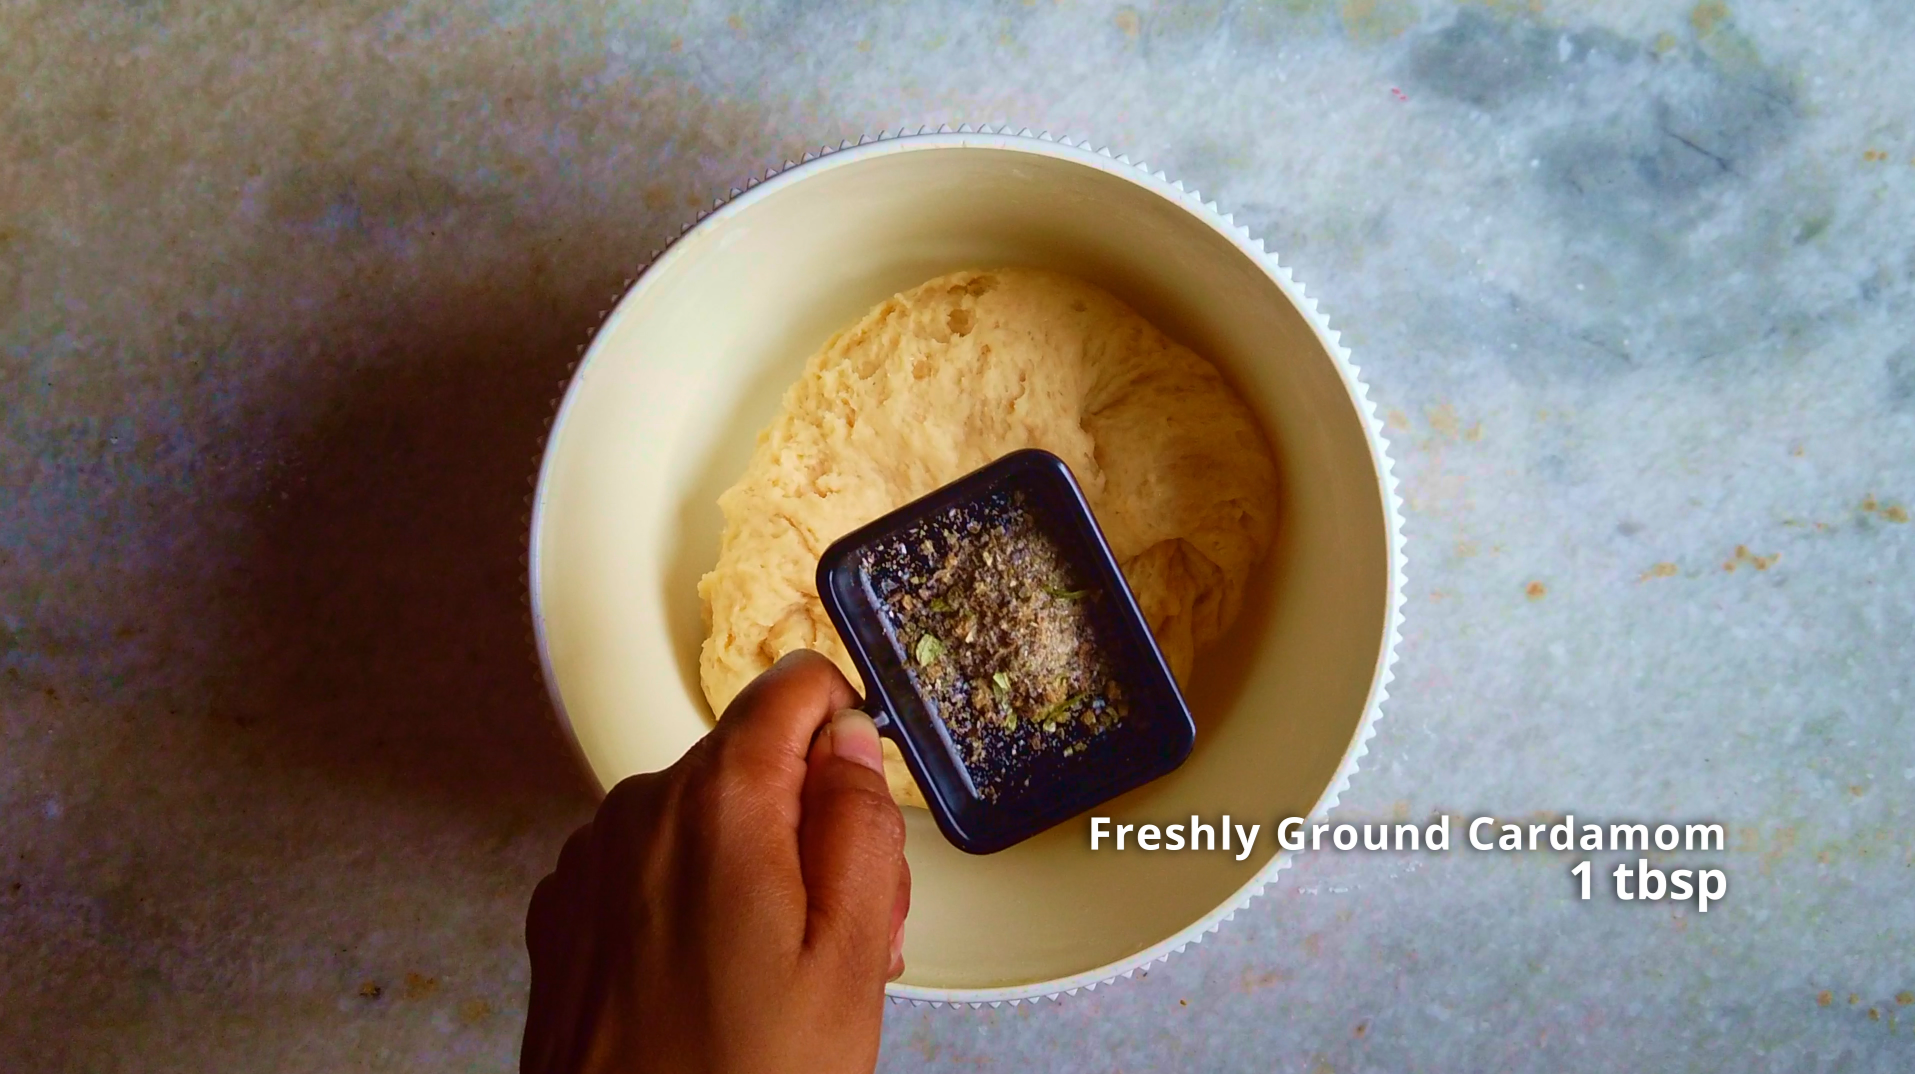
1 tbsp Freshly Ground Cardamom
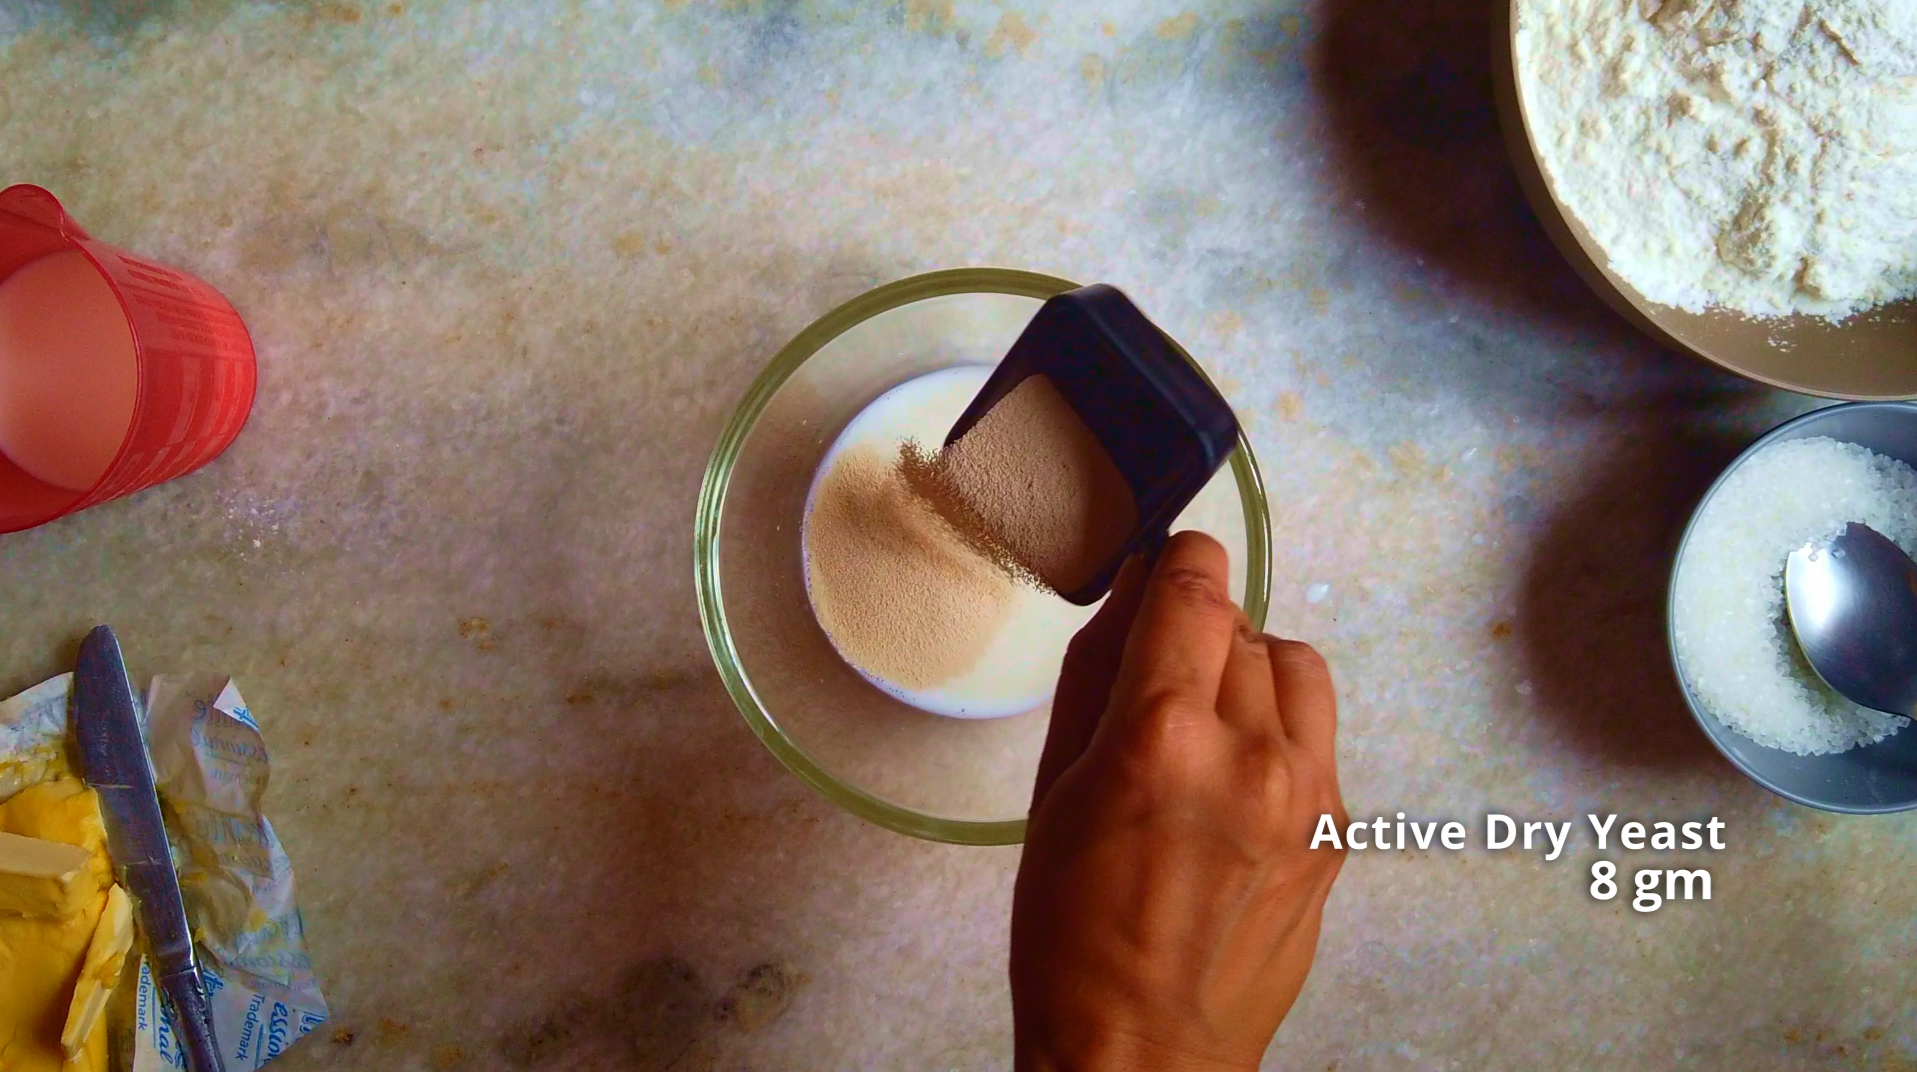
8 gm Active Dry Yeast
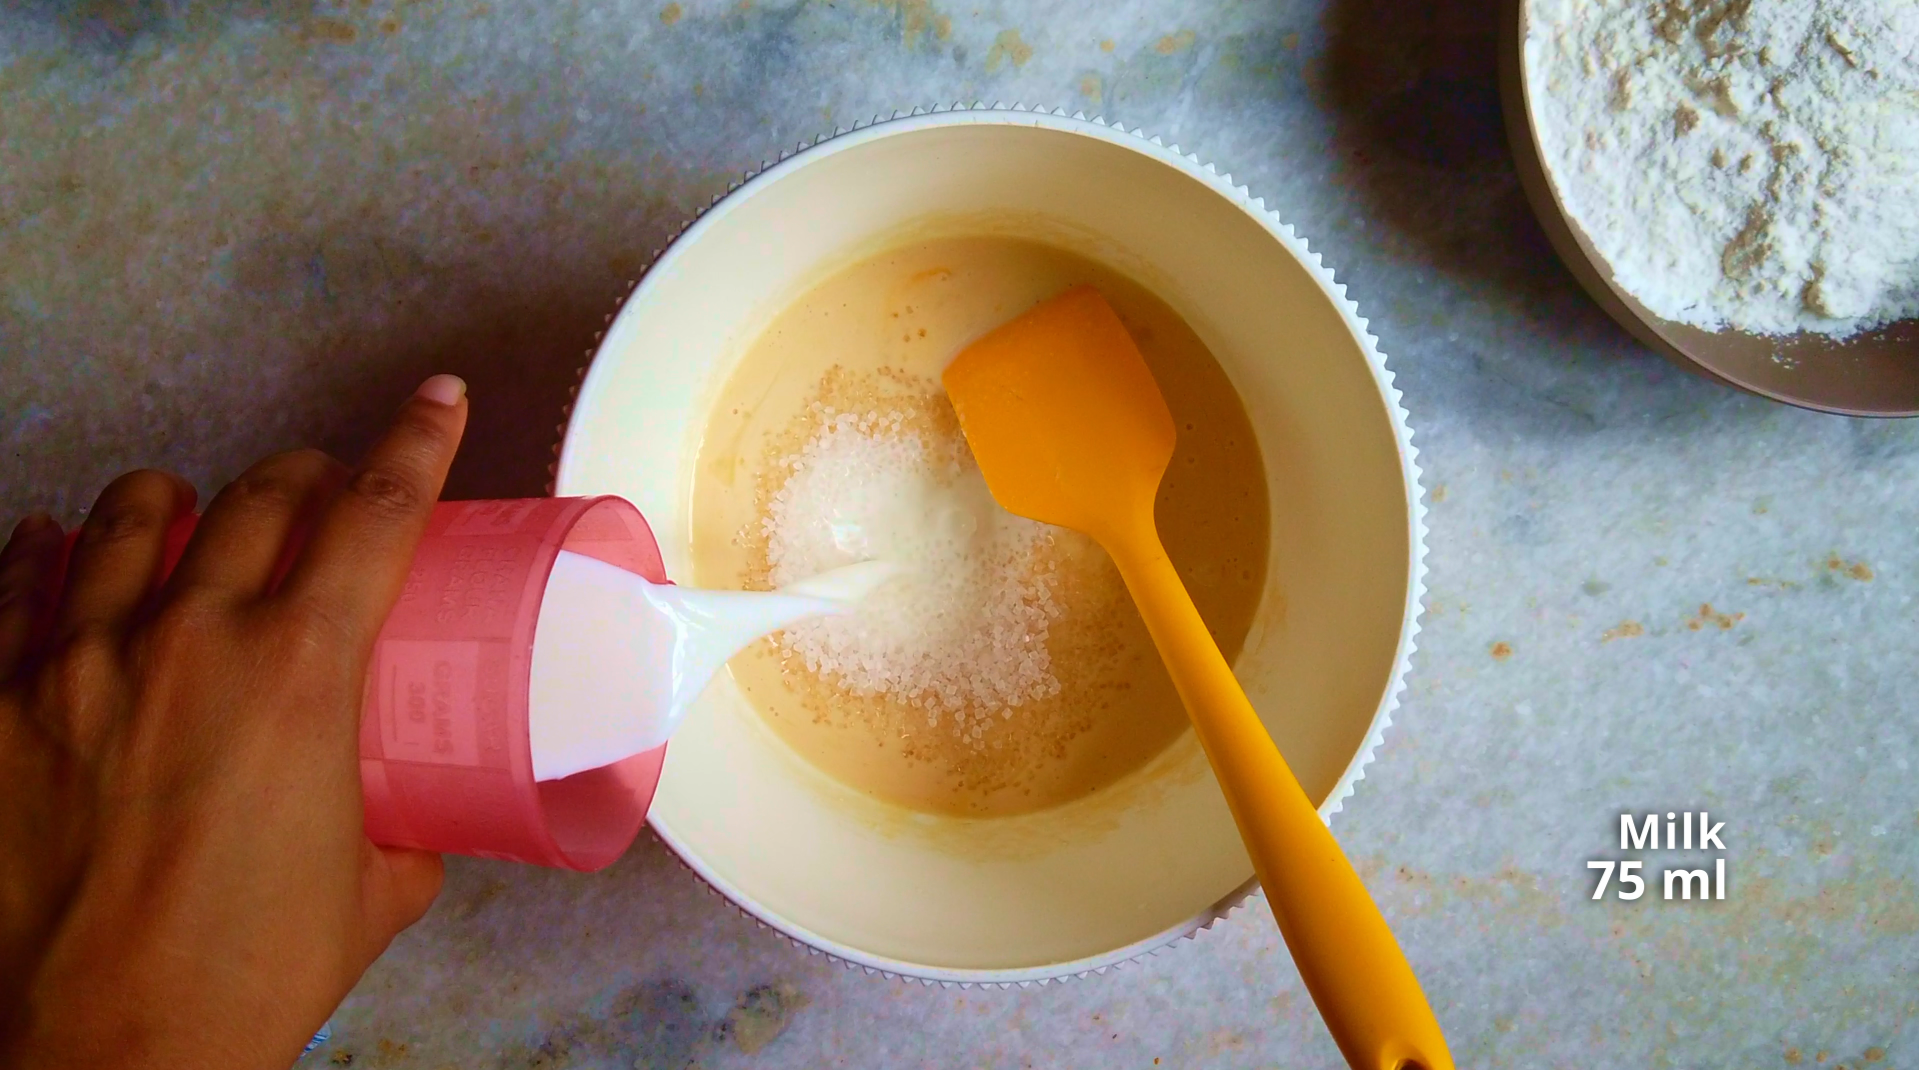
125 ml Milk
75 gm Granulated Sugar
1 no. Egg
100 gm Butter, room temperature
For Egg Wash:
1 no. Egg
1 tbsp Milk
For Almond Filling:
100 gm Whole Almonds
100 gm Granulated Sugar
A pinch of Salt
1 no. Green Cardamom
100 ml Milk
For Caramelized Almonds:
100 gm Almonds, chopped
2 tbsp Water
50 gm Granulated Sugar
For Whipped Cream:
1 1/2 cup Heavy Whipping Cream
1 1/2 tbsp Powdered Sugar
Sweet Milk For Serving:
480 ml Whole Milk
50 gm Granulated Sugar
1 tbsp Butter
1 no. Egg Yolk
For Decoration:
Powdered Sugar
Preparation:
For Cardamom Buns:
- Step 1: In a bowl, combine the flour, baking powder and salt. Keep aside.

- Step 2: In a small bowl, stir together 50 ml warm milk, 30 gm sugar and the yeast. Let the mixture sit until its very foamy on top, about 10 minutes.
- Step 3: In a large mixing bowl combine the yeast mixture, egg, 45 gm granulated sugar and 75 ml milk, stir to incorporate everything properly.
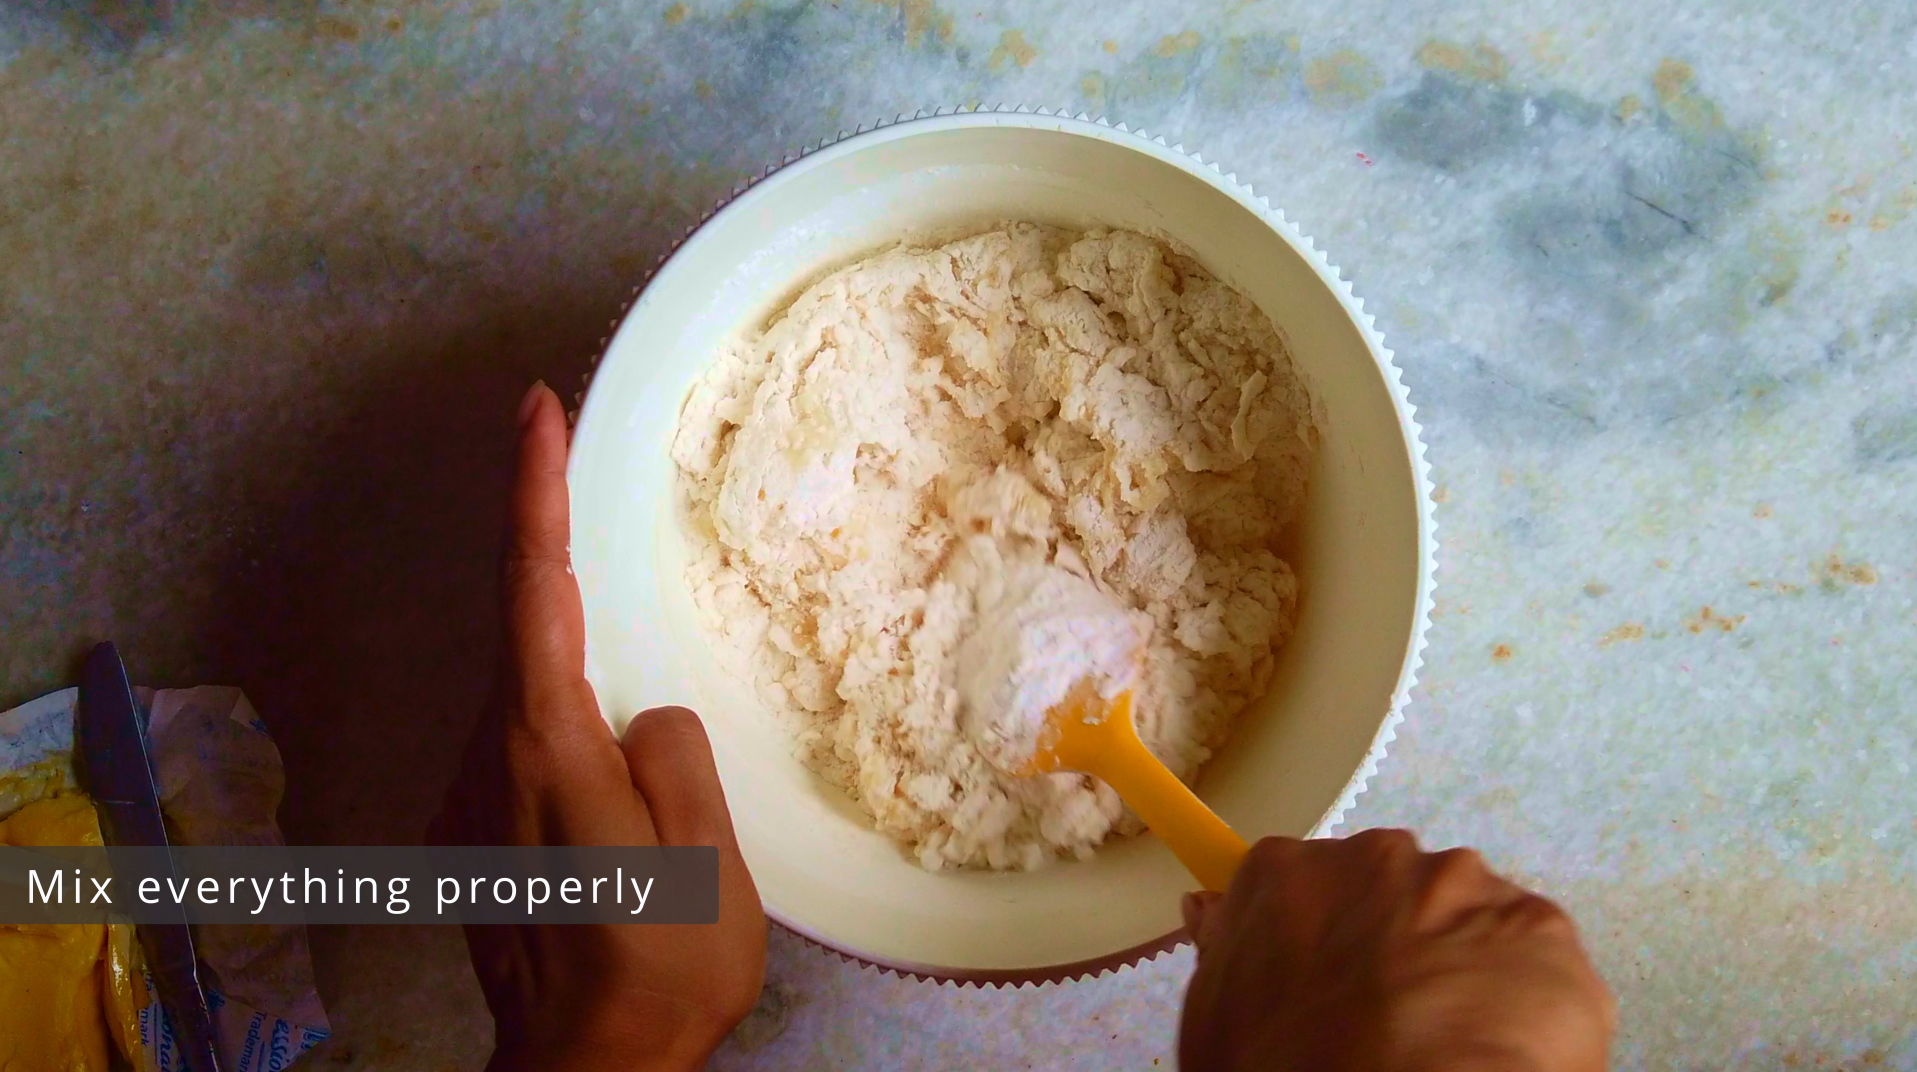
- Step 4: Then, add the flour mixture and mix everything properly.
- Step 5: Once all the flour has been incorporated add the butter and freshly ground cardamom, knead the dough for 6-8 minutes.
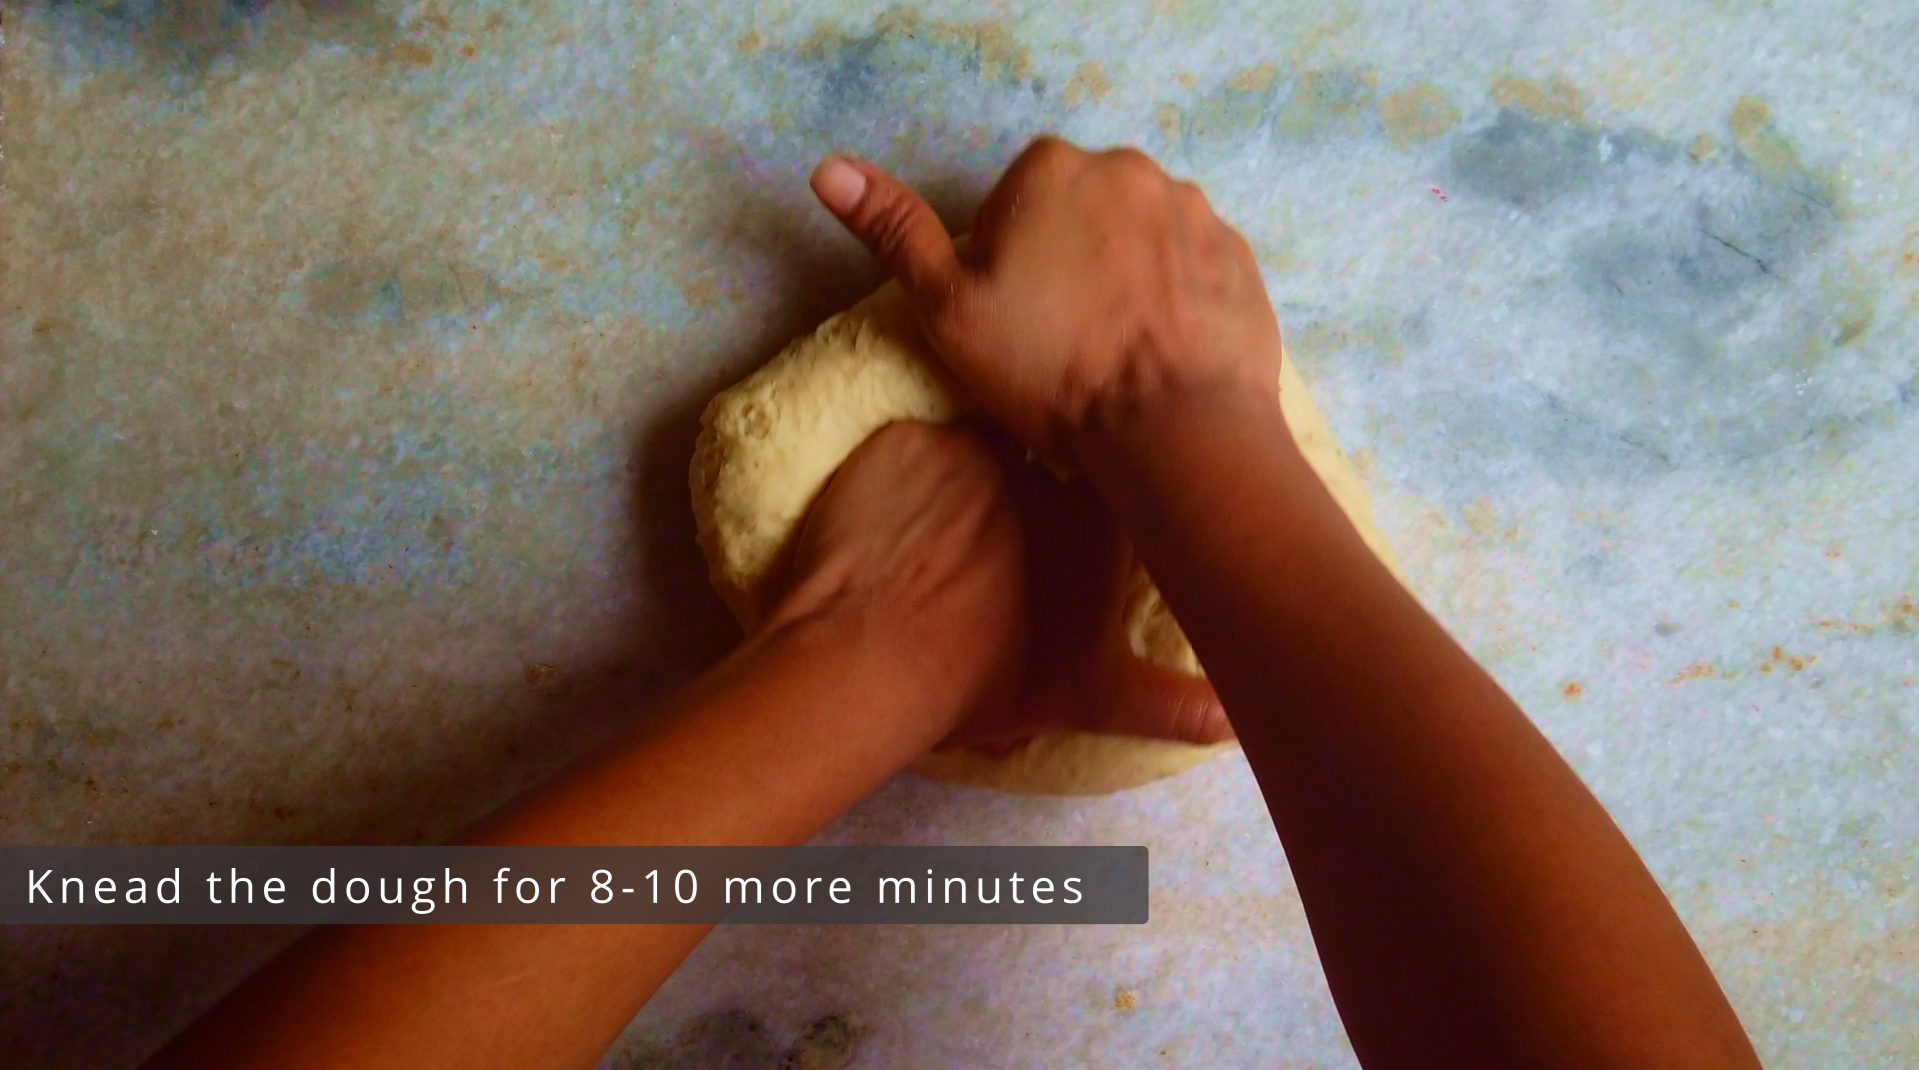
- Step 6: Turn out the dough onto a lightly floured surface and knead for 8-10 more minutes.
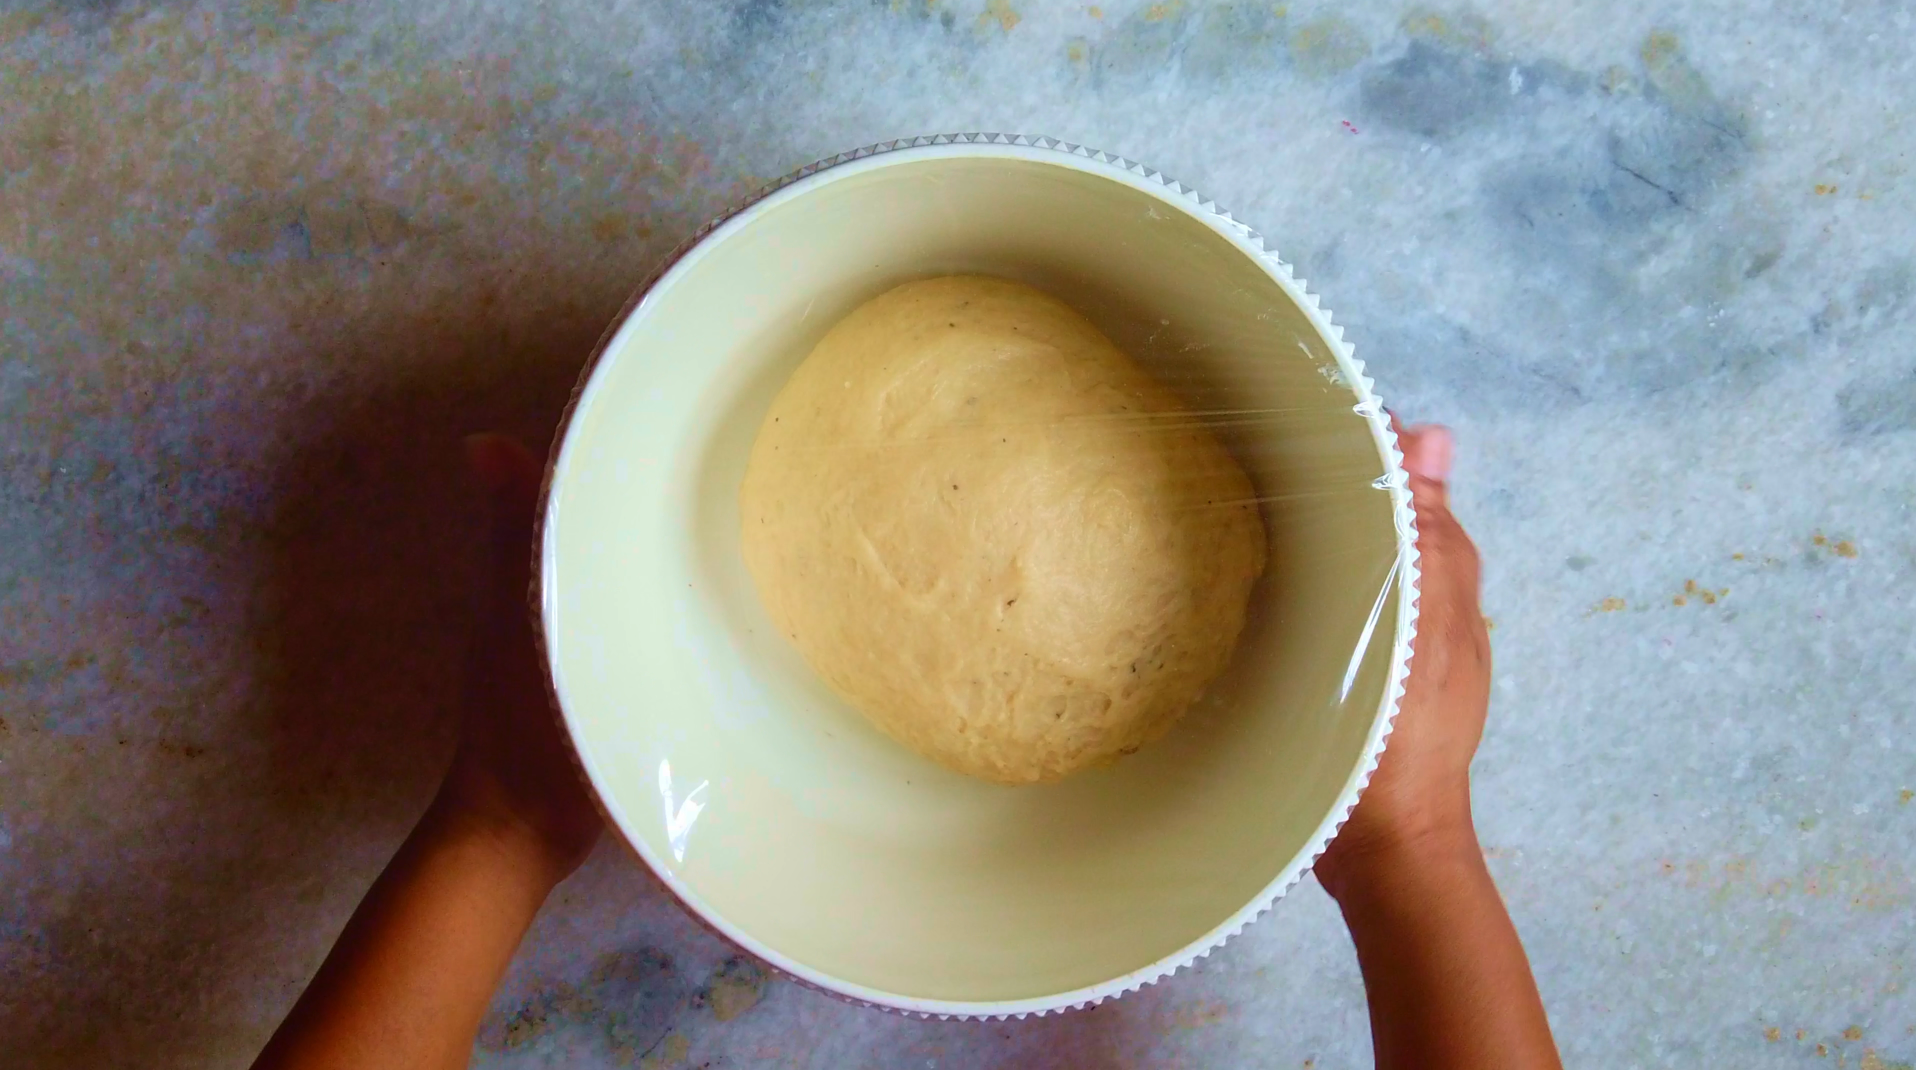
- Step 7: Grease a large bowl with oil. Shape the dough into a ball and place it into the prepared bowl. Cover with cling wrap and set aside in a warm place for 1-2 hours or until double in size.
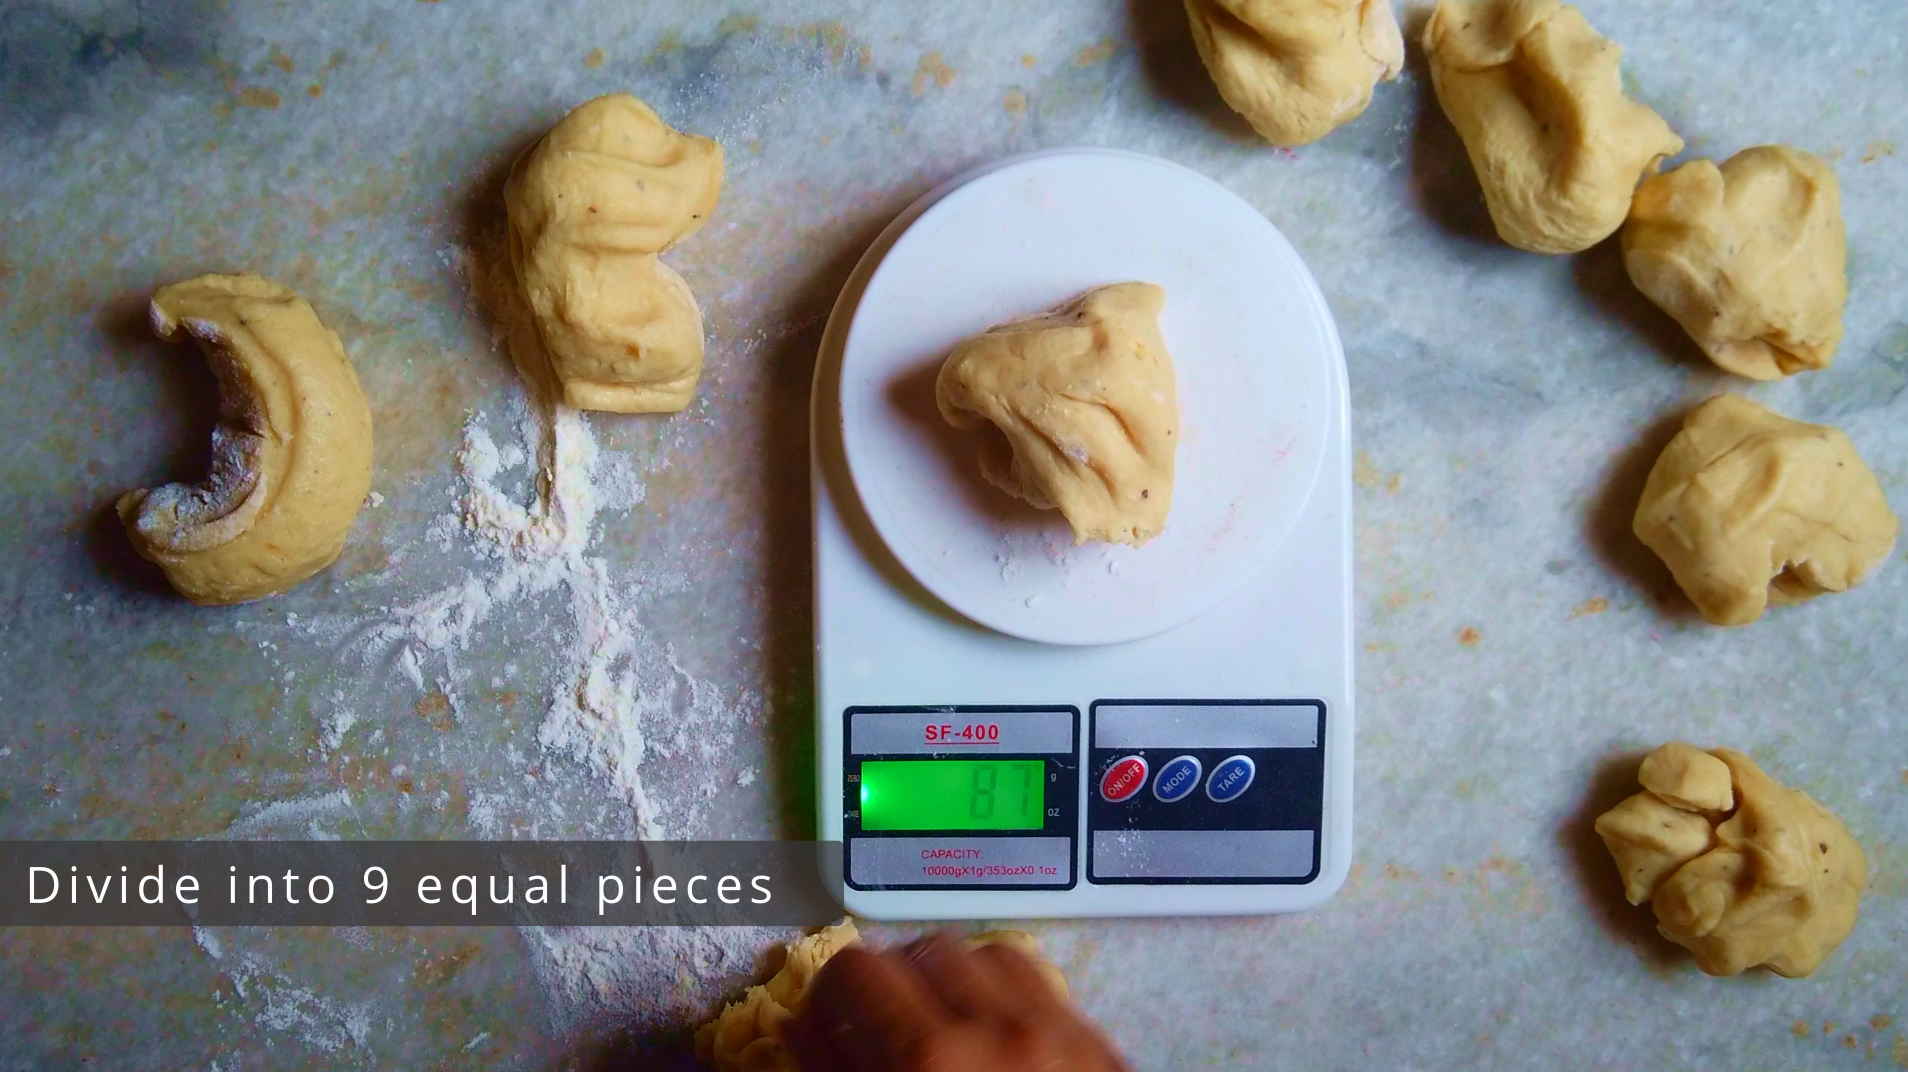
- Step 8: Turn out the proofed dough onto the lightly floured surface and divide into 9 equal pieces.
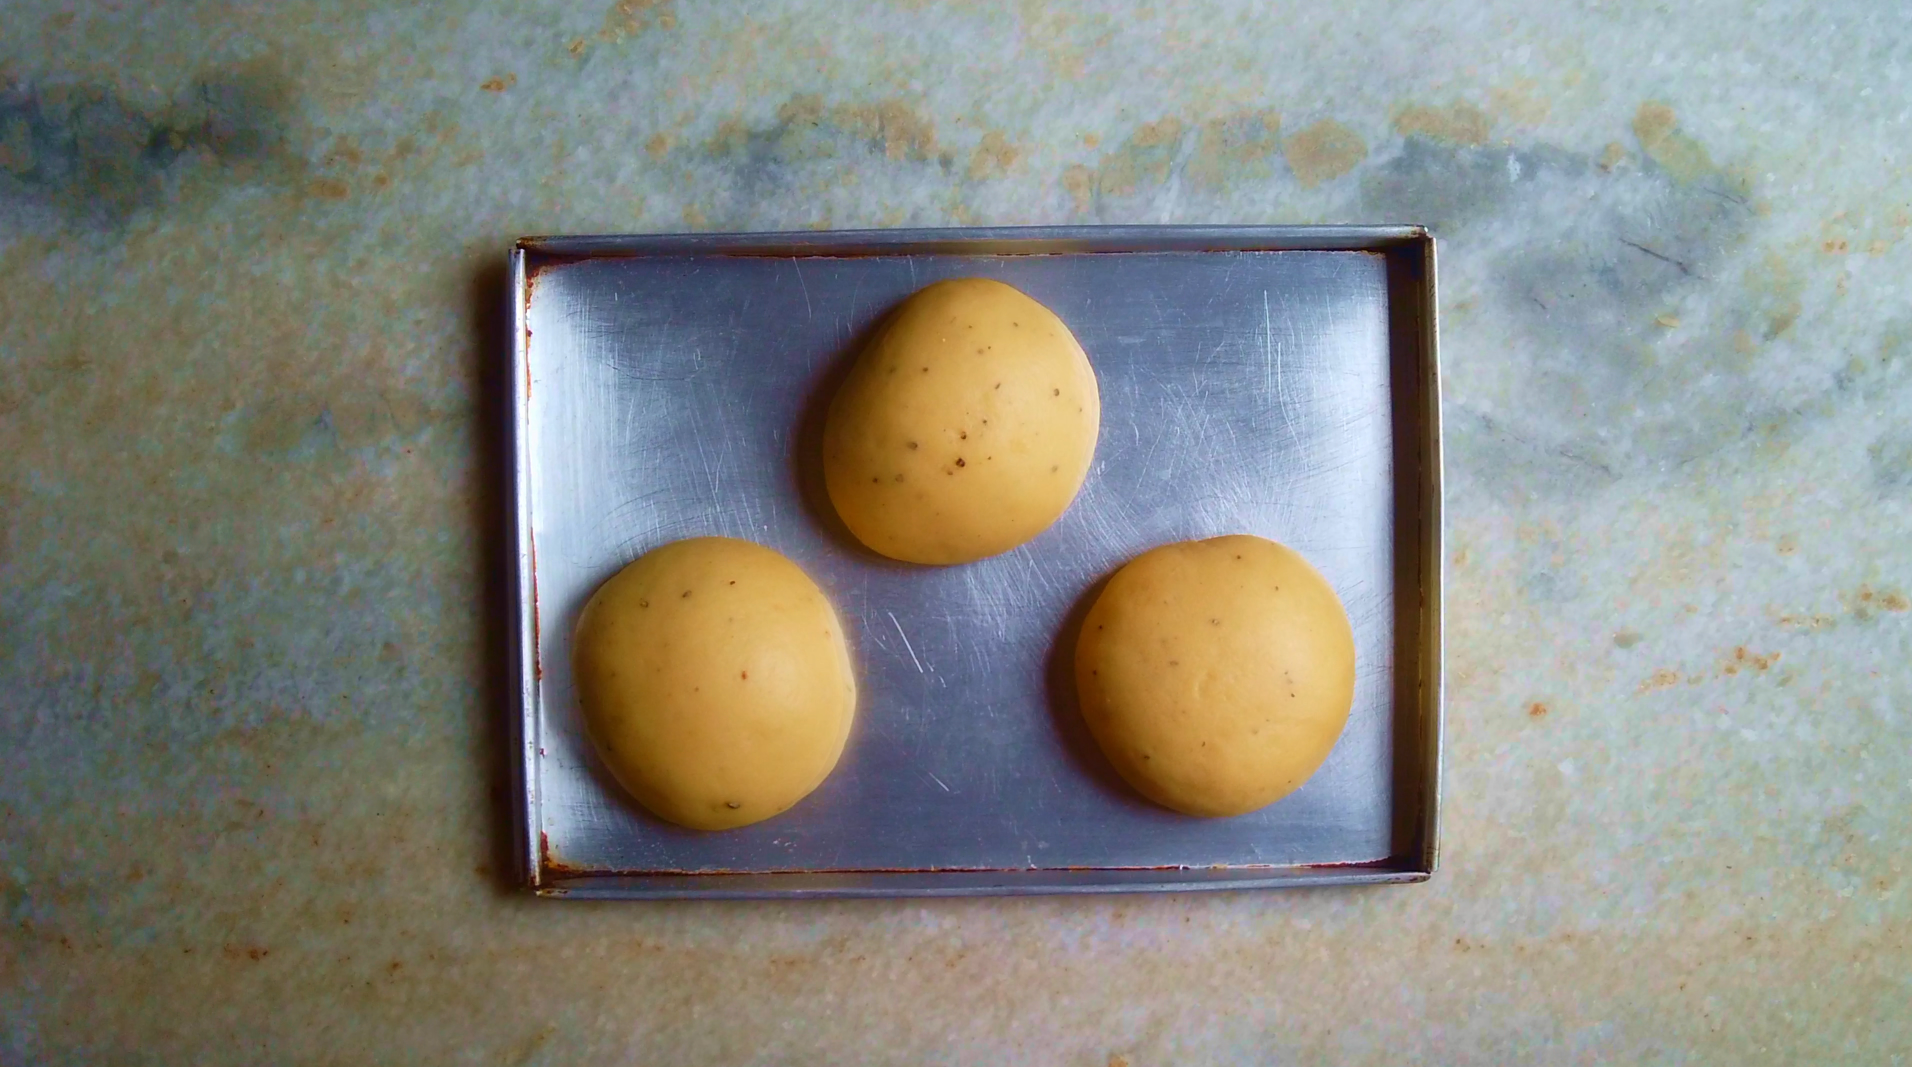
- Step 9: To start, hold each piece of dough, gathering the seams together and pinching them at the bottom. Place the ball on palm of your hand, creating tension in the dough. With a loose grip, roll the dough back and forth against palm of your hand, forming a tight, smooth circle without overdoing it to avoid tearing.

- Step 10: Once shaped, arrange the buns on a baking tray with ample space for rising and spreading. Cover the buns with a clean kitchen cloth or plastic wrap and place it in a warm place. Allow the buns to rest for approximately 30-45 minutes or until it nearly doubles in size.
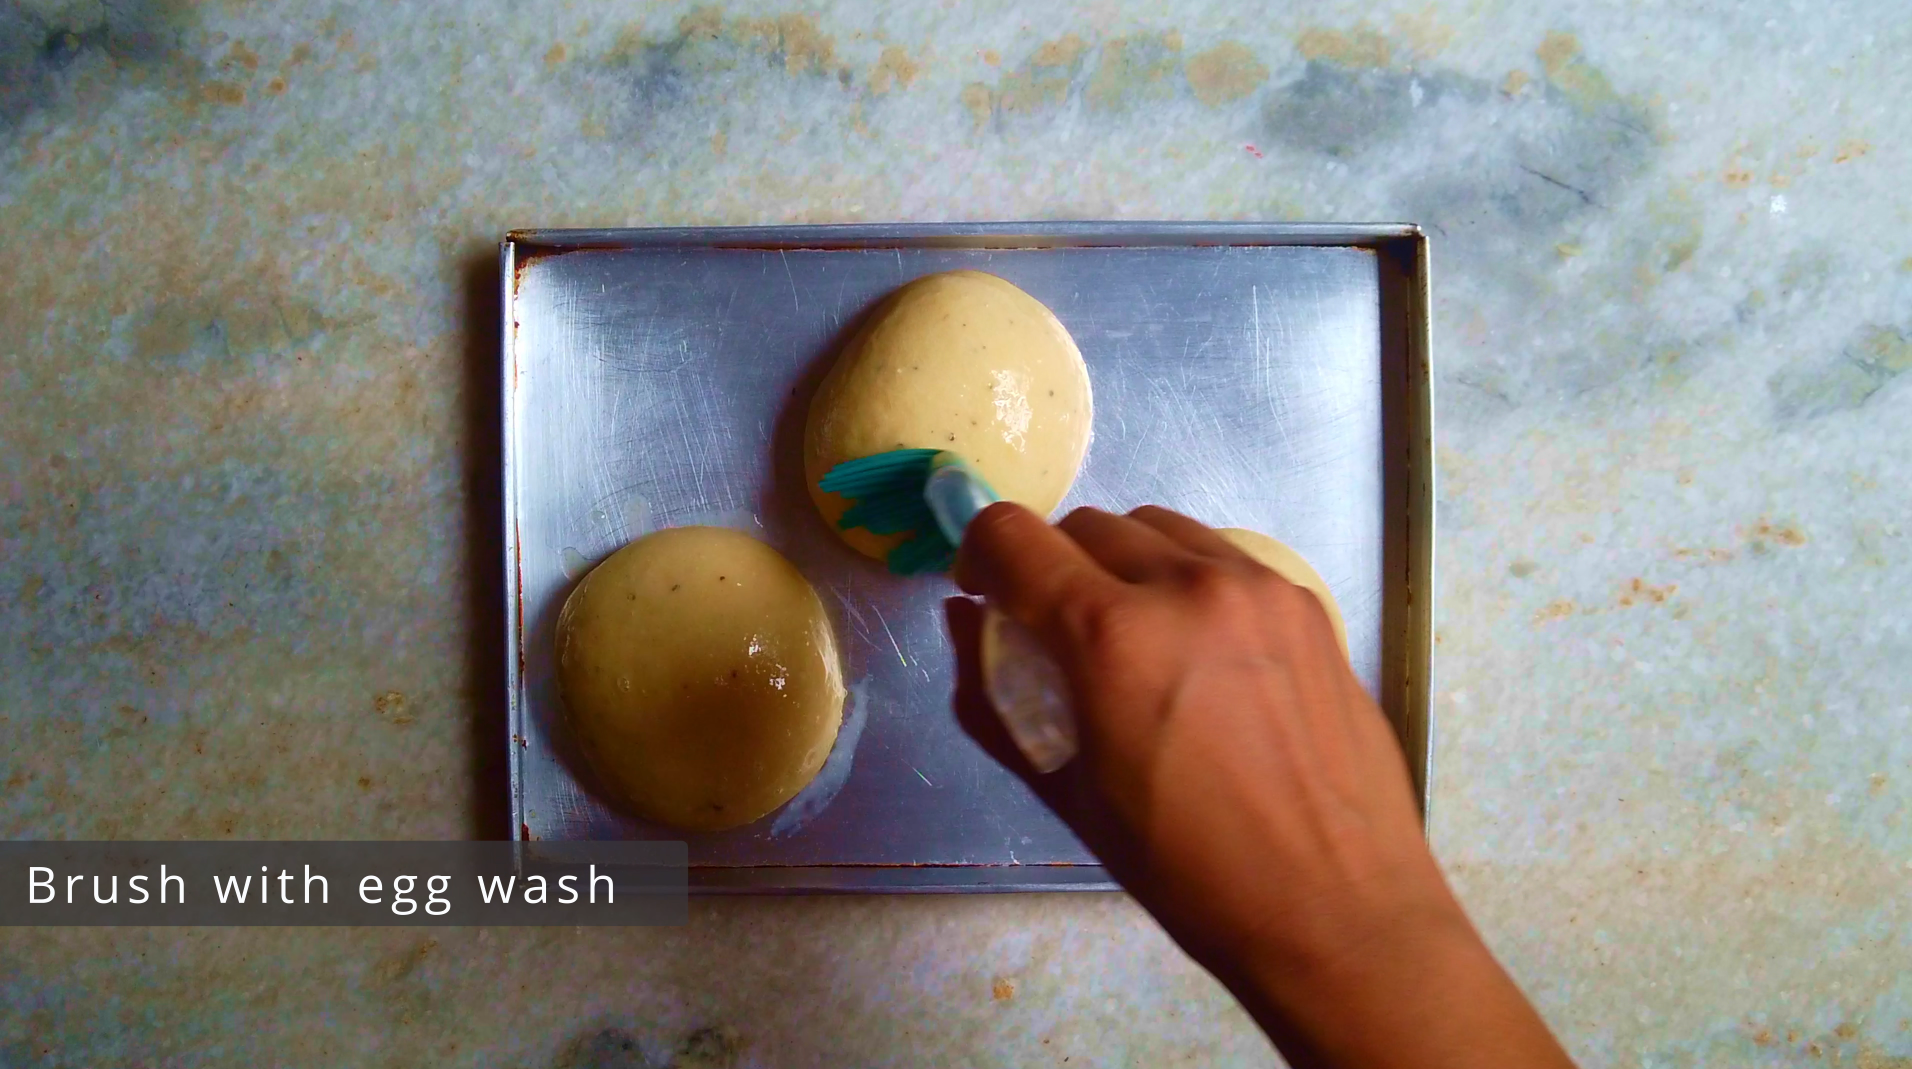
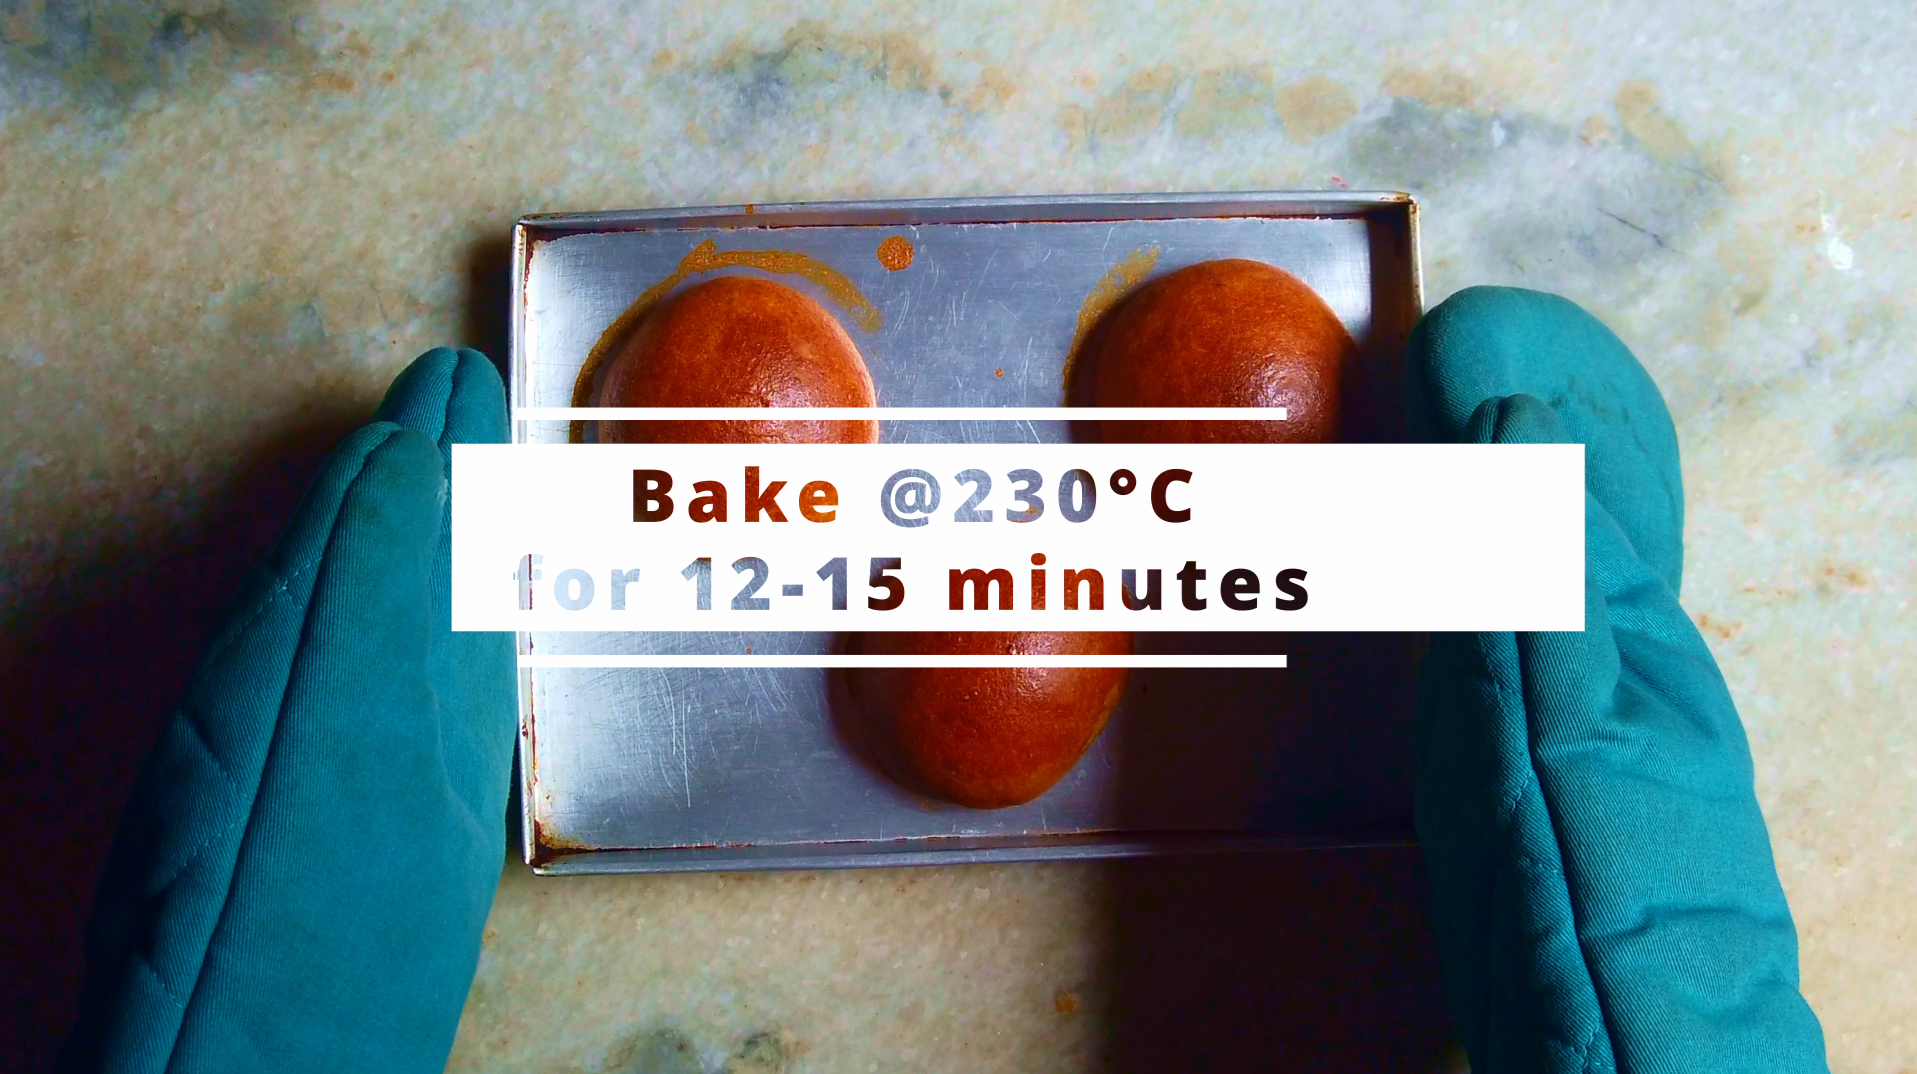
- Step 11: Preheat the oven to 230°C. Mix 1 egg and 1 tbsp water properly, egg wash is ready. When the buns are double in volume, Brush each bun with egg wash.
- Step 12: Bake the buns for 12-15 minutes or until golden brown in colour. Let cool on a wire rack.
For Almond Filling:
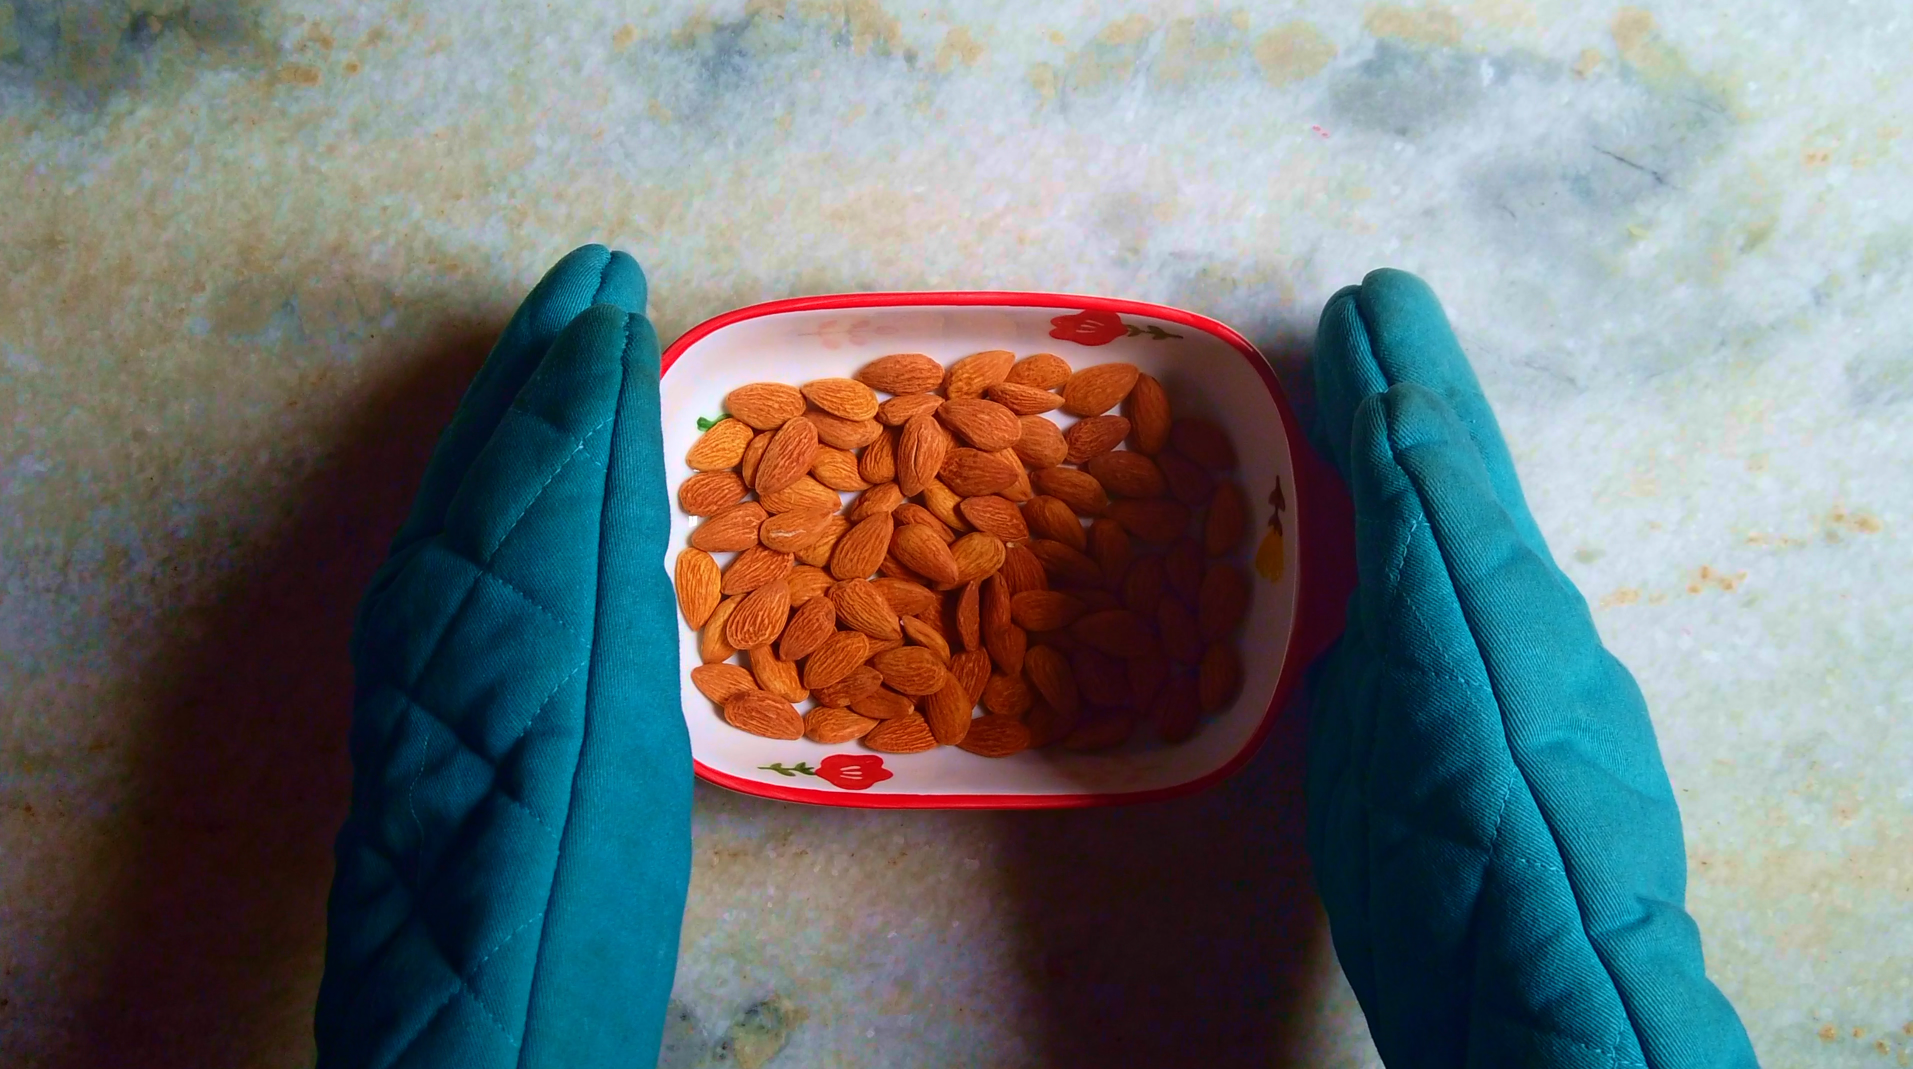
- Step 13: Preheat oven to 200°C. Spread the almonds on a baking sheet and toast for 8-10 minutes or until fragrant. Let them cool for a bit.
- Step 14: In a grinder jar, combine toasted almonds, sugar, salt and Cardamom. Pulse until you get a fine powder.
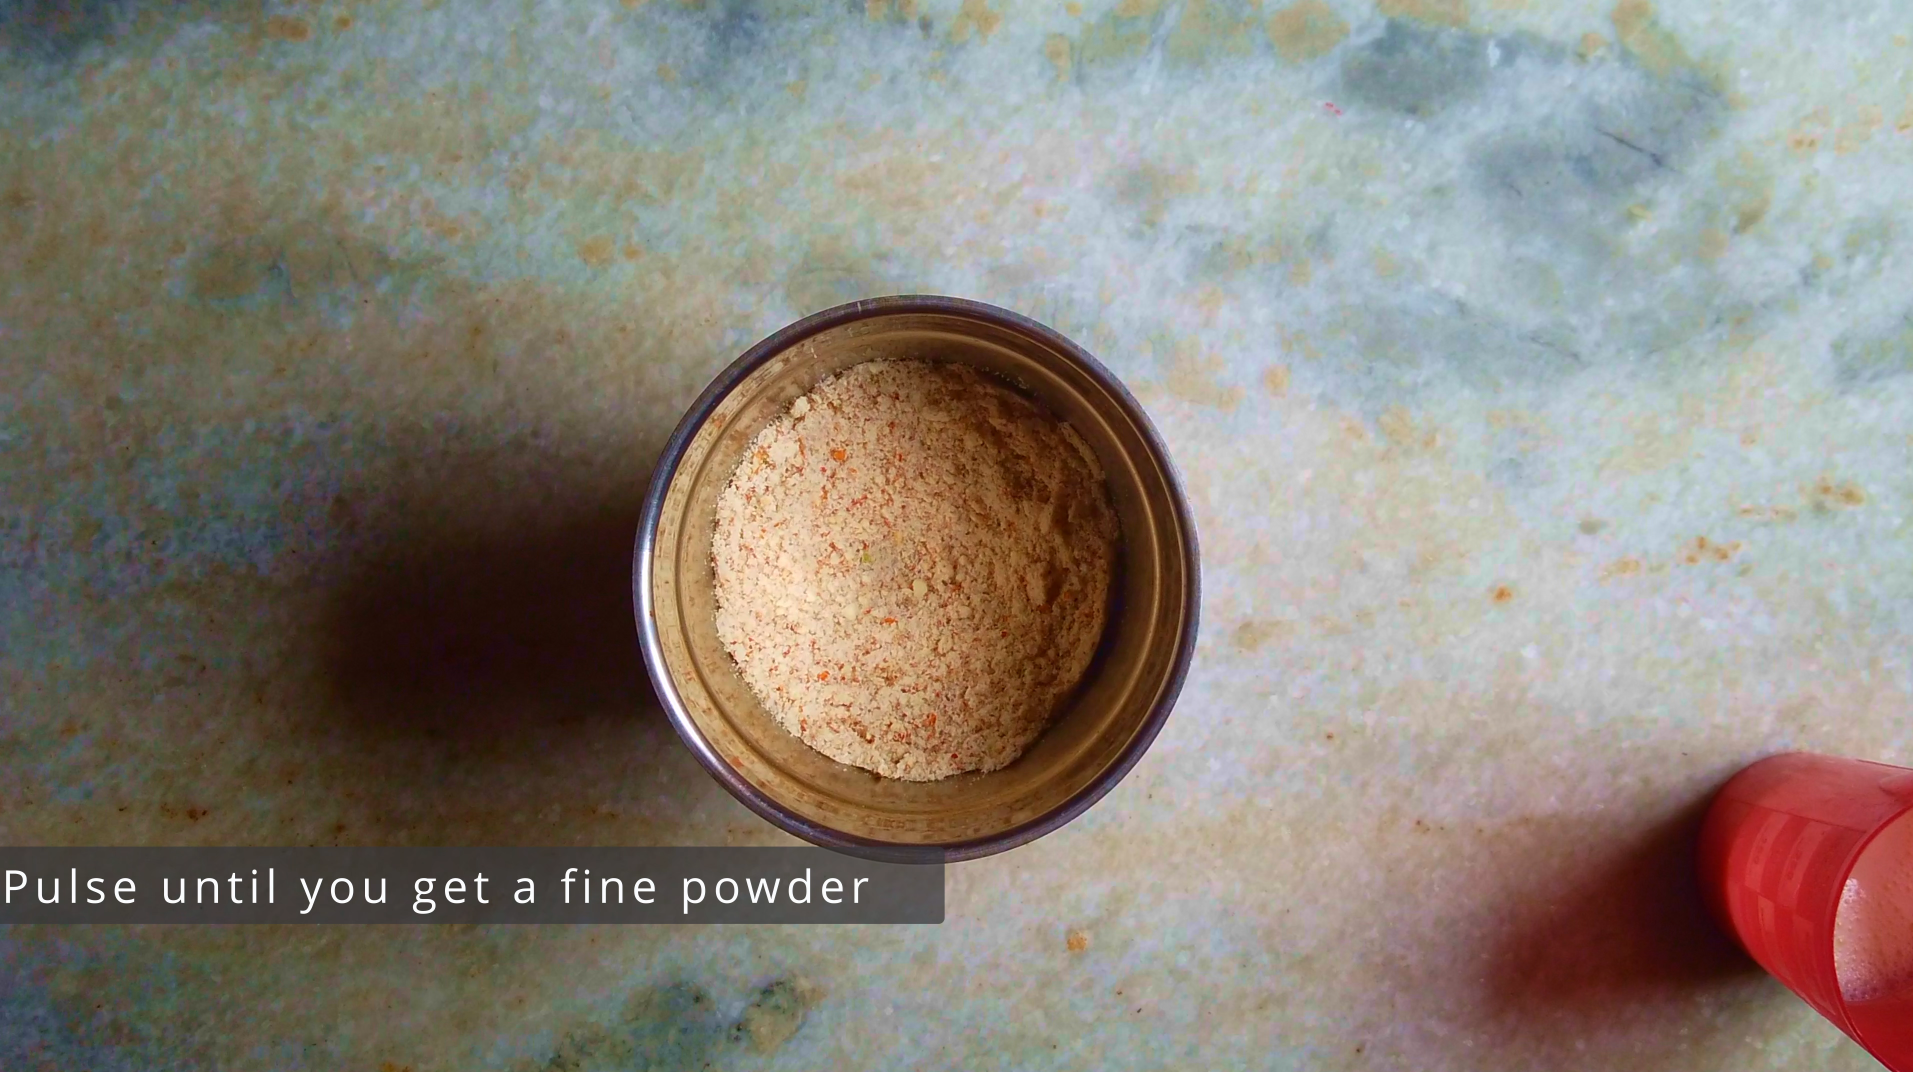
- Step 15: Then add the milk and blend until you get a quite runny and slightly chunky almond paste.
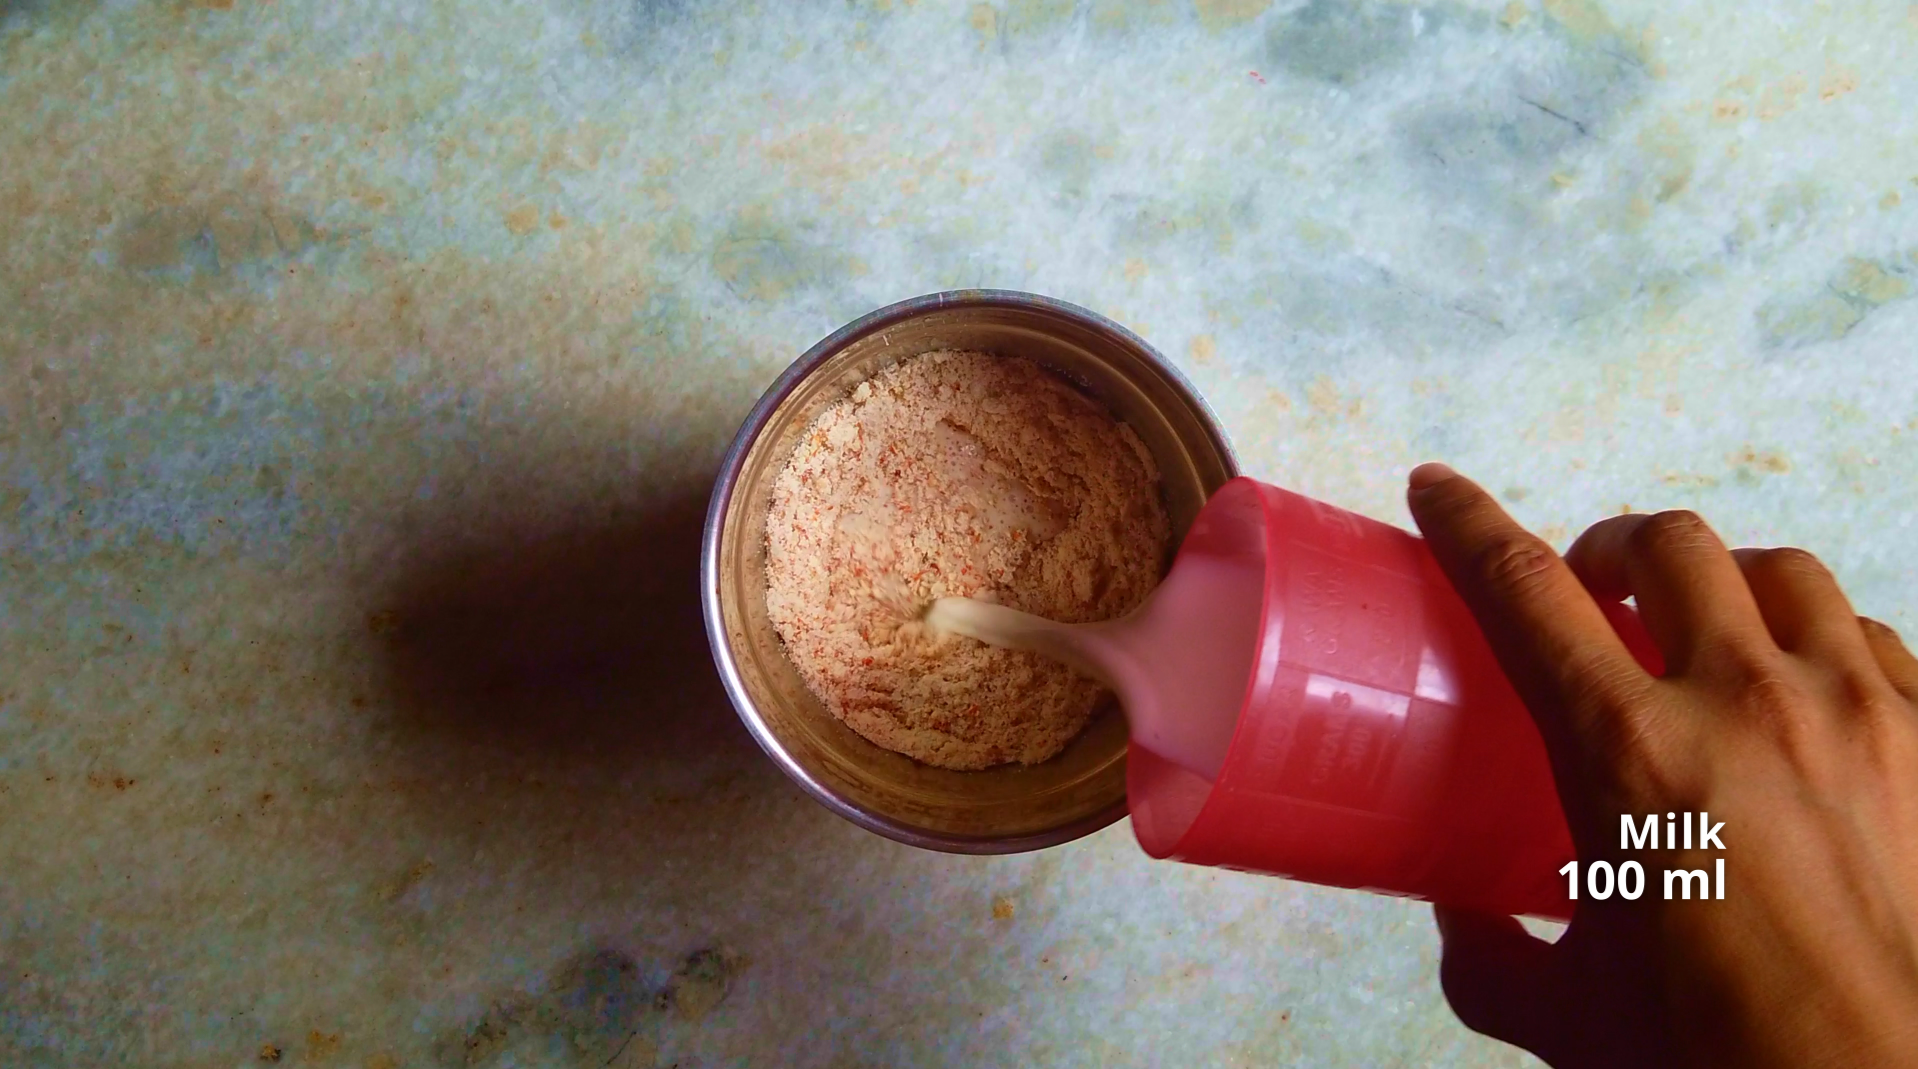
- Step 16: Transfer the almond paste in a piping bag and place in the fridge.

For Caramelized Almonds:
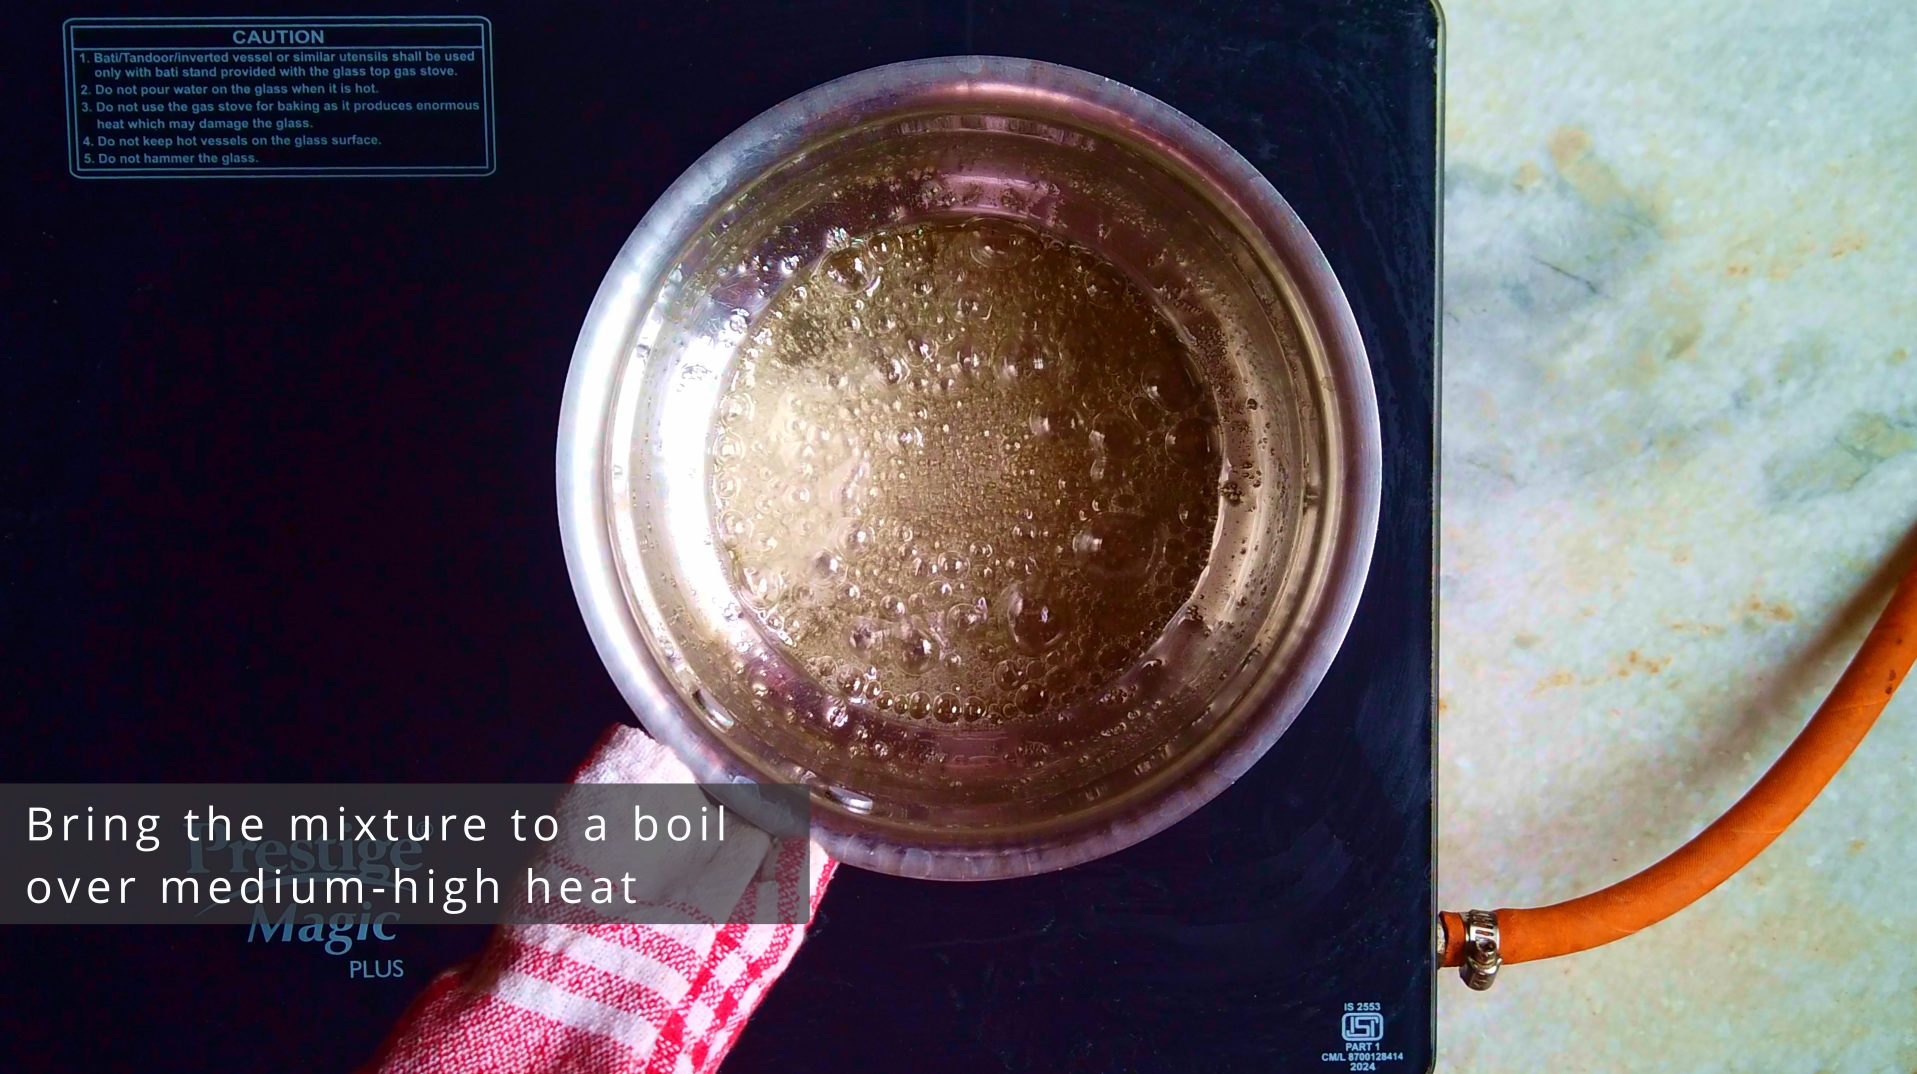
- Step 17: In a saucepan, combine granulated sugar and water. Bring the mixture to a boil over medium-high heat.
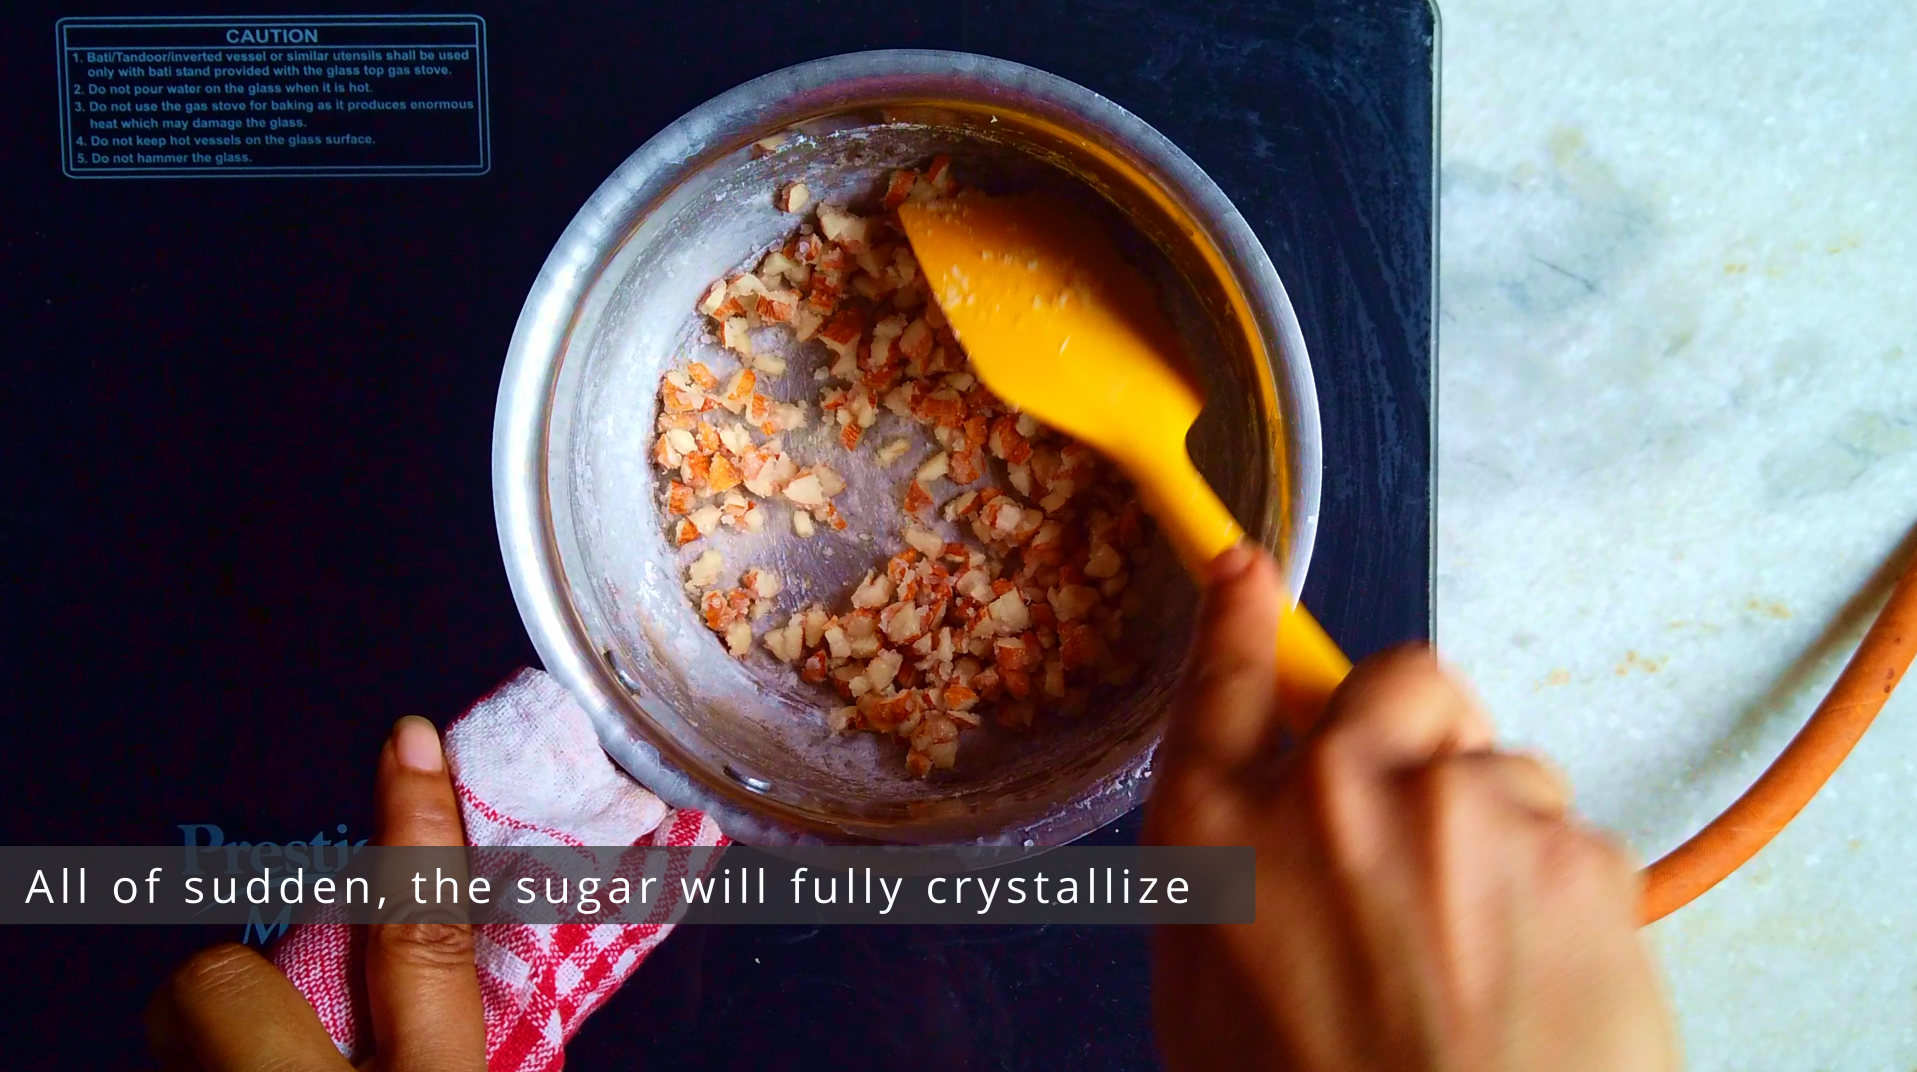
- Step 18: Reduce the heat to medium and add the chopped almonds. Stir constantly with a rubber spatula until the syrup will continue to thicken while the water evaporates. As the sugar begins to recrystallize, the syrup will become gritty. All of sudden, the sugar will fully crystallize.
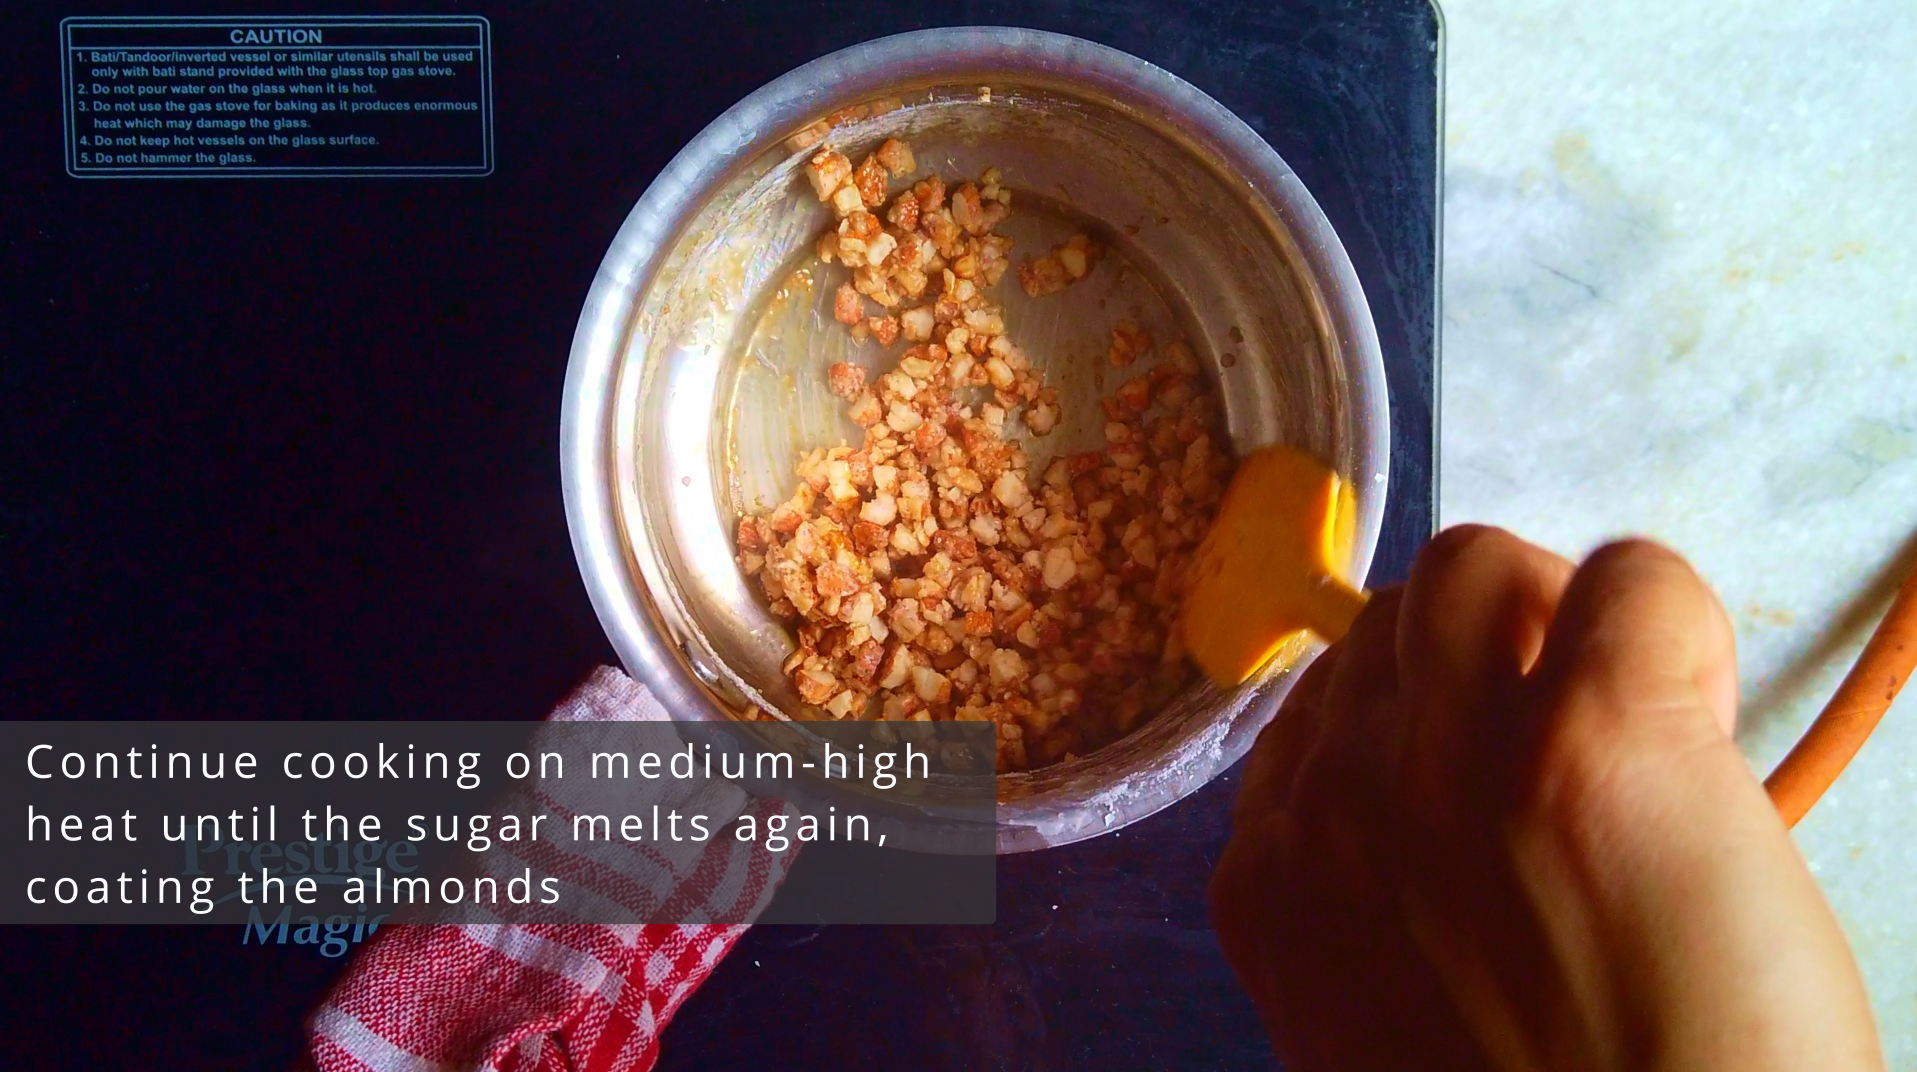
- Step 19: Increase the heat to medium-high and stir constantly, scraping the sugar from the bottom and sides of the pan. Continue cooking until the sugar melts again, coating the almonds, 4-5 minutes.
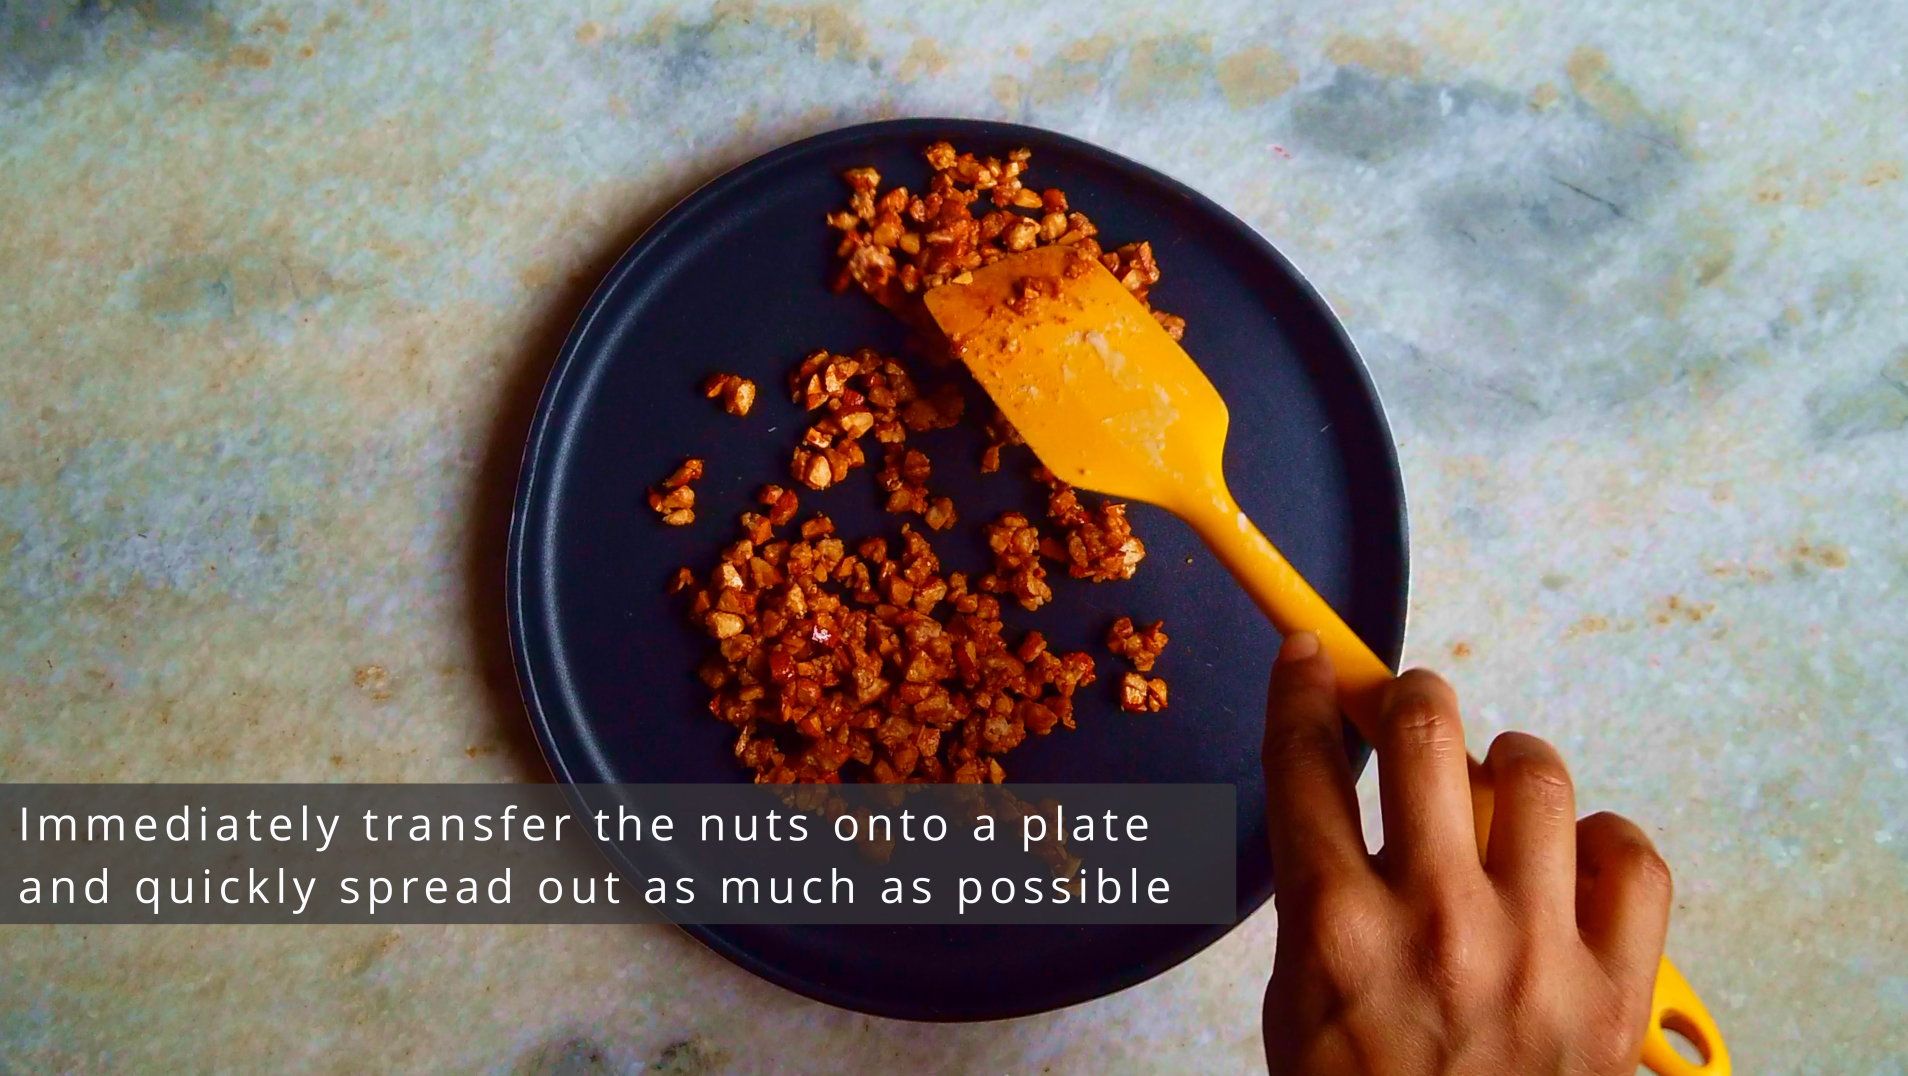
- Step 20: Remove the pan from heat once the almonds are toasted and sugar has melted and sticks to the almonds. Pour the nuts onto a plate and quickly spread out as much as possible. Let them cool completely and break into clusters if stuck together.
For Whipped Cream:
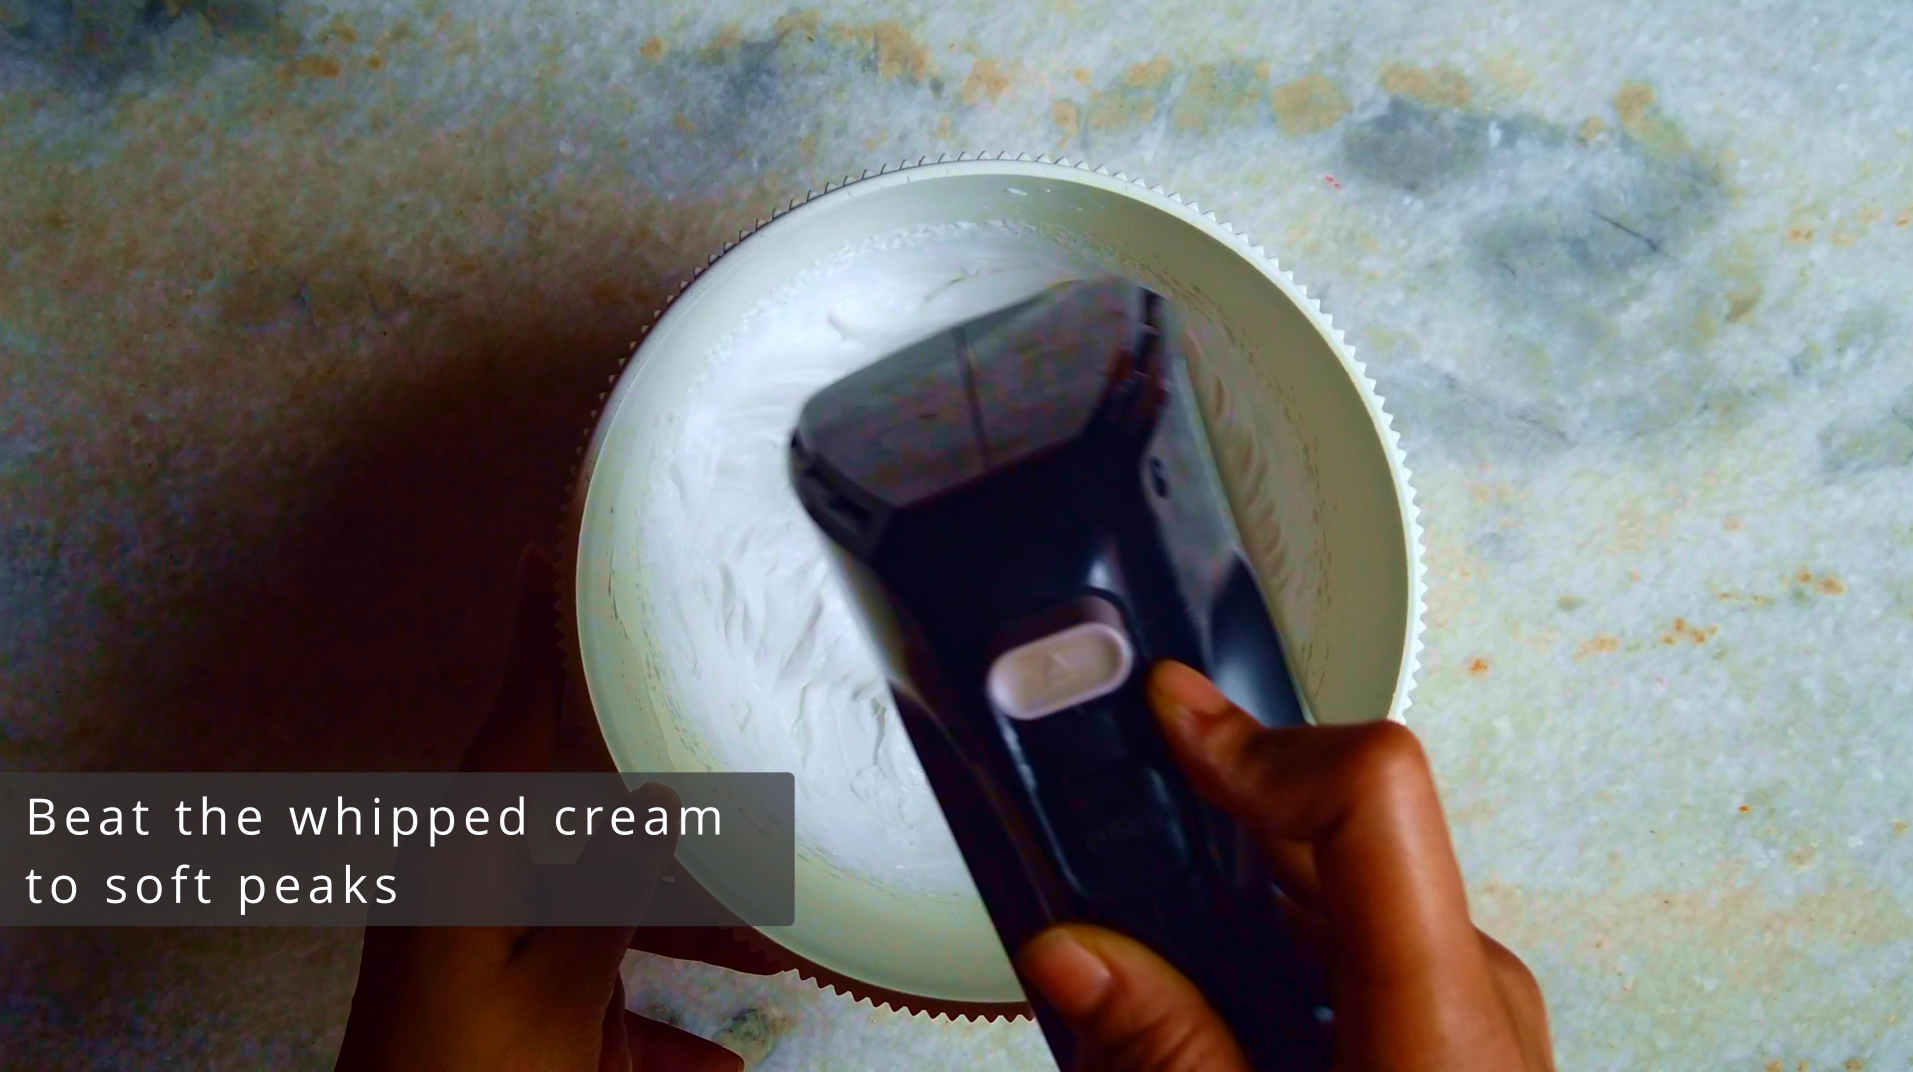
- Step 21: In a bowl, beat the whipped cream and powdered sugar to soft peaks. Transfer the whipped cream in a piping bag and place in the fridge.
Sweet Milk For Serving:
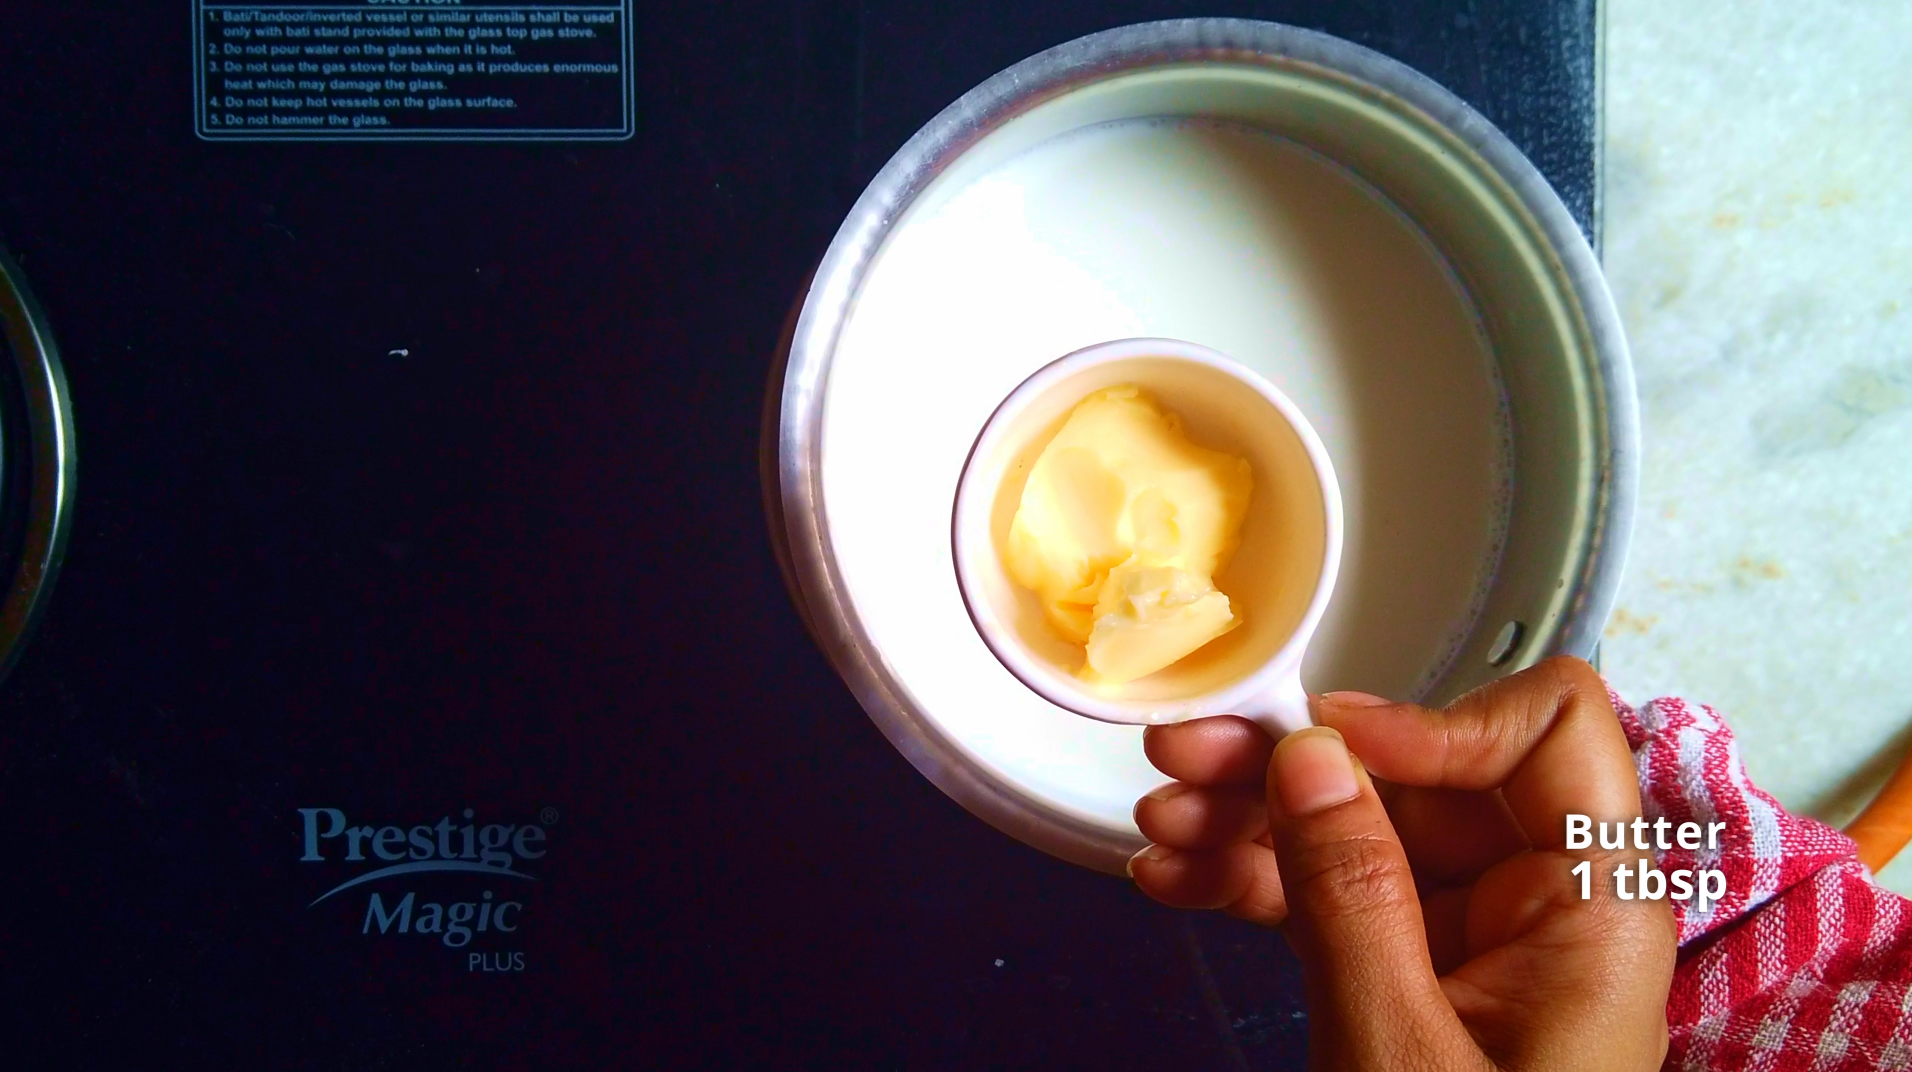
- Step 22: In a saucepan, combine milk, sugar and butter together and bring to a boil.
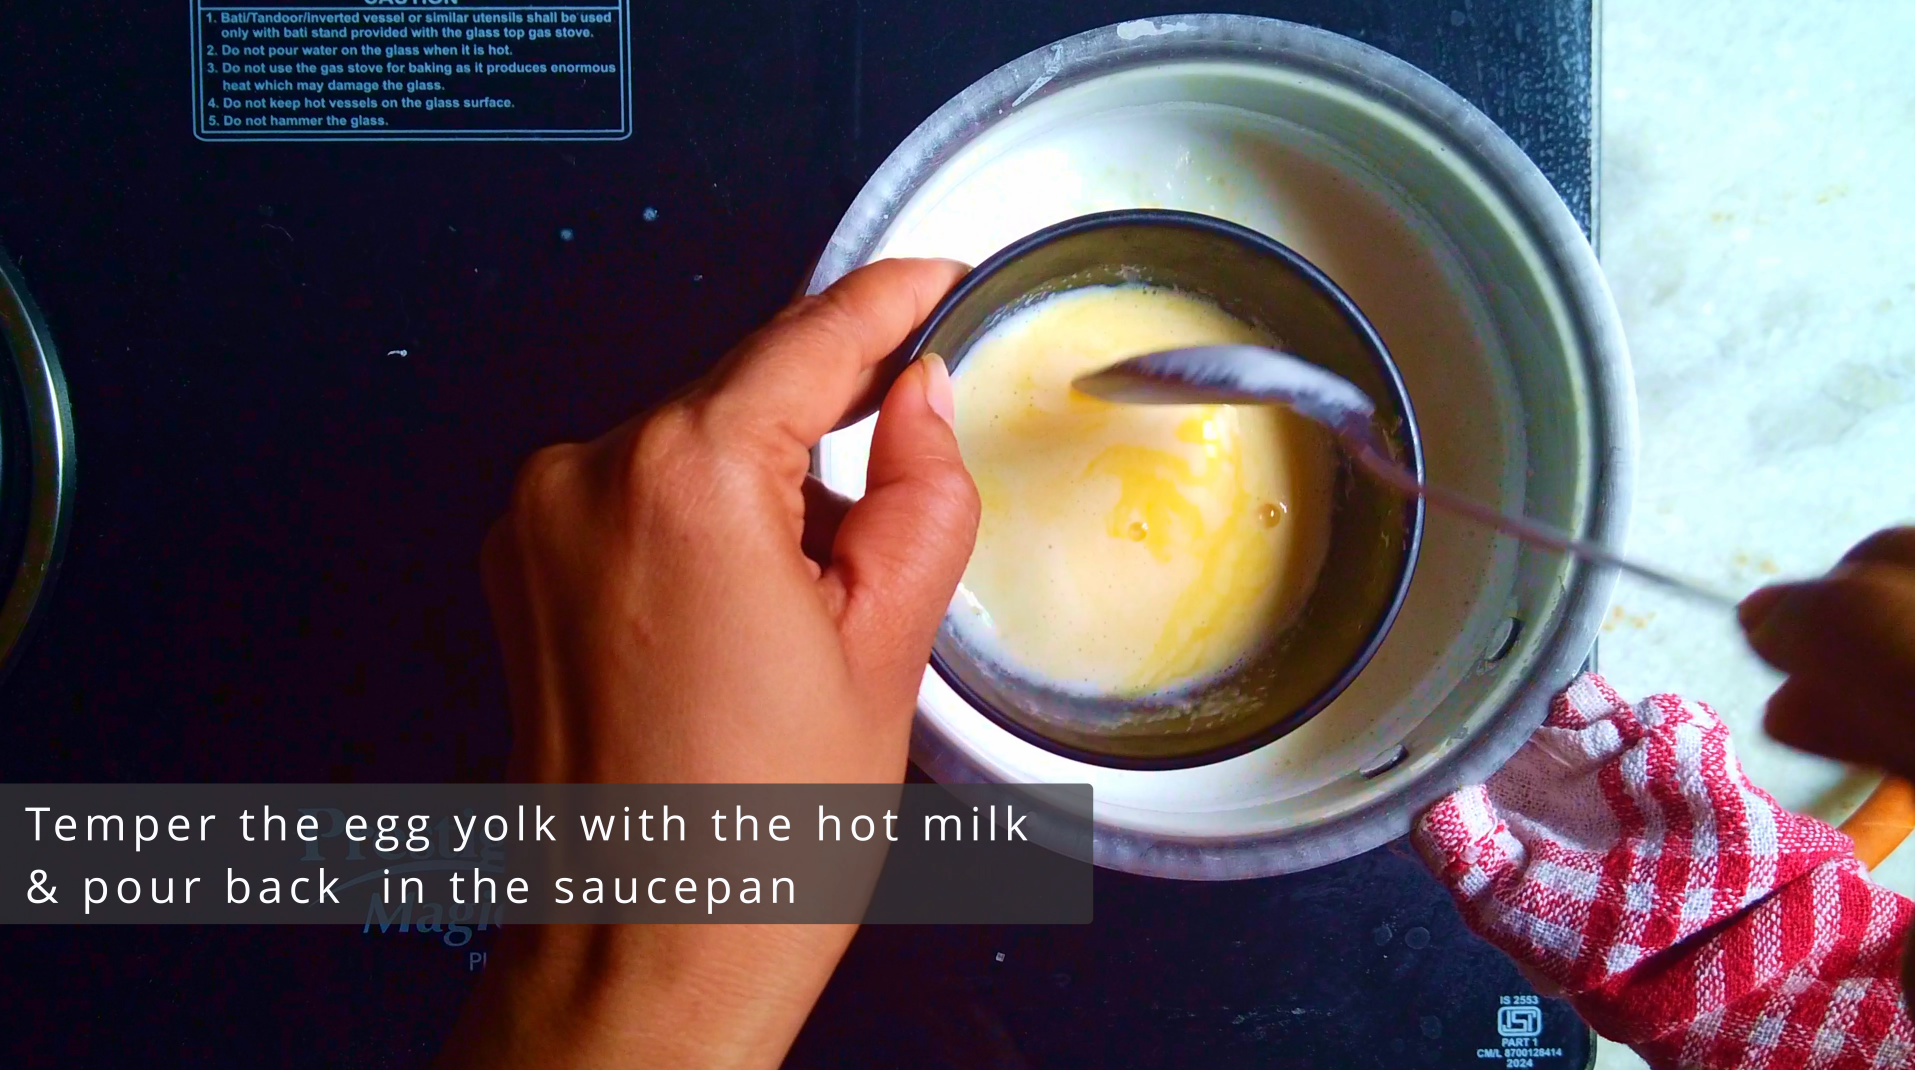
- Step 23: In a separate bowl temper the egg yolk with the hot milk and pour the egg yolk mixture back to the saucepan. Simmer for 4-5 minutes or until thicker in consistency.
- Step 24: Turn off the flame and keep the milk warm.
Assembling the Semla:
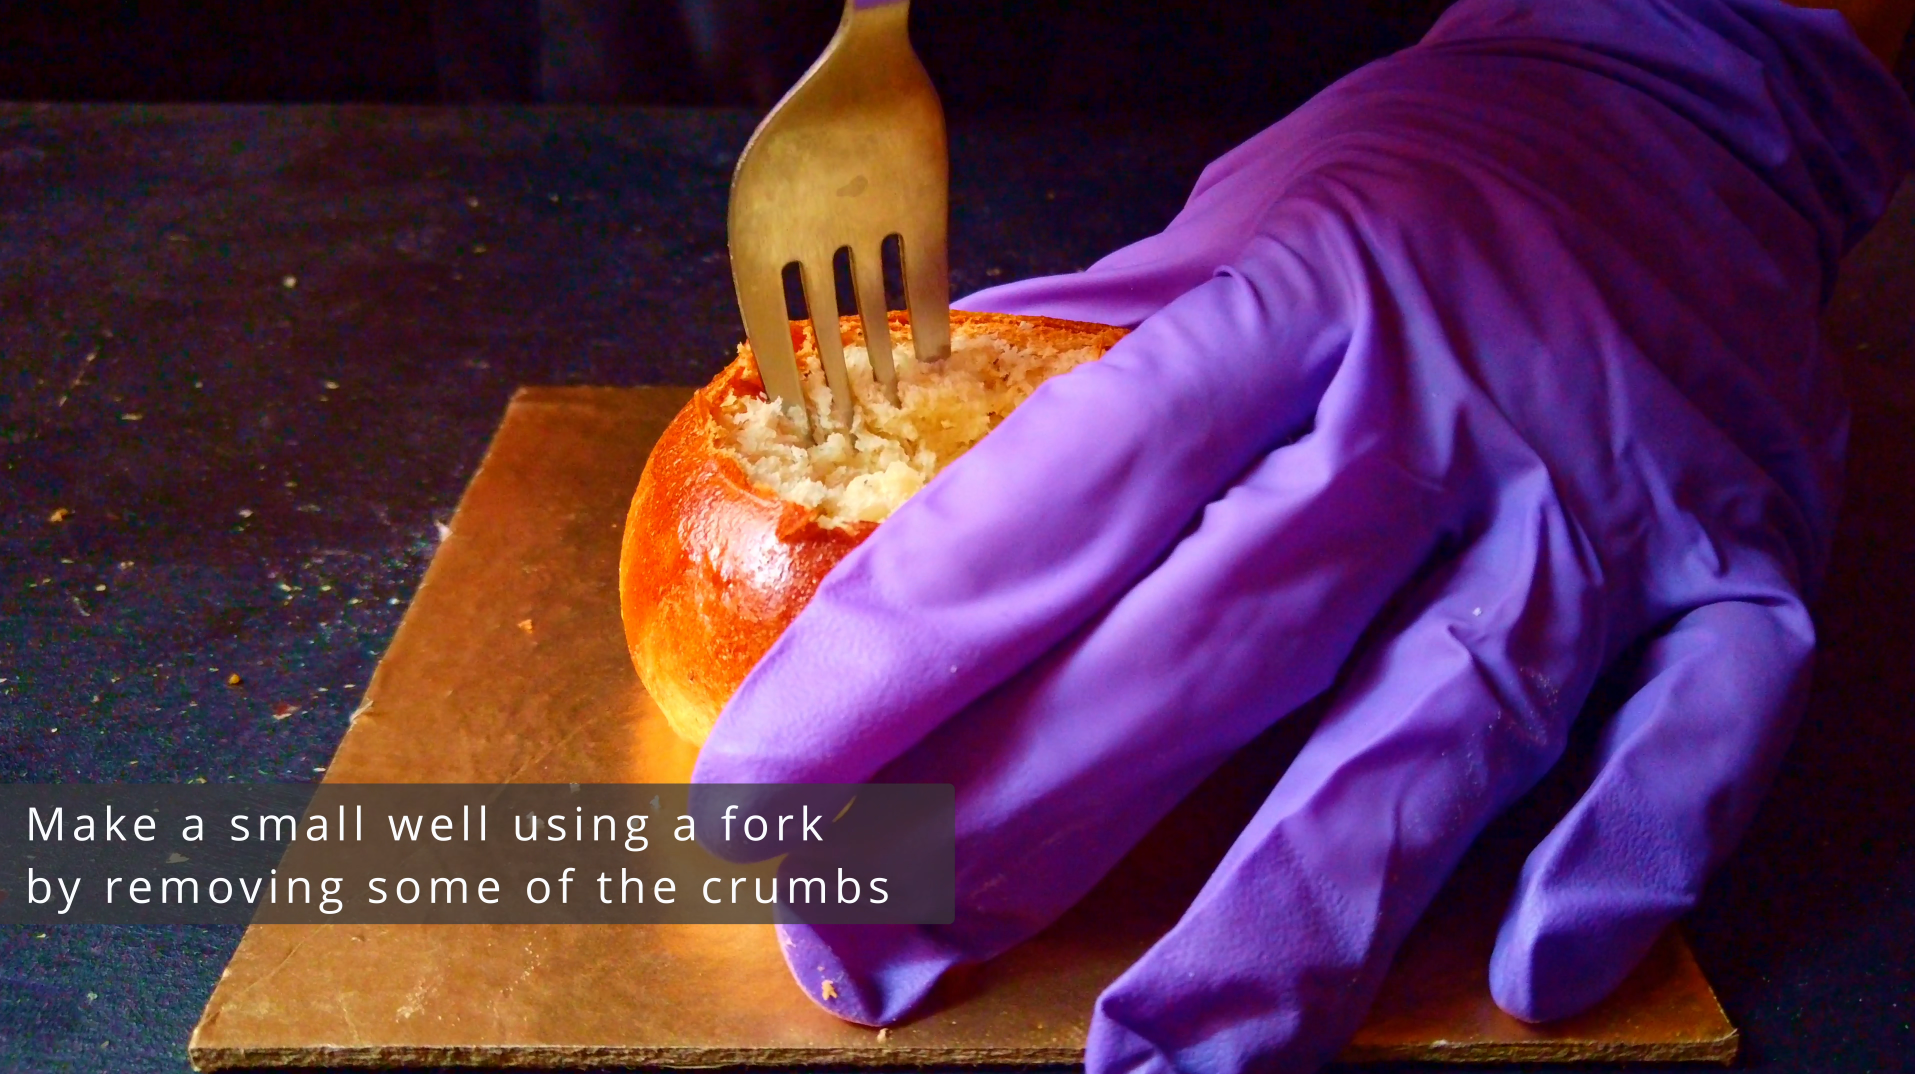
- Step 25: Cut the top of the buns to create a lid using a sharp knife and make a small well in the middle of the bun using a fork by removing some of the crumbs.
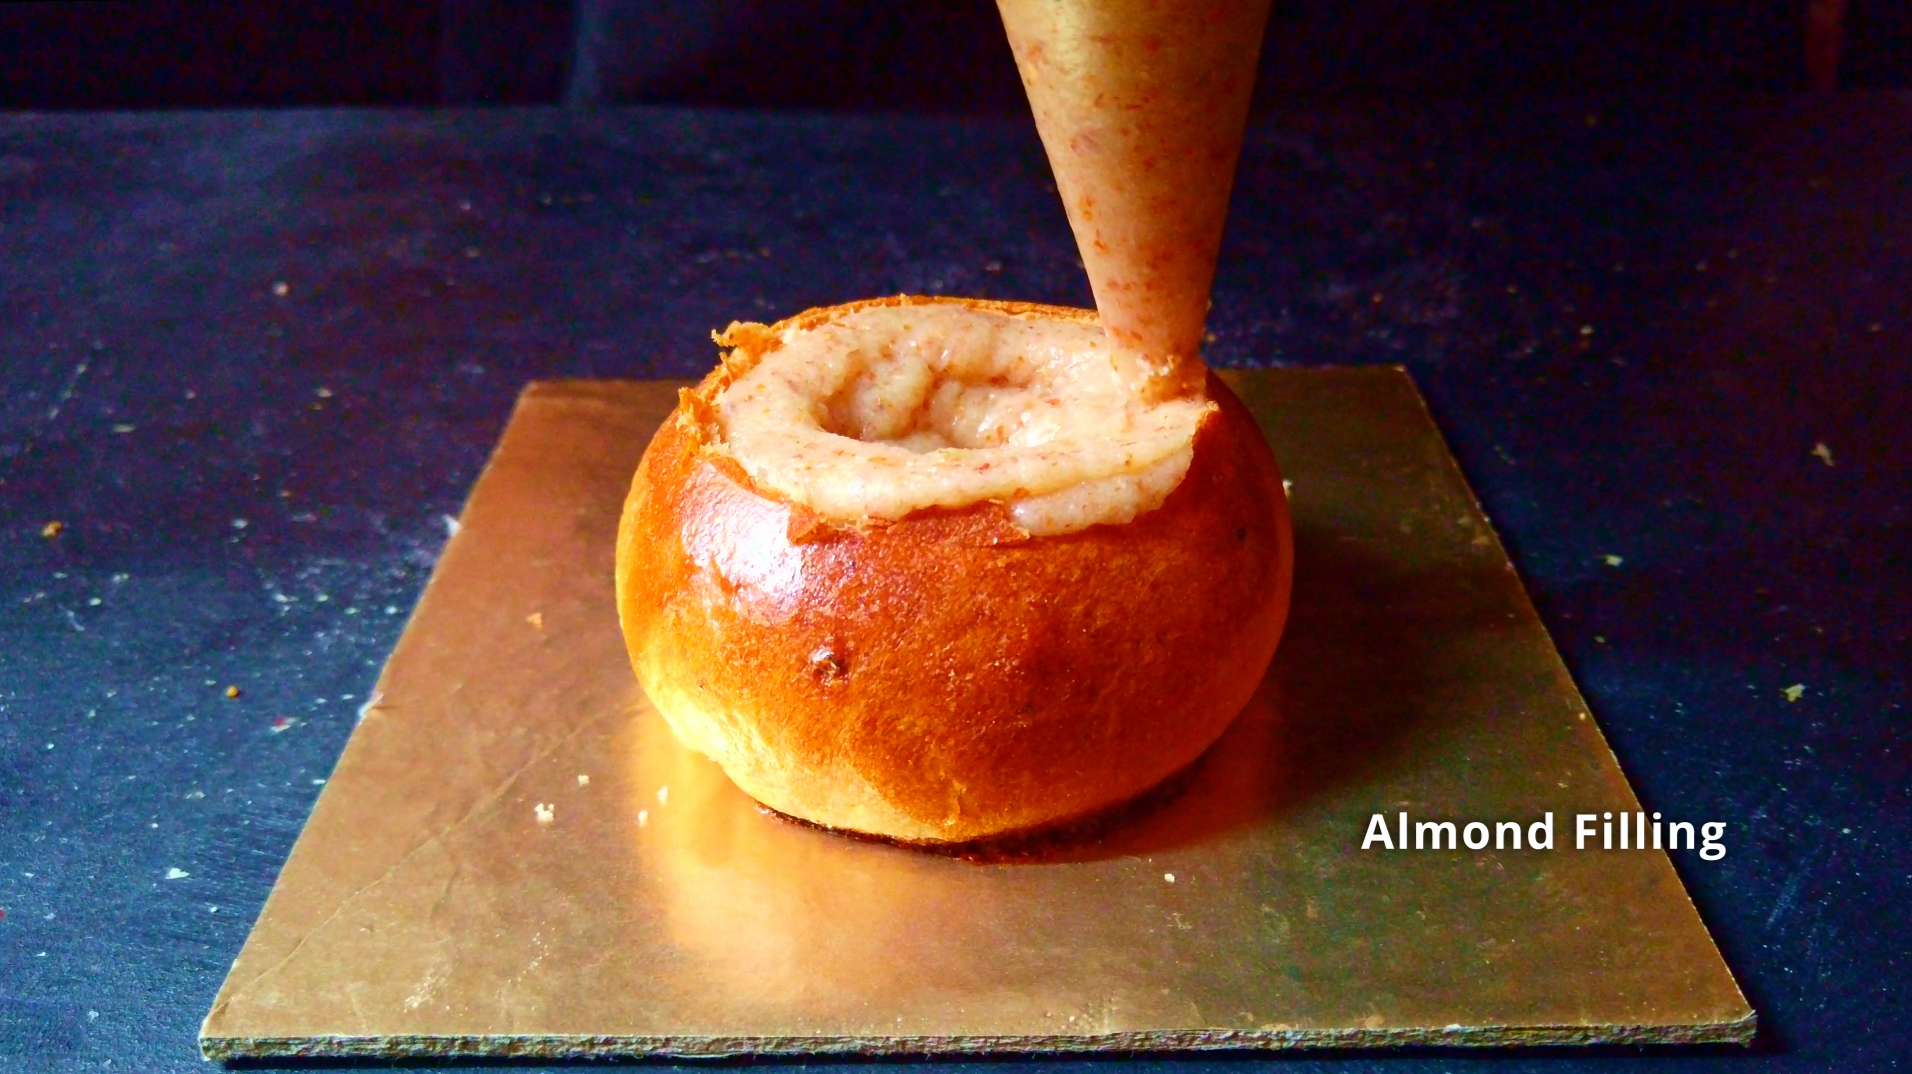
- Step 26: Pipe the almond filling into the bun and sprinkle some caramelized almonds.
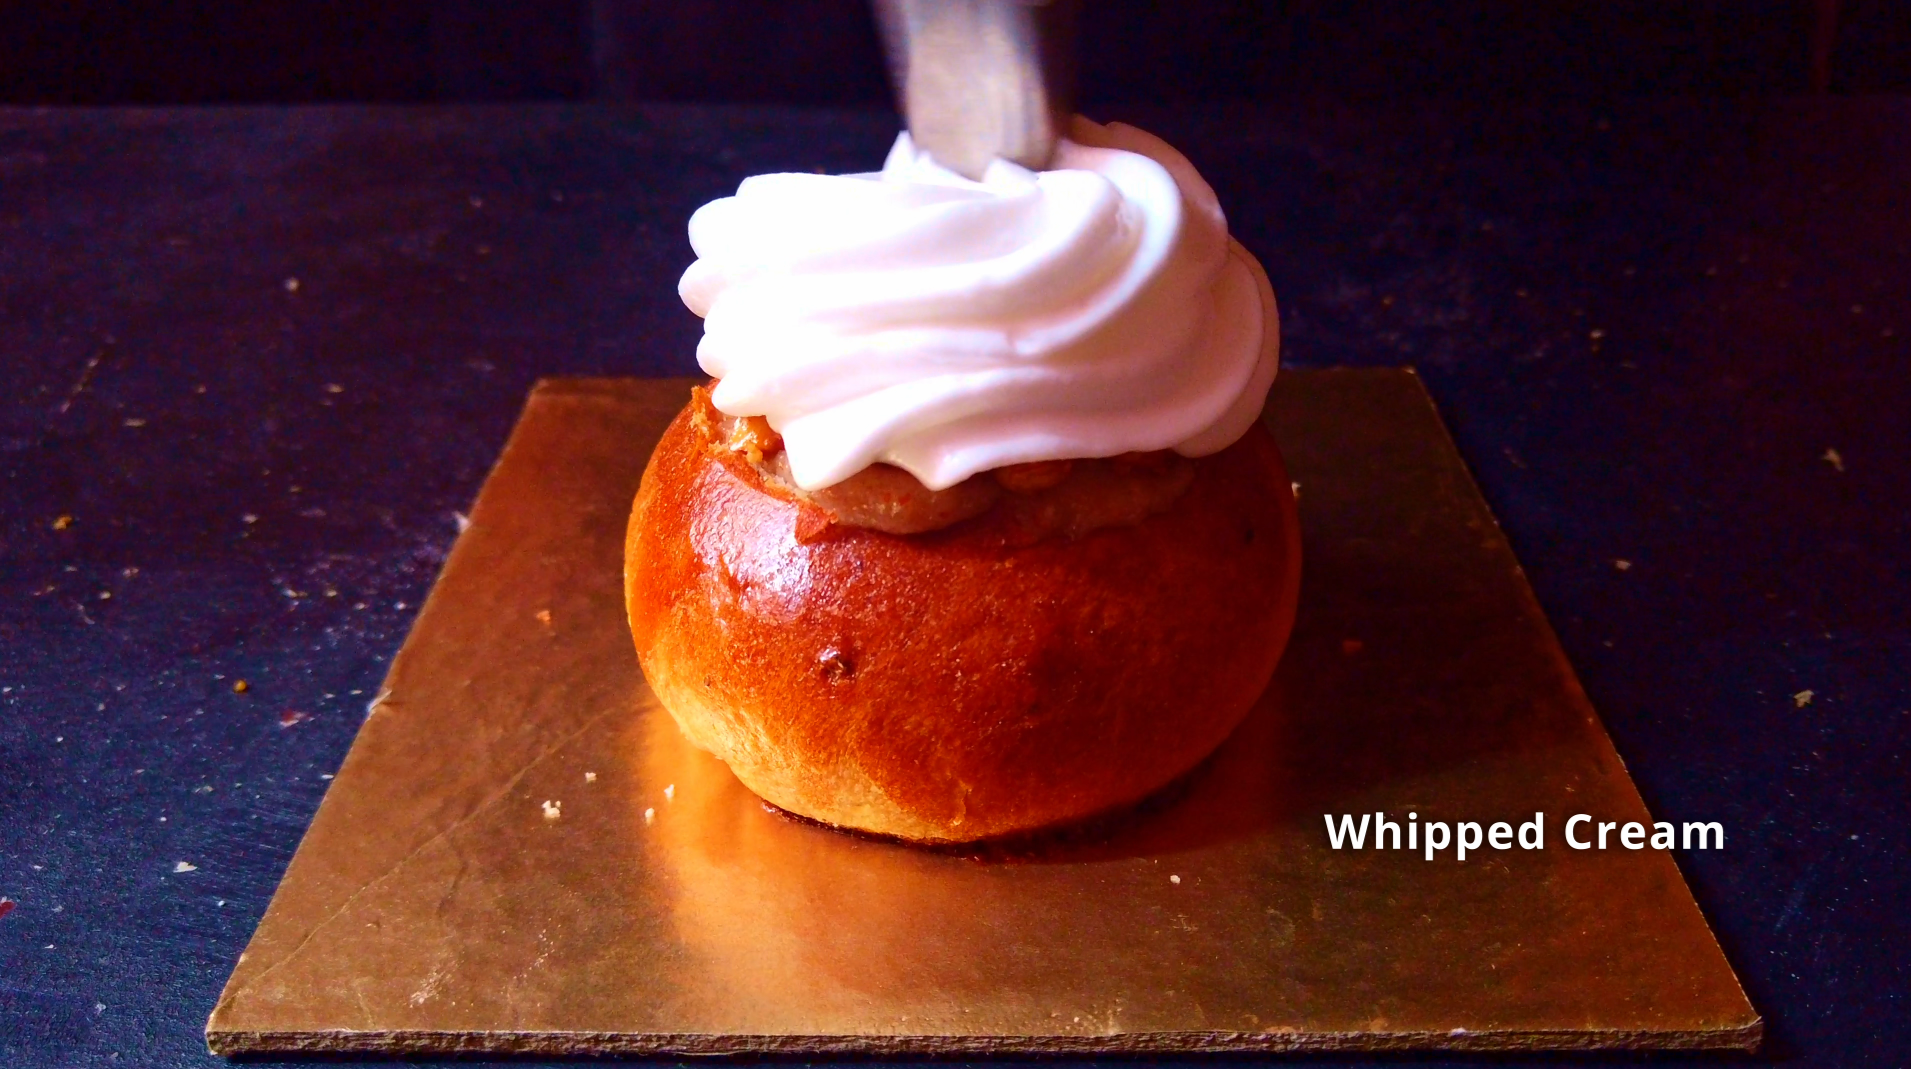
- Step 27: Top with whipped cram and place the lid on top. Dust with powdered sugar. Serve and enjoy!!
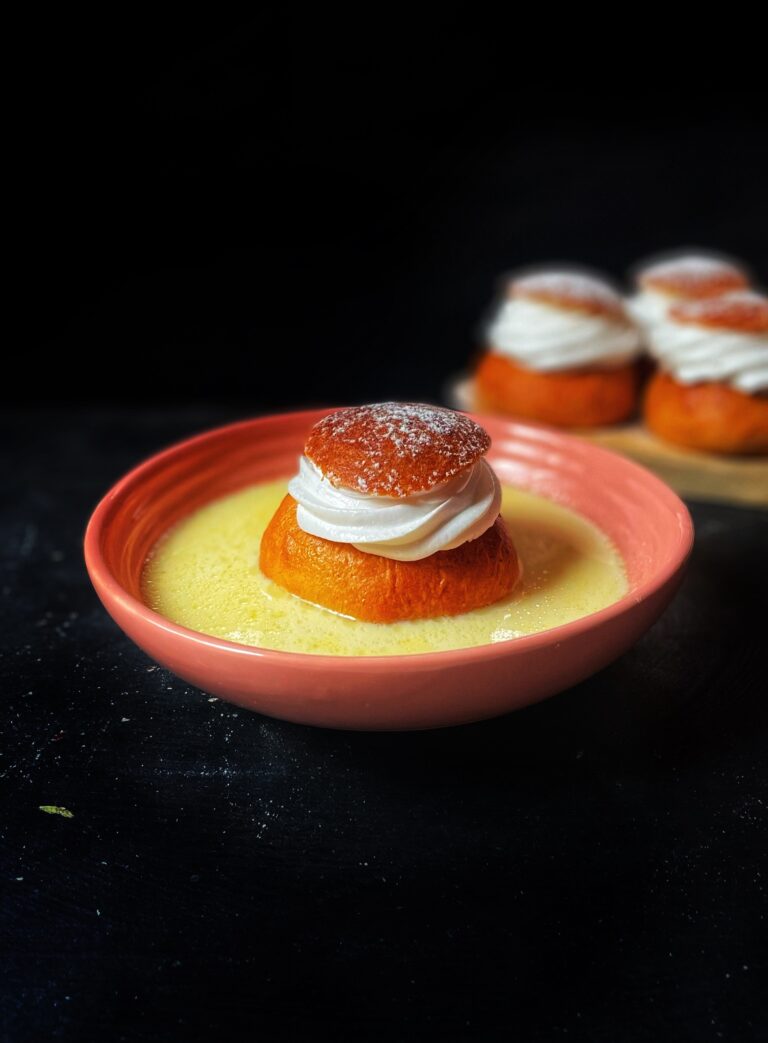
- Step 28: Or you can serve them another way. Place the prepared Semla in a bowl and pour some of the thickened warm milk around the Semla.
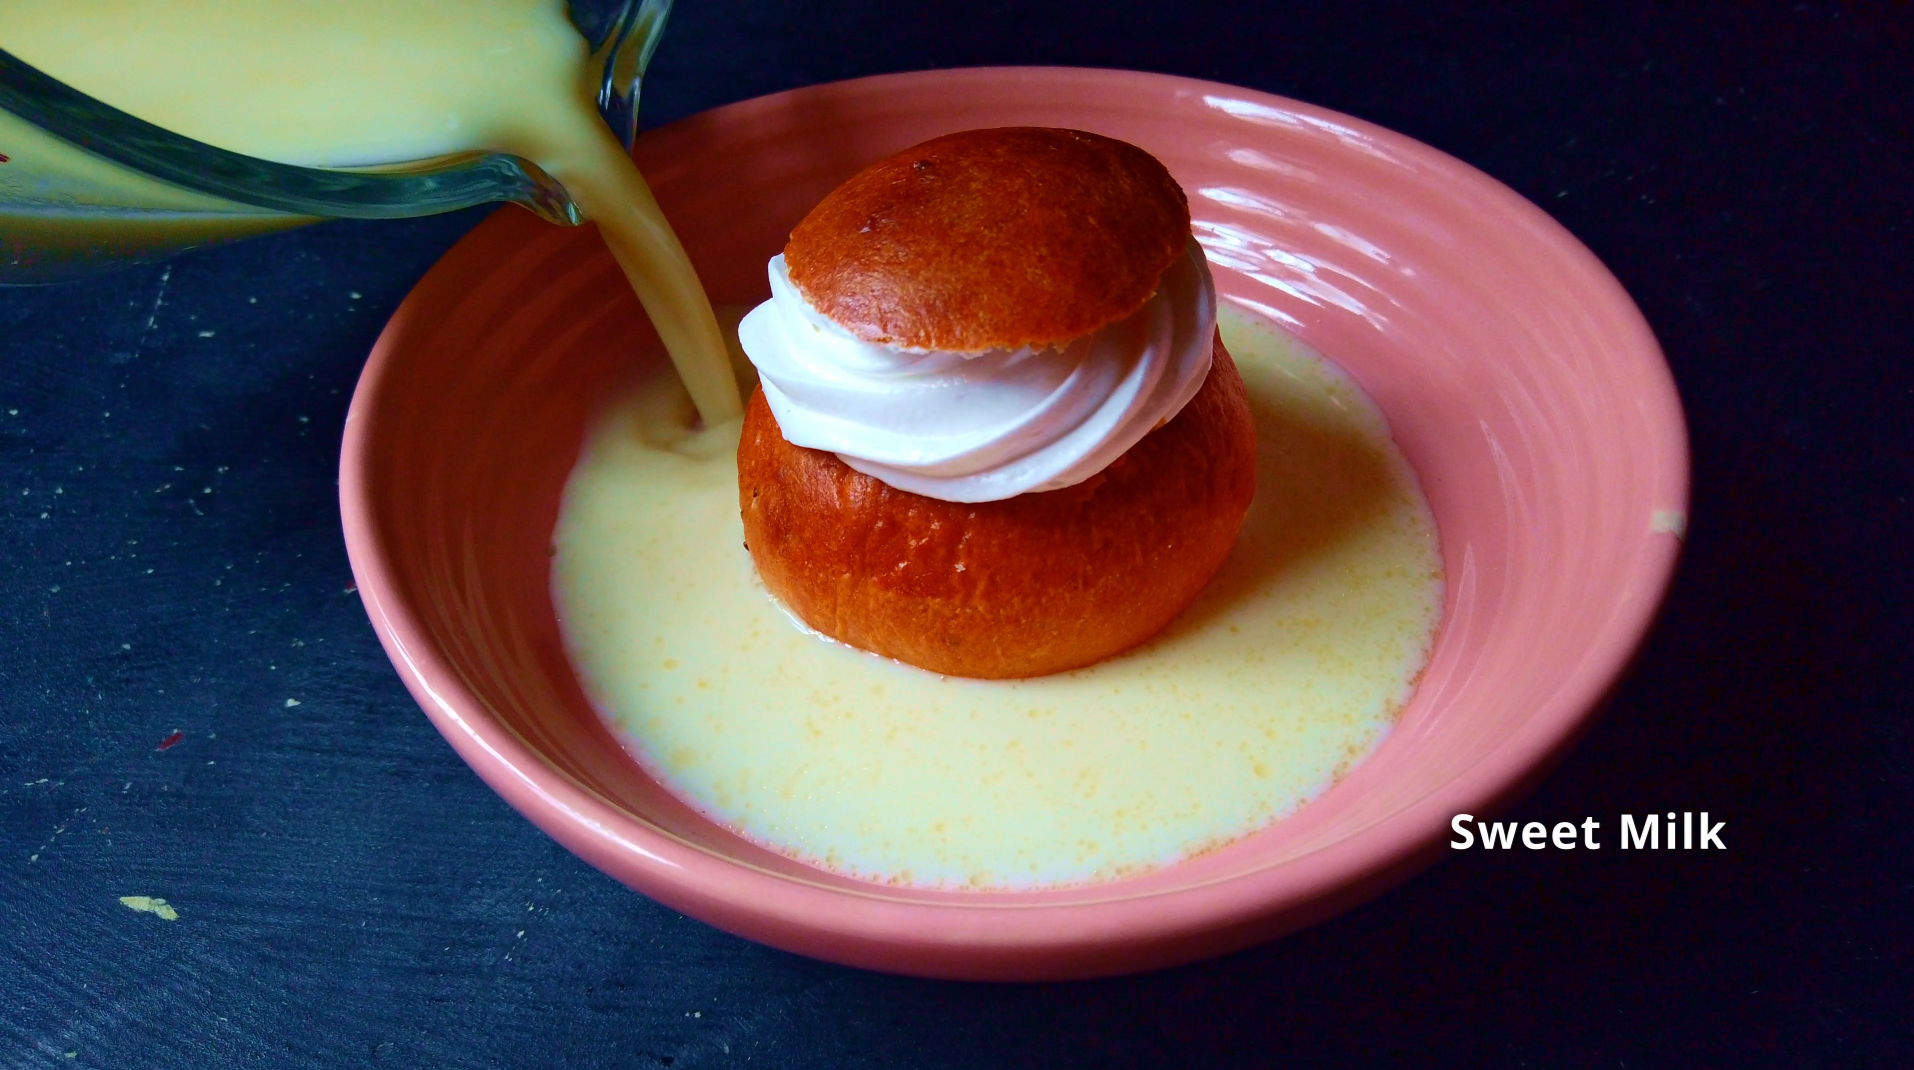
- Step 29: Serve immediately and enjoy!!
Pro Tips:
• For deeper flavour, freshly crushed cardamom is best. Grinding the seeds yourself releases far more aroma than using the pre-ground spice, which may require a larger amount to achieve similar intensity.
• Make sure the milk used to activate the yeast is warm but never hot. Overheated milk can stop the yeast from working, while cooler water won’t allow it to bloom properly.
• Melt the butter slowly and gently. Avoid letting it darken, as any browning will create a toasty flavour that isn’t ideal for these buns.
• Knead the dough thoroughly until it becomes smooth and elastic. This dough benefits from several minutes of steady kneading to develop the proper soft texture.
• Don’t rush the rising process. Allow the dough to double in size during the first proof, and give the shaped buns a complete second rise for the best lift.
• Wait until the buns are completely cooled before slicing and filling. Warm bread is difficult to cut neatly and will cause the fillings to soften or melt.
• When scooping out the center, remove only a small portion. Keeping a sturdy base prevents the filled buns from tearing, leaking or collapsing.
About Me

DEBJANI MONDAL
Welcome to Kitchenstagram, the home of delicious recipes, culinary inspiration and cooking adventures. I’m Debjani and I’m thrilled to be your guide through the wonderful world of food. I’m a self-taught professional baker, home chef, recipe developer, author of Kitchenstagram and an aspiring YouTuber.
My passion for food and cooking began at a very young age, when I would watch my mom and dad cook for me and my brother. My dad, in particular is a great cook whose culinary skills made a lasting impression on me. My dad would cook up a storm on special occasions by cooking variety of dishes, from delicious biriyani to samosa, fish fry, rasgullas and kachoris (sweet & spicy deep fried pastry with filling of lentils, meat or fish…>>>>>
FOLLOW ME
My Latest Posts
- post 1
- post 2